
Frontier guide · Progression · 15 of 18
Zenith (GR200+)
Zenith is the hardest standard content in Frontier Z: powered-up monsters from GR200, with Zenith armour, weapons, cuffs and skills. This page explains the monsters, their parts and materials, their new status effects and blights, and the gear you make from them.
What Zenith is
"Zenith" means a type of monster introduced in Frontier Z, and any equipment or skills you can only get from hunting these monsters.
Zenith monsters start harder than the existing Exotic monsters (G Rank Nargacuga, Zinogre and so on) at GR200. By GR800 they are the hardest standard content in the game, beaten only by super hard event quests such as Howling Zinogre.
Zenith equipment is almost a flat upgrade over all standard G equipment (Raviente weapons excepted). It has higher defense, more true raw and better skill points, and gives one of the new Zenith skills for each piece, cuff or weapon you equip.
Zenith skills are always-on skills, mostly designed to buff existing skills or to give a set more skills overall, by adding skill slots. For example the Zenith Daimyo Hermitaur Headpiece gives the Zenith skill Quake Res Up. It raises your Quake Res by 1 tier, including inside combination skills such as Three Worlds Protection. That lets the skill go past Quake Res+2 to become, in effect, Quake Res+3. These extra tiers of resistance are needed to counter Extreme Wind Pressure, Roars and Quakes.
Zenith monsters often use levels of Roar, Quake and Wind that standard Super High-Grade Earplugs and similar cannot counter. You either wear a piece of Zenith equipment that counters them, or you dodge the effects. In the same way, Poison, Paralysis, Sleep, Fire Blight and the rest are all raised, and you counter them with high enough resistance to the right element or with a Zenith skill that boosts the standard resistance. Not every status can be nullified. You can never counter Extreme Poison, so try never to be hit by it.
Zenith monsters
Zenith monsters are versions of existing monsters with very powerful attacks and extra abilities, such as Ultra Wind Pressure, Roars, Tremor, Sleep, Poison and Paralysis. Every Zenith monster has one highly developed part. When you break it, you get a specific material that depends on the rank.
There are four ratings, ★1 to ★4. Each raises the monster's attack and effective health. Every version of a Zenith gives a defense reduction of 1050, the same as Exotic monster quests.
| Monster | Effective health |
|---|---|
| G Rank Espinas (GR1, ★6) | 29,090 |
| G Rank Barioth (GR100, ★8) | 93,333 |
| ★1 Zenith Espinas (GR200) | 99,800 |
| ★2 Zenith Espinas (GR400) | 119,800 |
| ★3 Zenith Espinas (GR600) | 149,800 |
| ★4 Zenith Espinas (GR800) | 249,600 |
Treat ★4 as some of the hardest required content in the game, and do not try it without proper gear. But almost all materials are the same across every tier of a Zenith monster. You only need to kill around 5 of the GR800 monster while breaking its special part to max out any Zenith equipment. You can farm everything else on the GR600 versions without trouble. More on this under Zenith materials.
The special part
Every Zenith has a specific extra developed body part. If you break it you get a special item with a 100% break chance. It has four variants, each 100% within one rank band. This table shows them for Zenith Espinas, plus the top one from Khezu.
| Item | GR200 (★1) | GR400 (★2) | GR600 (★3) | GR800 (★4) |
|---|---|---|---|---|
| Espinas Zenith Horn | 100% | 0% | 0% | 0% |
| Espinas Zenith Mid Horn | 0% | 100% | 0% | 0% |
| Espinas Zenith High Horn | 0% | 0% | 100% | 0% |
| Khezu Zenith Top Head | 0% | 0% | 0% | 100% |
Breaking the part usually lowers the monster's threat. This varies. Some monsters lose part of their moveset, or lose properties such as Zenith-level Roar, Tremor or Wind Pressure. Others only get slightly easier.
Monster references
The guide marks in red the parts you must break to get the materials for each rank band. You usually have to break both parts when there are two (claws, wings and so on). The last column is the special part.
| Monster | Other parts | Special part |
|---|---|---|
| Khezu | Body, Wings, Legs | Head |
| Daimyo Hermitaur | Skull (twice) | Claws |
| Hypnoc | Tail | Beak |
| Espinas | Wings, Back, Belly, Tail | Horn |
| Rathalos | Head, Tail | Wings |
| Blangonga | Head, Tail | Arms |
| Akura Vashimu | Both Claws, Head | Tail |
| Tigrex | Head, Tail | Claws |
| Hyujikiki | Horn, Wings, Tail | Back |
| Giaorugu | Horn, Fangs, Chest, Legs | Tail |
| Midogaron | Head, Back, Tail | Legs |
| Rukodiora | Head, Tail | Wings |
| Plesioth | Back Fin, Legs, Tail | Head |
| Inagami | Head, Forelegs, Hindlegs | Tail |
| Toridcless | Head, Tail | Wings |
| Doragyurosu | Wings, Tail | Horn |
| Gasurabazura | Head, Back, Tail | Claws |
| Anorupatisu | Wing, Tail, Back | Horn |
| Bogabadorumu | Back, Tail, Head | Forelegs |
| Gravios | Head, Tail | Body |
| Baruragaru | Forelegs, Tail, Back | Head |
| Taikun Zamuza | Body, Legs | Claws |
| Harudomerugu | Forelegs, Wings, Tail | Head |
Zenith materials
Everything except the unique break item for each tier is available on every tier of the right Zenith monster. As an example, these tables show where to get each item needed for the Zenith Espinas Headpiece upgrades, and at what percentage. Each tier column is the chance to get the item on that tier.
Espinas Headpiece: items for Z through ZX Lv1
| Step | Item | Qty | GR200 (★1) | GR400 (★2) | GR600 (★3) | GR800 (★4) |
|---|---|---|---|---|---|---|
| ZX Lv1 | ||||||
| Espinas Thick Green Scale | 10 | 52% | 22% | 5% | 3% | |
| Deadly Poison Sac | 1 | 3% | 5% | 7% | 9% | |
| Espinas Wing Claw | 3 | 90% | 80% | 75% | 50% | |
| Espinas Zenith Horn | 1 | 100% | 0% | 0% | 0% | |
| ZF Lv1 | ||||||
| Espinas Crimson Barb | 20 | 31% | 53% | 8% | 5% | |
| Deadly Poison Sac | 2 | 3% | 5% | 7% | 9% | |
| Espinas Poison Membrane | 5 | 90% | 80% | 75% | 50% | |
| Espinas Zenith Mid Horn | 1 | 0% | 100% | 0% | 0% | |
| ZY Lv1 to Lv7 | ||||||
| Espinas Thick Green Scale | 30 | 52% | 22% | 5% | 3% | |
| Espinas Crimson Barb | 20 | 31% | 53% | 8% | 5% | |
| Espinas Thick Green Shell | 40 | 8% | 10% | 52% | 21% | |
| Deadly Poison Sac | 5 | 3% | 5% | 7% | 9% | |
| Espinas Wing Claw | 7 | 90% | 80% | 75% | 50% | |
| Espinas Heavy Wing | 2 | 10% | 20% | 25% | 50% | |
| Espinas Poison Membrane | 5 | 90% | 80% | 75% | 50% | |
| Espinas Sting Gland | 2 | 10% | 20% | 25% | 50% | |
| Espinas Poison Marrow | 10 | 90% | 80% | 75% | 50% | |
| Espinas Poison Tail | 2 | 10% | 20% | 25% | 50% | |
| Espinas Zenith Horn | 1 | 100% | 0% | 0% | 0% | |
| Espinas Zenith Mid Horn | 1 | 0% | 100% | 0% | 0% | |
| Espinas Zenith High Horn | 2 | 0% | 0% | 100% | 0% | |
| ZX Lv1 (the guide's last block) | ||||||
| Espinas Poison Blood | 20 | 5% | 7% | 23% | 55% | |
| Deadly Poison Sac | 2 | 3% | 5% | 7% | 9% | |
| Espinas Huge Gem | 1 | 1% | 3% | 5% | 8% | |
| Espinas Zenith Top Horn | 3 | 0% | 0% | 0% | 100% | |
The guide's table labels both its first and its last block "ZX Lv1". The headings are copied here as written. Together the four blocks come to the 196 materials the guide gives for Z through ZX Lv1.
From this you can see that although it may take longer, you can comfortably farm most items from ★1 to ★3 versions of the monster. You would only need to fight 3 of the GR800 ★4 version, as long as you reliably broke the horn.
Is ZX Lv2 to Lv7 worth it?
There are no decorations or other real benefits from taking ZX armour to Lv7, so you can leave it at Lv1 and miss nothing beyond some defense. The ZX upgrades are not really recommended. They add only around 30 to 50 defense, but use around 70% of the total items needed just to reach ZX Lv1.
The table below shows how many materials that is. ZX Lv2 to Lv7 needs 142 materials in total. In comparison, Z through ZX Lv1 needs 196 materials in total. It is almost always better to get other armour pieces or work on weapons than to upgrade to ZX Lv7.
| Item (ZX Lv2 to Lv7) | Qty | GR200 (★1) | GR400 (★2) | GR600 (★3) | GR800 (★4) |
|---|---|---|---|---|---|
| Espinas Thick Green Scale | 20 | 52% | 22% | 5% | 3% |
| Espinas Crimson Barb | 20 | 31% | 53% | 8% | 5% |
| Espinas Thick Green Shell | 20 | 8% | 10% | 52% | 21% |
| Espinas Poison Blood | 40 | 5% | 7% | 23% | 55% |
| Deadly Poison Sac | 5 | 3% | 5% | 7% | 9% |
| Espinas Huge Gem | 2 | 1% | 3% | 5% | 8% |
| Espinas Wing Claw | 5 | 90% | 80% | 75% | 50% |
| Espinas Heavy Wing | 3 | 10% | 20% | 25% | 50% |
| Espinas Poison Membrane | 5 | 90% | 80% | 75% | 50% |
| Espinas Sting Gland | 3 | 10% | 20% | 25% | 50% |
| Espinas Poison Marrow | 5 | 90% | 80% | 75% | 50% |
| Espinas Poison Tail | 3 | 10% | 20% | 25% | 50% |
| Espinas Zenith Horn | 3 | 100% | 0% | 0% | 0% |
| Espinas Zenith Mid Horn | 3 | 0% | 100% | 0% | 0% |
| Espinas Zenith High Horn | 3 | 0% | 0% | 100% | 0% |
| Espinas Zenith Top Horn | 2 | 0% | 0% | 0% | 100% |
Blights and status
Apart from new levels of Wind Pressure, Roars and Quake, Zenith monsters bring new levels of any status effect they inflict.
New status effects
| Status | What it does | Caused by |
|---|---|---|
| Super Poison | Works like other poisons, but can only be cured by picking up the purple shinies dropped on the ground during a Zenith Espinas fight. It drains up to 10 health per second at GR800. The Zenith skill on Poison Resistance can reduce its effect, but there is no Super Poison immunity. | Zenith Espinas |
| Sound Asleep | Works like other sleep, but can only be cured by being hit by other players. It lasts a very long time. While players are in this state, Zenith Hypnoc performs a Nightmare Song that drains health rapidly, which guarantees a one-shot if you are solo. The Zenith skill on Sleep Resistance reduces it to the effect of normal Sleep, so you can recover with an Energy Drink. | Zenith Hypnoc |
| Crystal Paralysis | A mix of Paralysis and Crystallisation. You are paralysed while also inflicted with the Crystal status. This stops you getting out of the crystals easily and leaves you fully immobile. The paralysis is the Lingering Paralysis below. Crystal Immunity stops the Crystal effect, but not the paralysis. | Zenith Akura Vashimu |
| Lingering Paralysis | Starts like normal paralysis, but lingers: every so often you flinch as if hit by a small monster, which interrupts your actions and is annoying. Only the Zenith skill on Paralysis Resistance counters it, and it gives full immunity. | Zenith Akura Vashimu |
| Bleeding | Causes damage over time and during all actions. You can cure it with Clotting Balls after a certain amount of time. Crouching or eating meat does not cure it, unlike mainline bleeding. | Zenith Tigrex, Hyujikiki |
| Lightning Rod Needle | A spike is stuck into the hunter, so that lightning targets it every so often. It is destroyed when struck. | Zenith Hyujikiki |
New blights
You can counter every new blight from Zenith monsters by having the matching resistance at 55 or higher. The easiest way is to use both the SR All Res Up skill (+14 to +19) and the individual Res Up skills (+25 to +34), plus Guild Food (+30). That can reach up to 83 in an individual resistance, which counters the blights on almost any set.
You can also buy Cancellation Fruit from the Pink Store NPC. It instantly cures any blights you have, as long as they have not left you unable to use it.
| Blight | What it does | Caused by |
|---|---|---|
| Extreme Fireblight | You lose both your normal health and the length of the health bar over time. Rolling cancels it. | Zenith Rathalos, Midogaron |
| Extreme Thunderblight | While you have it, taking any amount of thunder damage gives you cardiac arrest, and you need a hit to be revived. This mostly means a guaranteed cart. It runs out naturally, and another player's revival can cancel the cardiac arrest. Rolling cancels the effect. | Zenith Khezu |
| Extreme Waterblight | Your stamina recovers extremely slowly, and infinite stamina effects are removed at once. It runs out naturally, and rolling cancels it. | Zenith Daimyo Hermitaur, Plesioth |
| Extreme Iceblight | Actively drains your stamina, and freezes you in place when it hits zero. Freeze Res cannot cancel the freezing, but being hit after you freeze frees you at once. You can mash out of it both before and after the freeze. | Zenith Blangonga, Abiorugu |
| Extreme Dragonblight | Disables every recovery item: they give a negative reaction that reduces health instead. It also disables natural healing and cancels other sources, such as vampirism or a Transcend activation. It runs out naturally, or you can cancel it with 13 rolls, but only with your weapon sheathed. | Zenith Rukodiora |
Zenith skills
Zenith skills work like Burst, Origin or socketed Tower weapon skills, with one key difference: they mostly improve other skills, or let you have more skills overall.
For example, an armour piece may have Guard Up. While you have any level of the skill Guard, Guard Up raises it by one level. Guard+3 (the equivalent of Zenith Guard) gives new, unique effects.
| Skill you have | No Zenith skill | Guard Up+1 | Guard Up+2 |
|---|---|---|---|
| No Guard skill | Nothing | Nothing | Nothing |
| Guard+1 | Guard+1 | Guard+2 | Guard+3, Zenith Active |
| Guard+2 | Guard+2 | Guard+3, Zenith Active | Guard+3, Zenith Active |
| Fortification+1 | Guard+1 | Guard+2 | Guard+3, Zenith Active |
| Fortification+2 | Guard+2 | Guard+3, Zenith Active | Guard+3, Zenith Active |
Besides buffing skills, some pieces simply give extra skill slots. This goes up to a maximum of 7: 5 Zenith armour pieces, a Zenith weapon and a Zenith cuff. ZP armour also counts towards skill extension, so on a ZP set you could in theory have 19 hand-picked skills.
All the Zenith skills and their effects are in the Zenith skills part of Armour, Decorations and Skills.
Zenith armour
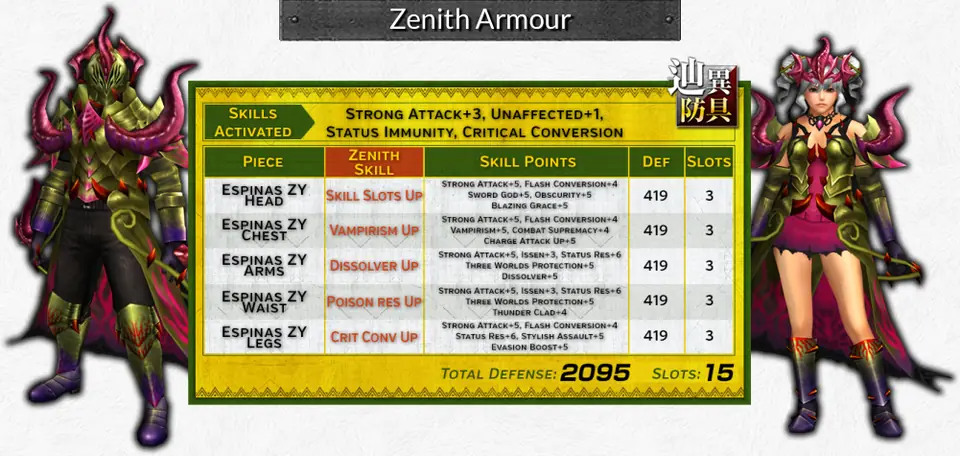
Zenith armour has four levels: Z, ZF, ZY and ZX. Z and ZF have only 1 upgrade each. ZY and ZX have the usual 7. The upgrades match the GR200, GR400, GR600 and GR800 tiers of the Zenith monsters. All ZX armour is better than standard GX or GP armour, and usually has at least 25 points across 5 different skills. It also has a Zenith skill.
There are Premium and Lottery Zenith armours with ZP upgrades. In the current sets, the progression goes from GP straight to ZP. They have less defense than a standard ZX piece, but more than a normal GX. They need only materials from a GR200 Hypnoc, and the Lottery ones also need 2 extra tickets for each piece you upgrade to ZP.
The skills on Lottery pieces are usually fixed and do not change when you upgrade to ZP. Premium Kits get completely reworked skills, to match the more common skills in the updates that came after their first release (Fencing replaced with Sword God, for example).
Skill Slots Up
All Z pieces count towards the skill slot expansion rule for G Rank armour. Five ZX pieces let you equip 12 skills, even if no piece has Skill Slots Up itself. If one piece has Skill Slots Up, that becomes 13, and so on.
| Zenith pieces | G Rank pieces | Origin pieces | Natural skills | Maximum skills |
|---|---|---|---|---|
| 0 | 5 | 0 | 12 | 14 |
| 0 | 4 | 1 | 11 | 13 |
| 0 | 2 | 3 | 10 | 14 |
| 4 | 0 | 1 | 11 | 17 |
| 5 | 0 | 0 | 12 | 19 |
The extra 2 slots that do not come from armour pieces come from a Zenith weapon and cuff.
Zenith cuffs
Zenith cuffs are simple. They all need Zenith monster materials to craft, take two slots, and are all rated SZ, which means they do not need a Premium outfit. They give no skill points of their own. Instead they give one extra Zenith skill. With an SZ cuff you could, for example, buff Thunder Clad or add an extra skill slot.
All of them take two standard Pugi cuff slots, so you cannot get skill points from cuffs while using one.
Zenith weapons
Zenith weapons are the current standard of weapon power. Each comes with a Zenith skill that varies, and can be very enabling. They also have a Zenith Partbreaker effect that raises damage to parts by 1.50x, which cuts the hits you need on a Zenith part to 66% of what a normal weapon needs. Upgrading a weapon uses materials from all tiers, and the final upgrade needs ★4 Zenith Breaks, ★4 Common Mats, Semi-Rares and Rares.
The list shows, for each source, the weapon types you can make, the element and the Zenith skills. The guide's table has no column headings, so the headings here were added. Abbreviations: SnS Sword and Shield, DS Dual Swords, GS Great Sword, LS Long Sword, HH Hunting Horn, GL Gunlance, Swaxe Switch Axe F, MS (Mag Spike) Magnet Spike, LBG Light Bowgun, HBG Heavy Bowgun.
Weapons from monster materials
| Monster | Weapon types | Element | Zenith skills |
|---|---|---|---|
| Khezu | DS, LS, Tonfa, HBG, LBG, Bow | Thunder | Dissolver Up, Skill Slots Up |
| Daimyo Hermitaur | DS, HH, Swaxe, HBG, LBG, Bow | Water | Dissolver Up, Skill Slots Up |
| Hypnoc | SnS, GS, Hammer, HH, GL, Swaxe | Sleep | Drug Knowledge Up |
| Espinas | SnS, DS, LS, Lance, GL | Poison | Drug Knowledge Up |
| Rathalos | DS, Hammer, GL, HBG, LBG, Bow | Fire | Dissolver Up, Skill Slots Up |
| Blangonga | GS, Tonfa, Swaxe, HBG, LBG, Bow | Ice | Dissolver Up, Skill Slots Up |
| Akura Vashimu | SnS, LS, Swaxe, Lance, GL, HH | Paralysis | Drug Knowledge Up |
| Tigrex | SnS, GS, Hammer, LS, Lance, Tonfa | Raw | Hearing Protection Up |
| Hyujikiki | DS, GS, Hammer, Swaxe, HBG, Bow | Raw | Quake Res Up |
| Giaorugu | SnS, DS, Hammer, GL, Lance, Tonfa | Ice | Thunder Clad Up |
| Midogaron | GS, Lance, LS, HH, Tonfa, LBG | Fire | Stylish Assault Up |
| Rukodiora | DS, HH, Swaxe, Tonfa, HBG, Bow | Dragon, Paralysis | Hearing Protection Up |
| Plesioth | SnS, GS, LS, Hammer, Lance, GL | Water | Stylish Up |
| Inagami | SnS, LS, Lance, Tonfa, HBG, LBG | Sleep | Skill Slots Up |
| Toridcless | SnS, GS, Lance, GL, HH, Bow | Thunder | Encourage, Vigorous, Reflect, Thunder Clad |
| Doragyurosu | SnS, LS, Hammer, GL, Swaxe, LBG | Sleep | Crit Conversion Up |
| Gasurabazura | GS, Swaxe, Hammer, HBG, Tonfa, Bow | Poison | Obscurity, Stylish Assault, Stylish, Skill Slots |
| Anorupatisu | Tonfa, DS, HH, GL, LS, Lance | Ice | Skill Slots, Obscurity |
| Bogabadorumu | DS, HH, Lance, GL, Tonfa, Bow | Blast | Rush Up |
| Gravios | SnS, LS, Lance, GL, DS, Swaxe | Fire, Blast | Rush, Guard, Encourage, Vigorous |
| Baruragaru | GS, Hammer, Tonfa, Swaxe, LBG, HBG | Water | Rush, Skill Slots, Bullet Saver |
| Taikun Zamuza | LS, Tonfa, Hammer, Swaxe, MS, HBG, Bow | Thunder | Ceaseless, Skill Slots, Thunder Clad, Rush, Vigorous |
| Harudomerugu | SnS, DS, GS, HH, Lance, GL, MS | Raw | Ceaseless |
Weapons from numbered sets
The guide lists these only by a number and a Chinese name, with no English name. The last five numbers are shown as "??" in the guide.
| Set | Weapon types | Element | Zenith skills |
|---|---|---|---|
| 32 / 鬼魂岩 | SnS, LS, HH, GL, Tonfa, LBG | Dragon | Dissolver Up, Skill Slots Up |
| 34 / 魚魂岩 | DS, GS, Hammer, Lance, Swaxe, HBG, Bow | Dragon | Dissolver Up, Skill Slots Up |
| 37 / 鳥魂岩 | SnS, LS, HH, Lance, Swaxe, LBG | Tenshou | Wind Pressure Up |
| 39 / 虫魂岩 | DS, GS, Hammer, GL, Tonfa, HBG, Bow | Tenshou | Wind Pressure Up |
| 41 / 辰魂岩 | DS, GS, Hammer, GL, Swaxe, HBG | Crimson Demon | Skill Slots Up, Bullet Saver Up |
| 43 / 蛇魂岩 | SnS, LS, HH, Lance, Tonfa, LBG, Bow | Crimson Demon | Skill Slots Up, Bullet Saver Up |
| 45 / 隼魂岩 | LS, Lance, HBG | Okiko | Quake Res Up |
| 47 / 鰐魂岩 | Swaxe, SnS, Hammer, LBG | Okiko | Quake Res Up |
| 48 / 蜃魂岩 | GS, Bow, Tonfa | Okiko | Quake Res Up |
| 50 / 狼魂岩 | DS, HH, GL | Okiko | Quake Res Up |
| 51 / 燕魂石 | DS, Hammer, Swaxe, HBG | Sound | Thunder Clad Up |
| 54 / 蛍魂岩 | LS, Lance, Tonfa, LBG | Sound | Thunder Clad Up |
| 56 / 妖魂岩 | SnS, GS, HH, GL, HBG | Sound | Thunder Clad Up |
| 57 / 鷲魂岩 | SnS, DS, LS, MS | Black Flame | Skill Slots Up |
| ?? / 獅魂岩 | GS, HH, GL, Swaxe, Bow, LBG | Black Flame | Skill Slots Up |
| ?? / 兎魂岩 | Hammer, Lance, Tonfa, HBG | Black Flame | Skill Slots Up |
| ?? / 鯨魂岩 | SnS, MS, Bow | Music | Skill Slots Up |
| ?? / 獏魂岩 | GS, Hammer, GL, LBG | Music | Skill Slots Up |
For the weapon family in general, see Weapons: Zenith weapon.
Written from the Monster Hunter Frontier guide by Fist (as saved in January 2022). That guide describes Capcom's old official servers; we reworded it, laid it out for Hunsterverse and added the "On Hunsterverse" notes (all of them: Hunsterverse vs the old servers). The pictures are from the original guide.