
Frontier guide · Progression · 12 of 18
Hunter Rank and Style Rank
How to climb from HR1 to HR7, what changes at HR5 (Gou, Exotic and Supremacy gear, SP gear), and how Style Rank, Hardcore monsters, My Missions and Hiden work.
Starting out (HR1 to HR4)
Treat HR1 to HR4 as a long tutorial. HR5 is where the game really starts. HR1 to HR4 was the free trial on the official servers: it is an introduction, even though it holds about as many quests as a whole mainline Monster Hunter game.
New players' server
On the official servers a fifth server tab held quests for new and returning players who wanted to catch up to G Rank. They give large rewards for little effort. Access was time limited and the expiry date showed on your Guild Card. The rewards are only materials that are not very hard to get otherwise, and nothing better than early G Rank gear. The guide's advice is to take as much from it as you can, especially the GRP quests, so you are not locked out of GR100 content when you want your first proper set.
After the tutorial
This part assumes you have finished the tutorial quest line, up to the point where your first Urgent quest is open (see Basics if not).
- Read the Frontier Base Movesets part of the Weapons page. Frontier changed many weapon actions and some are not something you would try by accident.
- Look round town, meet the NPCs and learn who sells what (see Menus and Town NPCs).
- Two facilities are open from the start: the Gook Farm and the Helper Area.
The Gook Farm has farm tools like those in the portable games. Use them once per quest you take to get materials. It is also where you raise Gook ducks. Gooks give materials, including the ones for gook tools: versions of the Pick, Bug Net and Fishing Bait that give double the item gathered.
The Helper Area holds your Halk and any Partnyaas you have hired. You can hire two Partnyaas at first, and a third unlocks later. A Halk joins you on every quest and gives configurable support: it can heal, buff or attack. It will not change the game, but it helps. A Partnyaa is a felyne companion that adds bag space. For fighting, Partnyaas are generally worse than other AI companions or other players.
Get a Partnyaa even if you never take it hunting. You can send it to the Guild Hall on Treasure Hunts, which give many materials and items that only Guild Cats have. These include Quick Potions, Mega Potions and Max Potions, which have the Eating effect (very fast drinking) built in. More in House and AI Companions.

Start the Story Quests as soon as you can. Talk to the Yellow Guildie and pick her first option. Take the quest line at the top of the list that appears (its Chinese name means "Rookie Hunter, advanced"). It gives materials for things like Gallery Gems and Gogomoa armour.
Do not start any other story line after you have started the first one, or your progress in the story line will be lost.
A full list of these quests and their best rewards is in Fist's Google Doc.
Key quests and Urgents
When you have done all your Key Quests, your Urgent opens. Finishing the Urgent takes you to the next rank. The quests you need are marked with a star icon and always sort first in the list, so it is hard to take the wrong ones.
| Rank | Key quests | Urgent |
|---|---|---|
| HR1 | Taikun Zamuza, Yian Kut Ku, Hypnoc | Abiorugu |
| HR2 | Rathian, Dyuragaua, Volganos, Gurenzeburu | Espinas |
| HR3 | Pariapuria, Rathalos, Nono Orugaron, Rajang | Rukodiora |
| HR4 | White Hypnoc, Orange Espinas, Kuarusepusu, Doragyurosu | Akura Vashimu |
| HR5 | Baruragaru, Diorekkusu, Toridcless, Gasurabazura, Toa Tesukatora | Supremacy Odibatorasu |
| HR6 | Supremacy Aruganosu and Goruganosu, Supremacy Unknown (repel quests) | Automatic progression |
| HR7 | None listed | Shantien |
HR2, HR3 and HR4
HR2: Rasta and Partner
At HR2, with the house upgrades, you can make your own Rasta and hire your own Partner. At the bar you can also contract another player's Rasta, and hire your Partner.
Contract someone's Rasta as soon as you can and use it. You start earning Guild Contribution Points (GCP). Spend them on upgrading the abilities of your hired Rasta or Partner, or on items at the shop that no other store sells. At end game a Partner is comparable to a Legendary Rasta and can hold its own against almost anything, so the guide says it is well worth investing points and time in them. See Partner and House and AI Companions.
HR3: High Rank and Transcend
HR3 is the start of High Rank. As in other games, it lets you fight stronger monsters and visit new areas. It also unlocks the whole Transcend system, a mechanic a little like wystones that you upgrade by doing regular events.
Fully upgraded, Transcend gives your whole party a large instant heal and, for a time, 2.0x Elemental Damage, 1.13x Raw Damage, more Defence and Resistances, Movement Speed Up and Super Armour (small knockbacks do not flinch you). If you deal enough elemental or raw damage while the buff lasts, you can also perform an Elemental Burst. It deals very high damage at once, and has extra effects such as freezing the monster in place for a moment or dealing huge KO damage.
HR4: The Pugi Farm
HR4 unlocks the Pugi Farm. There you get a Garden Manager who gives you points every day, sells you cat facilities and lets you take a Pugi on quests.
Pugis are very valuable. They can get you extra items when you carve, and they add extra points to your armour skills when you equip them with an Outfit and a Pugi Cuff.
The cat facilities are a Store, a Combination Booth and an Adventure booth. In time they let you buy things like Mega Demondrugs, make items like Quick Whetstones, and send cats out to gather unique materials. See House and AI Companions for the full steps.
HR5: where the game starts
Gear made from HR5 on often upgrades all the way to G Rank and stays useful until end game. HR5 is where you meet many Frontier-only monsters and the unique systems.
Basics
When you reach HR5, talk at once to the Purple Guildie at the Town Entrance to claim a batch of items. This includes materials for about three Zerureusu weapons, depending on which you make. They are very good weapons and give you a big boost on your first Gou quests.
You can only take HR5 quests outside the first server tab. The first tab is the beginners' server and is limited to quests below HR5. If you were in a beginners' server when you hit HR5, move to another tab to take HR5 quests.
There is an HR5 mixed set in Armour, Decorations and Skills with good skills that can last you until G Rank. You may need friends to help grind it, since it needs Brachydios, Zinogre and Diorekkusu.
Negative elemental weaknesses
From HR5 on, a monster part can have a negative elemental weakness. If you hit it with the element it is negative to, you deal less raw damage. This is different from a weakness of 0, where you simply deal raw damage and no elemental damage. A hit on a negative part shows a darkened elemental flash instead of the usual one.
Negative values work like positive ones. If an elemental weakness of 30 adds 30 damage, a weakness of -30 takes away 30 damage (give or take rounding).
SP equipment
SP equipment is only for HR5. All of it uses materials that are new at HR5, mostly coloured grass items (named "Dyed Grass" plus a colour in Chinese). They are low-percentage gathering items. You only need to find any one colour: the Veggie Elder at the Gorge trades them in a circle (White for Red, Red for Blue, and so on back to White) until you have the ones you need.
- SP weapons are average weapons used only in Hunting Contest quests. They have levels instead of normal weapon progression, and each level adds a little to the stats. SP weapons are only really useful for Hunting Contests now. You get a free SP weapon of every type, except Tonfa and Switch Axe (which are G Rank only), from the Purple Guildie when you reach HR5. The guide's author is not sure the free weapons still come after G10.
- SP armour gives no natural skill points. Instead you slot SP gems into it. To make up for how strong SP gems are, SP armour pieces have poor defence. SP armour still has a long-term use in gathering sets.
- SP gems give many skill points in one or several skills and only fit in SP armour. Some can be upgraded.
HR5 quest tiers
HR5 quests come in three tiers. Henshu and Kishu are the first tier, Goushu (Gou) is the second and Exotic is the last.
- Henshu and Kishu are the standard HR5 monsters: normal and sub-species (for example Diablos is a Henshu and Black Diablos a Kishu). They are generally weaker than Gou monsters and usually a dead end for gear progression.
- Goushu covers most of the stronger HR5 monsters: newer Frontier-only monsters and powerful ones such as HR5 Elder Dragons. Most have a Gou armour set. Almost all of those upgrade to G Rank levels (Burst or Origin), where they get good skills and special abilities, such as raising certain skills by a full tier (Expert +4 to +5) and a 30% increase to damage at Critical Distance for all ranged weapons.
- Exotic monsters are plain imports from mainline games. They are tuned up (the game has no monster stamina) and have new attacks. They are Zinogre, Deviljho, Brachydios, Barioth, Uragaan, Nargacuga, Stygian Zinogre, and from Z1 Gore Magala and Shagaru Magala.
Gou quests are mixed in with the other ★5 quests. Their quest card says "Gou Species Quest" (剛種任務) at the top. They are some of the harder HR5 content and where you find most of the Frontier-only monsters that have pre-G forms.
The guide's table of which monsters fall under which tier was broken in the original, so the names below are in the guide's order and may be incomplete. Some names (Rathian, Rathalos, Espinas and others) appear under Henshu and Kishu as several variants.
- Goushu
- Abiorugu, Lunastra, Inagami, Nono Orugaron, Chameleos, Harudomerugu, Odibatorasu, Baruragaru, Kamu Orugaron, Pariapuria, Gasurabazura, Forokururu, Garuba Daora, Berukyurosu, Kirin, Poborubarumu, Kuarusepusu, Meraginasu, Kushala, Yama Kurai, Gureadomosu, Yama Tsukami, Gurenzeburu, Lao-Shan Lung, Gogomoa, Rukodiora, Shen Gaoren, Gougarfs, Zerureusu, Varusaburosu, Taikun Zamuza, Rusted Kushala, Teostra, Voljang, Diorekkusu, Toridcless, Dyuragaua, Guanzorumu, Doragyurosu, Toa Tesukatora
- Henshu and Kishu
- Akantor, Hypnoc, Akura Vashimu, Khezu, Yian Garuga, Rajang, Yian Kut-Ku, Rathian, Espinas, Rathalos, Plesioth, Volganos, Gravios, Gypceros, Shogun Ceanataur, Akura Jebia, Daimyo Hermitaur, Kut-Ku, Tigrex, Diablos, Iodrome, Cephadrome, Gendrome, Bulldrome, Velocidrome, Blangonga, Basarios, Congalala
- Exotic
- Zinogre, Deviljho, Brachydios, Barioth, Uragaan, Nargacuga, Stygian Zinogre, Gore Magala (Z1), Shagaru Magala (Z1)
Monster details are on the Monsters page.
Gou weapons and armour
Gou weapons
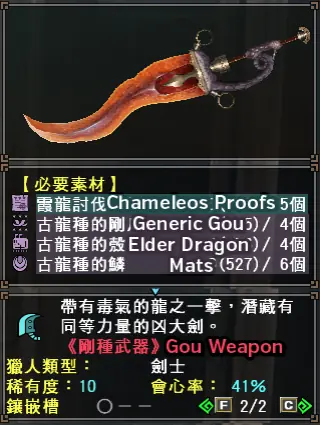
Gou weapons have their own section in the Blacksmith's crafting menu. They give ESP at 100% health. When upgraded, and worn with upgraded Gou armour, they give special bonuses on Gou and HR5 quests. They are among the best weapons before G Rank.
Most Gou weapons need 5 Proofs and a number of materials from the proof monster and from Gou Elder Dragons.
Once you have Style Rank, Gou weapons can be upgraded to Heavenly Storm weapons (天嵐武器). Worn with Heavenly Storm armour (天嵐防具) on Gou or Supremacy quests, each sharpness segment goes up one colour. A weapon with Purple sharpness gets Cyan, which is normally not available before G Rank. Gunners get an affinity boost instead of the sharpness increase. These boosts make such weapons ideal for the hardest content below G Rank.
Gou armour
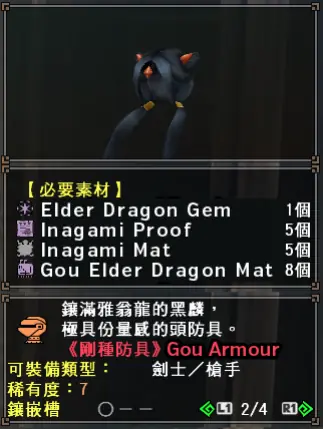
Gou armour is also made in its own part of the Blacksmith's menus. It gives bonus levels to certain skills, based on how many Gou pieces you wear and on your own status (details in Fist's Google Doc). It also gives many skill points in general, so it mixes well with other armour.
Every Gou armour piece needs proofs and 1 Gou Elder Dragon Gem (古龍種的稀玉) from Gou Rukodiora. A quest that cycles in has a 100% chance of giving a gem, which is ideal for making Gou armour. You also get 3 of these gems when you make your first Gou weapon.
Many Gou armours upgrade all the way to G Rank as Burst Armour (烈種防具). With a single Burst piece equipped you always get the bonus levels on every boostable skill. How Gou gear works together in G Rank is in Starting G Rank.
Exotic gear and Supremacy quests
Exotic monsters and equipment
Exotic monsters are the first mainline imports to Frontier since Tigrex and Akantor in 2007. You can fight their base forms as soon as you reach HR5. Zinogre, Deviljho and Brachydios are all available with G8.
Every standard weapon type has HR5 Exotic equipment. It does not upgrade until you reach G Rank at GR500, but it is very solid.
- Exotic weapons give the Quick Eating skill while equipped. They also have a special slot type that only matters at G Rank.
- Exotic armour is mostly like other standard armour, but wearing any single piece always gives a set skill for that set. For example any piece of Zinogre Armour (head, chest or any other) gives Thunder Attack [Large]. It is free: it needs no skill points and does not affect your other skills.
Supremacy quests
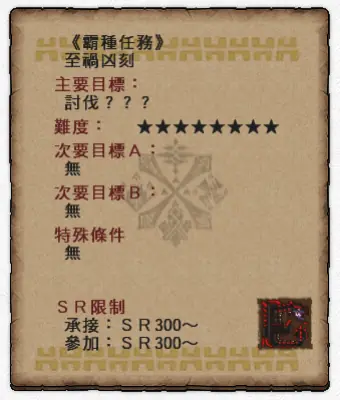
Supremacy quests are fights against powerful variants of monsters, available from HR5. Each gives unique items for that monster type, which you use to upgrade Gou weapons and armour past Heavenly Storm level. Monsters with Supremacy variants are Pariapuria, Unknown, Doragyurosu, Teostra and Odibatorasu.
Volganos has Aruganosu and Goruganosu as its Supremacy form. They are a Silver and a Gold monster that you must always fight together. They use combo attacks with Ice and Thunder, and both must be brought to 1 HP before either can die (see Monsters).
Supremacy monsters are powerful and can cart even G Rank players in an instant if you are careless. They count as HC for HC armour regen and HC bonuses. Odibatorasu is the easiest.
You have to beat Supremacy monsters to reach G Rank, but you do not need their items to do so. Several items drop only from them, and they go into any Gou armour or weapon tree. Your first sets will probably use some, and any gunning set will want at least one Origin piece.
Each quest gives a number of unique materials. How many depends on several things: carting and using a Halk Pot shrink the reward pool, and luck adds extras. These materials are used to make and upgrade Gou weapons and later G Supremacy weapons, and to upgrade all Gou armour.
There is usually an HR6 repel quest in the events section that gives a fixed 4 stacks of Supremacy Blood (the guide gives its name only in Chinese: 鮮烈的滾血). Look on page 4 of the quest info for the item name.
Chance of Supremacy Blood per roll
| Monster | Repel quest | Hunt quest | Successful kill |
|---|---|---|---|
| Odibatorasu | 10% | 18% | 17% |
| Unknown | 10% | 19% | 22% |
| Volganos | 10% | 21% | 23% |
| Pariapuria | 10% | 20% | 24% |
| Doragyurosu | 10% | 22% | 25% |
| Teostra | 10% | 23% | 25% |
Successful Hunt quests also give a fixed 1x Supremacy Blood.
Unique item for each monster
| Monster | Unique item |
|---|---|
| Odibatorasu | Odi Supremacy Scale |
| Doragyurosu | Dora Supremacy Scale |
| Teostra | Teostra Supremacy Wing |
| Unknown | Unknown Supremacy Claw |
| Pariapuria | Pariapuria Supremacy Stone |
| Volganos | Gold and Silver Supremacy Shell |
A successful slay also gives a fixed 2x of the unique material. Not using a Halk Pot gives a fixed 1x.
To farm a monster's unique items for Supremacy weapons, repeat the repel quests: they give 2 stacks of the item at about 38 to 40% per roll. For Supremacy Blood, the slay quests are far better: almost double the roll percentages, and more kinds of rolls.
Things to do every day
If you play often, these daily tasks are worth doing.
- Guild rewards. If you are in a Guild you get free items every day (resets at 00:00). See English Guild and Guild Hall.
- Daily Quest. Claim one at the Pink Guildie each day. You can only hold one, so you must use it on a quest before you can claim another. Taking it also gives a 5-stack of Halk Pots and 5 N Points. Daily Quests are best spent on Hiden dailies or event quests. Take your Daily first, before you claim the N Points.
- Pugi points. At HR4 and above, take your daily points from the Pugi Farm manager to build towards your Pugi and cat facilities (resets and updates at 00:00).
- Rasta materials. If your Rasta is contracted out to other players, or you contract one, and they play, you get small amounts of materials based on what was hunted that day. They are usually junk, but now and then you get G Rank or Zenith materials. Collect them at the Bar: the right-hand Bar NPC, last option.
Style Rank
Basics

You can start Style Rank as soon as you reach HR5. It starts by itself: walk towards the Guild Master after reaching HR5.
Style Rank gives you special SR Skills, two new movesets for each weapon type, and access to Hardcore monsters. You can try the weapons on the bed in your house to see how their SR movesets work. Detailed overviews are on the Weapons page under Detailed Weapon Information. Standard weapons share one section, and Tonfa and Switch Axe each have their own.
Weapon styles
To turn on a new moveset, open any large box that lets you change gear (such as the one at the Blacksmith). Go to the part where you normally choose equipment and pick the new last option, the Book of Secrets (Change Equipment > Equip Book of Secrets). That opens a menu where you choose your weapon type, then the second option, then your style (Weapon > Style > pick a style). Menu names may differ slightly on our server.
- At HR5 you have Heaven Style (天之型) and Storm Style (嵐之型). Storm Style is the best choice for most weapons at this rank, with some exceptions. You can swap styles at any time.
- After you reach G Rank, talk to the Guild Master again to unlock Extreme Style (極之型). It changes weapons far more than Storm or Heaven do, and is generally the best style for every weapon in high-level play. Switch all your weapons to it as soon as you can.
Your Book of Secrets must be equipped to use any of the other movesets. If you switched it off by mistake, open the SR menu, choose the first option and then the first option again to turn it back on.
Hardcore monsters, carves and souls
Hardcore monsters
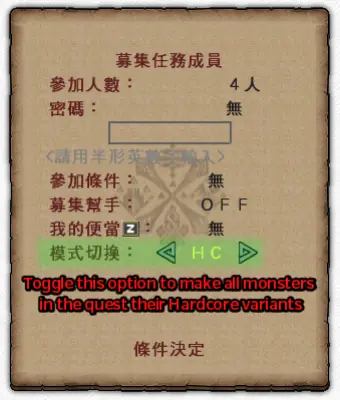
Hardcore (HC) is an option on SR quests that turns the large monsters in the quest into HC monsters. A quest that can be made Hardcore has a flame icon at the top right of its name in the quest list. The flame only means HC is possible: you have to turn HC mode on yourself. You do that on the final screen after choosing a quest, where you confirm the number of players and the password.
HC monsters are stronger and have new skills, abilities and looks. Many have higher Roar, Wind or Quake levels. To protect yourself you will need Super Earplugs, Quake Res +2 and Dragon Wind Breaker. If a quest has several large monsters, they all become Hardcore. That is the only difference in the quest.
Finishing a quest in HC mode gives you SR Weapon Souls (they look like tickets), used to make some weapons and armour for that weapon type (see Hiden sets below). If your weapon is within the Rarity Limit shown in your Book of Secrets, you also get multipliers: HRP x3, SRP x4, Zeny x1.5 and GCP x1.5. That once made HC quests a very good way to gain ranks. As of G10 most of these multipliers no longer matter, except that they multiply the same things on your Partner (Partner Rank and Partner Weapon Rank).
G Rank quests work the same way, with different multipliers that apply to the G versions of the points and money (GRP, GSRP, Gzeny).
Hardcore carves
An HC carve is an extra kind of carve you only get from HC monsters. In general each monster has one HC carve for each tier it has (HR1-2, HR3-4, HR5-6, G Rank).
- The usual way to get them is to kill and carve an HC monster. A small number of event quests also give them as normal rewards.
- The standard rate is 5% for an HC carve and 2% for a GHC carve (G Rank Hardcore).
- They act as the low-percentage carve (like Gems or Plates) in anything added since HC monsters came in, so they appear in a lot of gear.
- Carving an HC carve plays a special jingle, different from a normal carve. Your Partner can carve them too and they show in the post-quest rewards (no jingle). The Legendary Pugi can also get them like your Partner when on Premium.
- You can also buy HC carves with N Points (about 100 at least) or Festival Points (about 500 at least). The Diva Defense event now and then lets you buy carves with standard GCP, if you have the right Prayer on. See Regular Events.
HC carves are outside the normal carve pool. When you carve, the game first rolls which pool you get an item from, then rolls the item. For example, a Volganos:
| Pool | Item | Chance in pool |
|---|---|---|
| Normal carve (95%) | Volganos Scale | 48% |
| Volganos Shell | 38% | |
| Volganos Fang | 14% | |
| Hardcore carve (5%) | Lavasioth Rotary Fin | 100% |
Anything that rerolls a carve, such as Caravan Gem skills, rolls for the pool again on the second try. If you first carved a Volganos Scale and got a reroll, the new carve has a 5% chance of being HC and a 95% chance of being a Shell (73%) or a Fang (27%).
Weapon Souls, Ribbons and Merits
A Weapon Soul is a ticket for one weapon type that you get for killing any HC monster. Each weapon has 4 levels of Soul, set by the rank of the monster.
| Soul | From |
|---|---|
| Low Soul (魂・序) | HR1-2 |
| Mid Soul (魂・中) | HR3-4 |
| High Soul (魂・極) | HR5, non-Gou |
| Top Soul (魂・天) | HR5, Gou |
For example, fighting an HC Teostra at HR5 with a Tonfa gives a Tonfa Soul (Top). Souls are used to make and upgrade certain weapons and armour. A lot of gear during HR5, and most good gear after it, needs at least one. They are used heavily in the Hiden grind (see below).
At GSR1 you can earn Ribbons and at GR500 you can earn Merits. They work almost the same as Souls but come from GHC quests and normal G Rank quests respectively. They are covered in the Hiden section.
Style Rank skills
Once you have Style Rank you can choose an SR Skill for each weapon. These are permanently active buffs, like armour skills, but they take no skill slots. To equip your first skill, open the weapon's Book of Secrets menu, choose one of the Special Effect (特殊效果) options, then pick a skill: Change Equipment > Equip Book of Secrets > Weapon > Special Effect > Skill. You can equip 1 skill until you reach GSR100, and 2 after that.
The skills
| Skill | Effect |
|---|---|
| Defense Up | Up to +170 Defence. |
| Fire Res Up | Up to +34 Resistance. |
| Water Res Up | Up to +34 Resistance. (The guide's English says "Ice" twice; the Chinese name is water.) |
| Thunder Res Up | Up to +34 Resistance. |
| Ice Res Up | Up to +34 Resistance. |
| Dragon Res Up | Up to +34 Resistance. |
| All Res Up | Up to +19 to all Resistances. |
| Sharpening Up | +50 sharpness, or maximum sharpness, from sharpening. |
| Health Up | +50 health at most. Works like the armour skill and is mostly a wasted choice, since food buffs are so easy to use. |
| Affinity Up | A flat +20% to +24% Affinity (GSR Swaxe and Tonfa add +2% each). |
Skills that need G Style Rank (GSR):
| Skill | Effect |
|---|---|
| Conquests Defense | Up to +320 Defence on Conquests (not Shiten). |
| Conquests Attack | Up to +110 Attack on Conquests (not Shiten). |
| Passive Master (every GSR999 weapon) | A monster attack that would leave you fully knocked down is partly recovered: you land on your feet instead of lying down and getting up slowly. |
| Secret Technique (every GSR999 weapon) | Usable once a day after 12:00. After a long wind-up it deals massive damage. It is bound to the Kick button or key, and raises your attack for the rest of that quest. |
| Soul Revival (once you have 11 GSR999 weapons) | Once per quest it revives you after you hit 0 HP once and fills your health bar. Disabled by Determination. It is unlocked on your GSR999 weapons once you have 11 in total. |
When you get them
- HR5: the basic Defense skill.
- HR6: all the elemental Res skills and the first Sharpening Up.
- HR7: Affinity Up and the maximum Sharpening Up.
The Res and Defense skills grow as you rank up in G Style Rank. Some need GSR999 on a weapon, or on several weapons, to unlock or max them. At G Rank there is almost no reason not to have Affinity Up on: it is the same as Expert +2, for free.
The Book of Secrets stats and Attack Ceiling
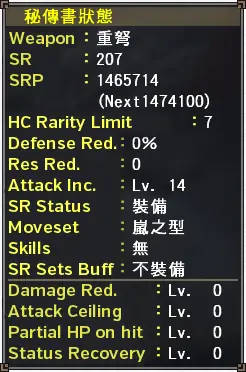
The Book of Secrets status page shows everything to do with Style Rank. Open it from the Equipment Box, or look at it (no changes) from the menus: Status > Book of Secrets Status.
| Stat | What it does |
|---|---|
| HC Rarity Limit (HC Rarity Suitability) | The highest weapon rarity that still gets the HC multipliers: Rare 11 at HR5 and Rare 12 from HR6 on. It is not shown on a GSR weapon. Mostly useful for ranking up AI companions, since HR and SR were removed. Rarity Sigils on G Rank weapons count for this check. |
| Attack Up | A flat increase to attack: each level is +1 true raw, up to +100 at GSR999 (the same as the Lone Wolf skill). It is 17 at HR5, 45 at HR6 and 50 at HR7, then rises gradually to 100 at GSR999. |
| SR Status | Whether your SR is on or off. |
| Weapon Style | Which of the three styles is equipped on the weapon. |
| SR Skill | Which of the skills above you have equipped: 1 during SR, 2 after GSR100. |
| Hiden Buff | An extra 0.10x multiplier if you have several FX-level Hiden sets. It does not matter at this point in Frontier. |
The last four stats are raised with My Missions (see below):
| Stat | Levels | Effect |
|---|---|---|
| Damage Reduction | 20 | Reduces damage taken by (Level / 2)%, up to 10%. |
| Attack Ceiling | 180 | Raises the largest attack value you can have above the 800 true raw limit, by +40 true raw per level, up to 8,000 true raw. |
| Red Health Amount (Partial HP on hit) | 25 in this table | Increases the red health you are left with after a hit: +1% per level, up to +25%. |
| Status Recovery | 25 in this table | Shortens status effects by 1.5 frames per level, up to 1.25 seconds. |
The guide is not consistent here. A later passage gives 20 levels for Red Health (up to +20%) and for Status Recovery (up to 1 second, 30 frames at 30 fps), and says Attack Ceiling has 110 levels in one place and 180 in another. The numbers above are from the stat table, which agrees with 800 + 180 x 40 = 8,000.
Attack Ceiling
The Attack Ceiling does not make you stronger by itself. It lets you have higher attack values without hitting a cap. By default the cap is 800 true raw. Every weapon type multiplies true raw by its own number, and the cap is that number times 800. Everything that raises the attack value shown on your Guild Card counts towards it: the LS Spirit Bar, Tonfa combo meters, DS sharpens, Demon Drugs, food buffs, SR Attack Up levels and so on. Critical hits and sharpness do not count, as they do not change the value on your Guild Card.
Raise it as you go through G Rank. 800 is very easy to pass in recent updates: Z1 added many skills that stack attack, Zenith weapons have up to 580 base true raw, GSR1 already adds +50 true raw and skills can add +150 at once. G Rank weapons can have over 600 true raw with no skills at all.
| Weapon | Multiplier | Max attack at default (800 true raw) | Max attack at 180 levels (8,000 true raw) |
|---|---|---|---|
| SnS / DS | 1.4 | 1,120 | 11,200 |
| LS / GS | 4.8 | 3,840 | 38,400 |
| Hammer / HH | 5.2 | 4,160 | 41,600 |
| Lance / GL | 2.3 | 1,840 | 18,400 |
| Tonfas | 1.8 | 1,440 | 14,400 |
| Switch Axe F | 5.4 | 4,320 | 43,200 |
| Bowguns / Bows | 1.2 | 960 | 9,600 |
To find a weapon's true raw, divide its displayed attack by its multiplier.
Example with a Sword and Shield. Your skills push it to 3,080 attack (2,200 true raw).
- With no levels you would only ever have 1,120 attack (800 true raw), losing 1,960 attack (1,400 true raw).
- With 22 levels your cap is 2,352 attack (1,680 true raw), so you still lose 728 attack (520 true raw).
- With 35 levels your cap is 3,080 attack (2,200 true raw). You keep all of it. A Power Pill or Demon Horn would push you over again and you would lose some.
Each level adds 40 true raw. Doing 50 levels raises the base from 800 to 2,800 true raw, which allows 3,920 attack on a Sword and Shield or Dual Blades (2,800 x 1.4).
A good first target is about 50 levels, which covers most skills before Hiden, including Hunting Horn buffs and Adrenaline. Later you want much more (the guide says around 190, though the maximum it lists is 180 levels). For a set of skills you want to use, Fist's Damage Calculator works out the levels and My Missions you need. If you only want an estimate, enter 500 to 600 as base true raw for a late-game weapon. It also has a Future Skills button.
| Set | Recommended Attack Ceiling levels |
|---|---|
| Basic G Rank set | 25 |
| Basic Hiden set | 70 |
| Good Hiden set | 110 |
| Determination set | 80 |
| Determination Hiden set | 130 |
These are broad figures that cover most situations so you never lose raw. At the very least get about 20 levels as soon as you start G Rank, and push to around 80 to 100 as your sets improve.
My Missions
My Missions are a series of kill targets that raise the four stats at the bottom of the Book of Secrets. The guide says they unlock after HR6 once you have Style Rank, and elsewhere that you can start them at SR500. There are two kinds.
- The Medal Series is only for show. Each has a Hunter Navigation task that gives 30 My Mission Tickets (挑戰達成證), which let you skip Weapon Series tasks. You take these in the SR Display Room in your house, marked with a bullseye icon (unlocks at HR5).
- The Weapon Series are the ones that raise the four stats on all weapon types. As of G10 they are shared by all your weapons (before that, each weapon type needed its own set of missions).
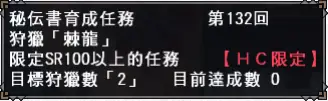
To see your current My Mission, open the Book of Secrets status page. It shows the task number, the target and your progress, which is saved when you log out. Both the Hunter Rank and the G Rank quest NPCs have an option for these missions: it searches for quests that fit. You must still turn on HC yourself if the mission needs it.
You can skip a mission with My Mission Tickets, which are fairly rare, or with lottery coins (not recommended). The skip option is on the Guild Master, who also gives SR and GSR. A day of premium gives 40 My Mission Tickets, and you can trade junk weapon tickets from the lottery system for them at the combination NPC.
How many missions you need depends on your progress. See the Attack Ceiling table above. Treat them as compulsory for anything like end game: the game keeps adding skills that raise attack, so the 800 true raw limit matters less and less. Use the Damage Calculator for an exact number.
The SR Self Challenge Room
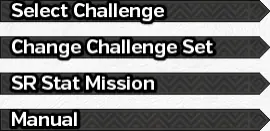

When you hit HR5 and start Style Rank you get the SR Self Challenge Room. It shows all the weapons you have SR in and the Hiden sets you have made. It has two NPCs, R and S.
- R gives challenges that earn medals, mostly for show. Finishing them all gives 30 My Mission Tickets for skipping S's stat quests.
- S gives challenges like R's, and the quests that improve the stats in your Book of Secrets. You can take these from SR500. They also show up on the main quest NPCs once they apply, so you never need to visit the room for stats.
Menu options:
- Select Challenge: pick one of ten challenges from your current set.
- Change Challenge Set: swap to another set. Each set has its own decorative disc, which gets decorations as you finish its challenges.
- SR Stat Mission: the missions that raise the bottom four stats of your Book of Secrets. S and the standard quest NPCs have this.
- Manual: opens the online manual in your browser.
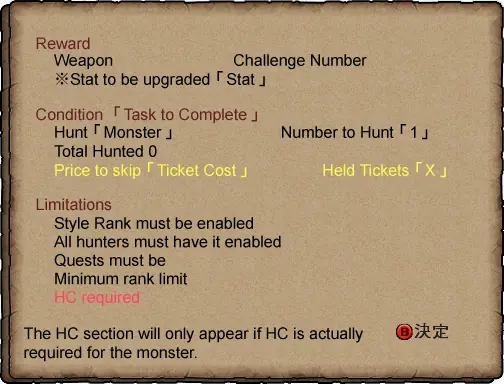
A Mission or Challenge opens a window like the SR100 Urgent's. It lists a target and how many to kill. Quests are saved between sessions and are marked done as soon as you reach the goal. After you take an SR Stat mission from S, the game asks if you want to skip it with items. The Guild Master in the main town square offers the same menu. You are asked whether to use tickets or Lottery G coins, then to confirm.
Hiden
What Hiden is
Every weapon has Hiden armour and Hiden decorations. They give points in that weapon's Weapon Tech Skill, a skill made for one weapon type. Each always gives Super High-Grade Earplugs and an attack multiplier of at least 1.2x for melee and 1.3x for ranged. Having one of these skills is called "having Hiden" for that weapon. You have Hiden when you have at least 5 decorations for that Hiden type. You make the decorations by converting fully upgraded Hiden armour into decorations.
Getting your first Hiden is a long process: at least 775 hunts, probably 30 hours or more of play even with a good set. Do not start the Hiden grind when you first get to G Rank. Do it once you have an established set, because starting too early is very likely to burn you out. A guide to an efficient grind is on the G Rank page.
Weapon Tech skills
| Weapon | Skill | Effects |
|---|---|---|
| Sword and Shield | SnS Tech (Sword Saint) | Super High-Grade Earplugs. Attack x1.3. All Elemental Sword Stone skills +3, all Status Sword Stone skills +2, Bomb Sword +2. Faster movement with the SnS unsheathed. Fencing. The +3 versions of the Crystal skills overwrite the +2 versions in this skill if active. |
| Dual Blades | DS Tech (Dual Dragon) | Super High-Grade Earplugs. Attack x1.2. Fencing +1. You always recover 3 units of Stamina per hit while attacking in either Demon Mode. Demon Modes start faster. |
| Great Sword | GS Tech (Sword King) | Super High-Grade Earplugs. Attack x1.2. Fencing +1. A guard slash counter block recovers half of the sharpness it would lose. Faster charging (stacks with Focus). Charge stays at level 4 longer before dropping to level 2 (Storm Style). Perfectly timed blocks cause no knockback, can be evaded out of, use no stamina and recover half of the sharpness that would be lost. The sharpness recovery also works while using Sharp Sword and lets you recover sharpness with +2. |
| Long Sword | LS Tech (Katana God) | Super High-Grade Earplugs. Attack x1.2. Fencing +1. Spirit Bar use is halved. Sharp Sword +2 while the Spirit Bar is full. Attack x1.25 (originally x1.15) while the Spirit Bar is glowing, after it has been filled completely. |
| Hammer | Hammer Tech (Blunt Beast) | Super High-Grade Earplugs. Attack x1.2. Fencing. Attack x1.3 for the whole combo after a perfectly timed charge attack release (including the infinite combo). |
| Hunting Horn | HH Tech (Flamboyant Emperor) | Super High-Grade Earplugs. Attack x1.2. Fencing +1. The note colour in Performance mode is decided 34% faster. |
| Lance | Lance Tech (Heavenly Spear) | Super High-Grade Earplugs. Attack x1.2. Fencing +1. No damage taken when you block successfully. 4 hops instead of 3. Motion Value +10 for the final (3rd or 4th) Normal, Diagonal and Sky Stabs. |
| Gunlance | GL Tech (Cannon Emperor) | Super High-Grade Earplugs. Attack x1.2. Fencing +1. Wyvern Fire and Heat Blade cooldown halved, and Heat Blade activation time cut to 3 seconds. Normal Shells +2, Long Shells +1 and Wide Shells +1, stacking with Load Up (or Gentle Shot). |
| Switch Axe | Switch Axe Tech (Edge Marshal) | Super High-Grade Earplugs. Attack x1.2. Fencing. Certain successful actions raise attack by 1.05x for a short time (morphing in Earth Style, sword attacks in Heaven Style, guarding in Storm Style). The infinite swing combo uses half the stamina. Attacking in axe mode raises the phial gauge, and phial attacks use less of it. |
| Tonfa | Tonfa Tech (Piercing Phoenix) | Super High-Grade Earplugs. Attack x1.2. Fencing +1. An extra 6th Combo / EX Meter segment. |
| Light Bowgun | LBG Tech (Gun Prodigy) | Super High-Grade Earplugs. Attack x1.3. Ammo bounces off monsters less often. You can use items with the weapon unsheathed. A Perfect Shot is added to the Just Shot meter and deals extra damage. |
| Heavy Bowgun | HBG Tech (Gun Sage) | Super High-Grade Earplugs. Attack x1.3. Power of Element and Status ammo x1.2. Evade Distance Up. Melee attacks and Crag/Cluster shots all do 15 KO damage. Heat Beam does x1.2 damage. A perfectly timed Compression gives more attack for that one salvo. |
| Bow | Bow Tech (Bow Demon) | Super High-Grade Earplugs. Attack x1.3. Arrows cannot be deflected. Power Coating modifier +0.2x extra. Arc-Shot can be used at charge level 2. |
Hiden armour that gives these skills becomes available at HR6, but cannot be finished until GR500. Completing a set is one of the big grinds of the mid to late game.
The grind in short
Making Hiden decorations lasts until late G Rank. You can start Hiden armour at HR5 but cannot finish it until GR500. It needs many HC, GHC and G1% carves and a lot of Weapon Souls, Ribbons and Merits from HC, GHC and normal G Rank hunts. The G Rank page has the guide's full grind advice: Hiden grind guide.
Read Choosing decorations before you commit: you do not want a pile of useless "brick" decorations because you skipped a few paragraphs.
How a Hiden set is built
As soon as you hunt an HC monster you get a Soul for the weapon you used (an LS on Gou HC gives a Longsword Soul (Top), for example). Souls make the base Hiden sets. To fully upgrade a set you must also be in G Rank to get Ribbons, and at GR500 to start getting Merits.
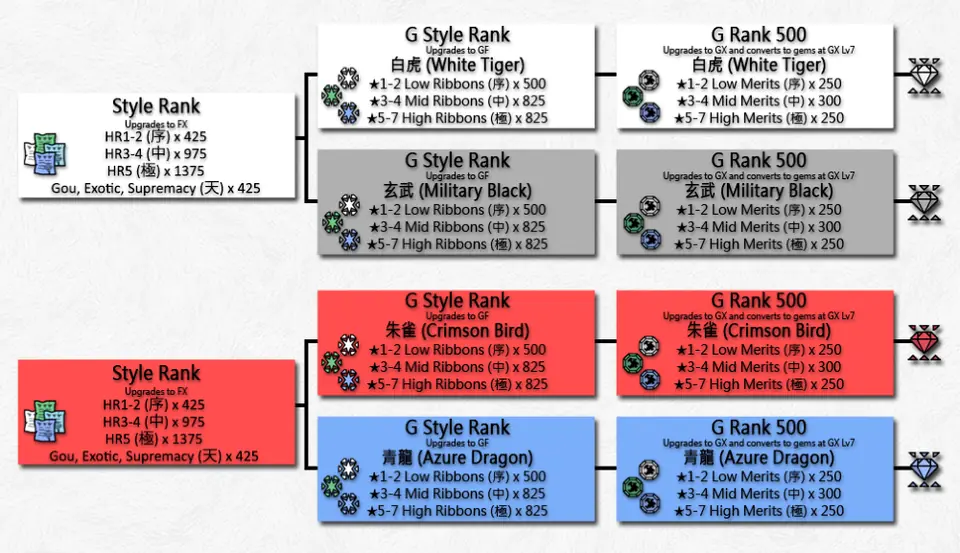
Every day at 12:00 a set of monsters becomes Priority. Hunting them gives extra Souls, Ribbons or Merits: always 2 extra, and 5 more if you are on premium, for a total of 8. They follow a fixed pattern, and the guide links a schedule that it presumes is correct.
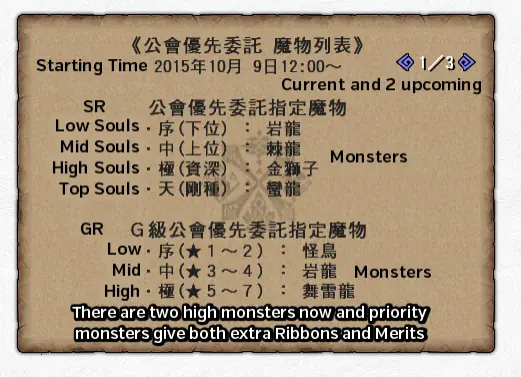
You need many of each item, plus HC carves from monsters of every rank and 1% carves from G Rank monsters. To completely finish one Hiden set you need:
| Type | Souls (SR) | Ribbons (GSR) | Merits (GR500) |
|---|---|---|---|
| Low (序) | 425 (HR1-2 quests) | 500 (GSR1, ★1-2) | 250 (GR1, ★1-2) |
| Mid (中) | 975 (HR3-4 quests) | 825 (GSR1, ★3-4) | 300 (GR1, ★3-4) |
| High (極) | 1,375 (HR5 quests) | 825 (GSR1, ★5-7) | 250 (GR1, ★5-7) |
| Top (天) | 425 (SR Gou and Supremacy quests) | - | - |
This page's version of the table labels the Soul quests SR1-30, SR31-99 and SR100; the G Rank page labels them HR1-2, HR3-4 and HR5, which matches the Soul types. You can work on Souls casually as you rank up: spare Souls never hurt.
Written from the Monster Hunter Frontier guide by Fist (as saved in January 2022). That guide describes Capcom's old official servers; we reworded it, laid it out for Hunsterverse and added the "On Hunsterverse" notes (all of them: Hunsterverse vs the old servers). The pictures are from the original guide.