
Frontier guide · Progression · 14 of 18
G Rank
How G Rank works once you are past the first steps: quests and star ratings, weapons, sigils, armour, Pugi cuffs, decorations, Conquests, the Diva and the Hiden grind.
Tips for early G Rank
These come after the steps in Starting G Rank.
Upgrade your weapons
Do not use Level 1 weapons. If your weapon type has no easy-to-make weapon (see Easy equipment on the starting page), upgrade the weapon as soon as you can, as high as you can. That gives a bigger boost to your success in quests than changing anything else.
This only means literal G Rank Lv1 weapons. Many weapons have no levels at all but are solid and match higher levels. A G Supremacy weapon is about Lv11, Burst about Lv30 and Origin about Lv50. G Exotic weapons' two upgrades are about Lv45 and Lv50. Event weapons without levels vary a lot, from Lv1 level to as good as Lv50.
Use mixed sets
Full sets of one armour are almost always unusable. G Rank is built around up to 12 active, relevant skills early on and up to 16 late in the game. The newer a monster is, the more likely it is tuned for that many skills. Make a basic intro set, upgrade a weapon until it is not terrible, then start on a proper mixed set as soon as you can (see Armour, Decorations and Skills and the Armour set builder).
Set up your Pugi
The chance that a good set does not use a cuff is tiny. Get a Pugi, an Outfit, the Departure Facility and the G Rank Cuff License as soon as you can. The guide lists costs of 30P, 30P, 20P and 60P for these. You get 60P outright from the Hunter Guide tasks before G Rank, but the Pugi Farm only moves on at midnight if you have not done it before G.
The guide recommends a Premium Outfit over a normal one, because Premium Cuffs are often set-enabling and sometimes their materials are free from events, which are no use without a Premium Outfit. Premium items are not sold here (see the note at the end of this section).
For the G Rank Pugi Cuff License, spam the Talk option with your Pugi Farm Manager. Reaching G Rank gives over 60 points as a reward, and you trigger it by talking repeatedly. If you wasted those points, you get them back over 40 days by always taking your daily points. The guide also mentions an expensive G Guide item pack (300 points) sold on the official servers, and does not recommend it.
Use Sigils
Sigils go into normal G Rank weapons in place of decorations. They can add flat true raw, true elemental and affinity, and buff weapon motions. The Hunter Guide gives you many tickets that make mostly random sigils. They are unlikely to be great but can be usable. For a few easy good ones, hunt G Rank Hypnocs once you have a basic set. The A Sigil Recipe on Hypnoc can roll up to +30 attack. You can fit three sigils in a weapon, so it adds up even with low rolls: about 40 attack across several sigils is close to, or over, a 10% power increase.
G Supremacy, Burst and Origin weapons have no sigil slots. They have normal decoration slots and give an armour skill just by using them (Varusaburosu weapons have Vampirism, which leeches health back as you attack, for example). They sound strong, but in practice good sigils on a good weapon are very likely to beat them.
Set up a Partner
See AI companions on the starting page.
G Rank quests
The quest list has Favourites, Quest History and Search tabs.
Star ratings
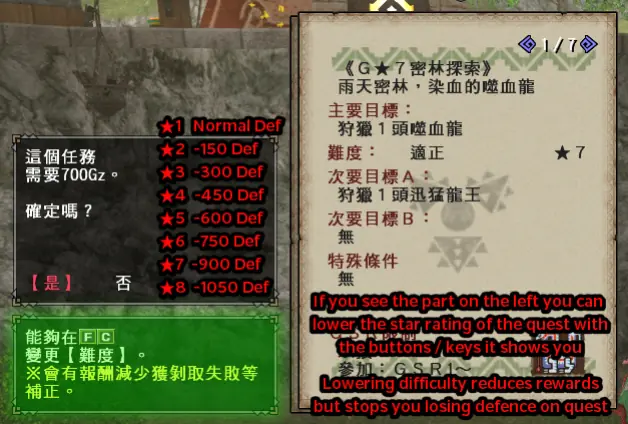
Normal Quests are much like standard hunting quests, but are sorted by star rating, not HR. The rating runs from ★1 to ★7. It decides how much Defence you lose: a flat 150 per star starting at ★2, up to 900 at ★7.
You can lower the star rating to make a quest easier, at the price of fewer rewards and carves. Press F or L1 (or C) while confirming the quest to change it. If you set a quest to GHC, the star rating decides the type of Weapon Ribbon you get. If you are GR500 or higher and do not set it to GHC, it decides the type of Merit. See Hiden.
Scheduled quests
The Scheduled Quests section holds quests that rotate on a schedule or are otherwise notable.
- Active Events are tied to events running on the server.
- Burst and Origin Quests are ★7 versions of certain Gou monsters. They give materials to upgrade Gou armour to GF (Burst) and GX (Origin).
- G Exotic Quests are ★8 versions of mainline monsters. You need GR500 to fight them at all. They give items for G Rank Exotic weapon upgrades, and for upgrading standard G Rank weapons to G Finesse if hunted at GR800. They have the highest Defence reduction in the game, and the monsters can one-shot through a Halk Shield.
- Frontier Quests are against Frontier-only monsters, monsters in unusual zones, or quests with something else special. Quests for specific G Break Jewels are usually posted here.
- Daily Quests work as at lower ranks. You can take only one daily, whatever the rank, so doing a non-G one stops you doing a G one, and the other way round.
The Superior Quests at G Rank are for GRP to rank up, or for materials for one full armour piece at GX level.
Urgent quests
After any standard G Rank quest with a proper large monster as its target, an Urgent Quest may cycle in. It is always against Mi Ru, a flying wyvern that can shape-shift. Mi Ru is optional, and with little purpose now: Mi Ru equipment is very niche from Z1 on. The fight itself is good, so try it for fun.
Burst and Origin monsters
Burst and Origin monsters are the natural evolutions of Gou monsters. You need them to upgrade Gou armour and weapons past G Supremacy. Origin monsters always have a specific 5% drop that you need for Origin upgrades: an Origin Gem (始淵的黎玉) from Gureadomosu or Toa Tesukatora, or an Origin Blood (始淵的黎血) from Yama Kurai or Voljang. Burst monsters are not much harder than ★7 monsters. Origin monsters hit hard and have large health pools.
Exotic monsters at G Rank
The G Rank versions of Exotic monsters need GR500 to take their quests. They are rated as a fixed ★8, a Defence reduction of 1,050. They are some of the hardest standard fights now. Each Exotic monster has a set of G Finesse weapons (listed in Fist's Google Doc).
G Rank weapons
Most G Rank weapons are now surpassed by Zenith weapons. You still want to push one weapon to Lv11 and later to Lv50, to unlock all content.
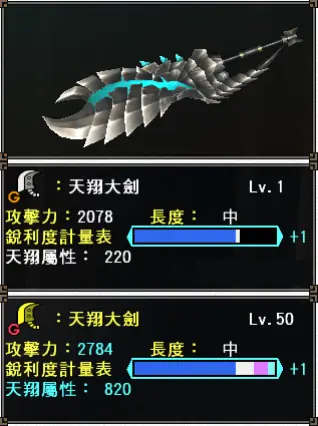
Making a G Rank weapon is the same as making a lower-rank one. You craft it from the G Rank option at the Blacksmith, it starts at Lv1 and upgrades up to Lv50.
Upgrading is where it differs. For levels 1 to 10, upgrade at the main Blacksmith in the part for G Rank weapons. Bowguns also level up (they do not just have 5 upgrades like pre-G Rank ones), and attachments fit in the same place as on normal Bowguns.
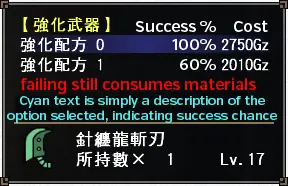
At Level 11 things change. The next time you upgrade, you see two recipes. The first uses more items and has a 100% success rate. The second uses fewer and has a 60% success rate. If you fail, all the materials for that upgrade are used up and the weapon comes back as it was. For example, if you fail the gamble upgrading a Lv24 weapon to Lv25, you lose the materials and keep the Lv24 weapon.
Sigil slots take the place of decoration slots on G Rank weapons. Weapons start with 2 and gain a third at Level 30, which needs a gem from Conquests. From Level 30 you need Conquest materials (see Conquests).
Making and using Sigils
Sigils replace gems in G Rank weapons. You craft them at the Cat Smith who makes random Gou weapons (the cat who handles Partnyaa gear). Effects range from a simple boost to a weapon's raw values, to new versions of weapon moves, to being able to wave at the Balloon endlessly. The cat's menu has: Craft Sigil, Craft Premium Sigil, Insert Sigils and Remove Sigil. Menu names may differ slightly on our server. The full list of what each sigil skill does is in Weapons and Sigils.
Making sigils
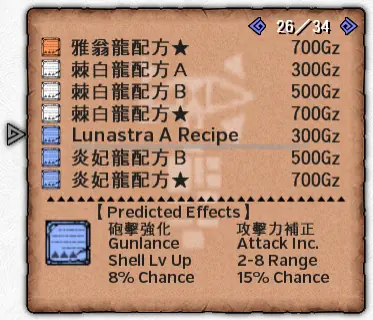
To craft a sigil you pick a recipe from a list. Each recipe is biased towards certain skills, and there are three types:
- Recipe A costs 300 Gz and uses common monster materials.
- Recipe B costs 500 Gz and uses rarer materials, such as fairly low-percentage carves or break-only items.
- Recipe ★ costs 700 Gz and uses the 1% carve of a G Rank monster.
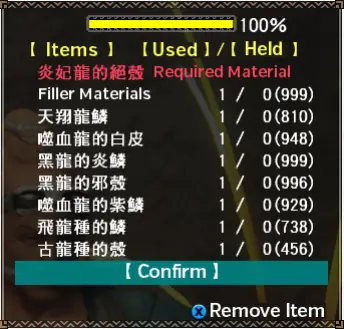
After you pick the recipe and base materials, a window lets you add 'filler' materials if you need them. They do not affect the result: they only pad the completion % at the top right up to 100%.
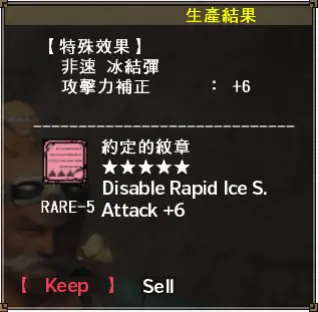
Then you craft the sigil and see the result, with a relative rarity in stars based on what you rolled. Use Insert Sigils to put one in a weapon.
Removing sigils
To remove a sigil from a weapon you need a Sigil Catalyst (紋章用觸媒). You get them by using the Gook Cooking Facilities on any G Rank materials, for 12 NP in the N Point Store, or by exchanging Tower Medals (earned in the Sky Corridor) at the Tower NPC.
Recommended recipes
Every recipe has many possible results. These are some with easy materials and a chance at skills that suit a beginner. Roll chances for all recipes are in Fist's Google Doc.
| For | Recipe | Sigils it tends to give |
|---|---|---|
| Any weapon | Hypnoc A | Attack Power |
| Any weapon | Forokururu A | Elemental Power |
| Any weapon | Zerureusu A, Gypceros A | Status Attack |
| Any weapon | Zerureusu A, Red Khezu A | Affinity |
| Gunners | Rajang A | Elder Dragon Attack |
| Gunners | Dyuragaua A | Heat Cannon Add |
| Gunners | Abiorugu A | Rapid Fire; Ultra Cluster Shot (the original lists one recipe for both) |
G Rank armour
Making and upgrading
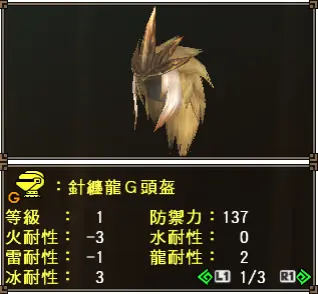
Making and upgrading G Rank armour works like lower ranks. Creating it has its own section, like the Gou armours. Crafting G armour is also the only way to get G, GF and GX gems (see G Rank decorations).
- G pieces are what all G Rank armour starts as. They can be upgraded 7 times and then into a GF piece.
- GF pieces are like G pieces but with more points in the armour skills. They also have 7 levels, and may gain decoration slots as they level.
- GX pieces are the final form. Compared with GF they usually add points in one extra skill, and again may gain decoration slots with upgrades. Upgrading to GX needs materials from the Conquests event (see below).
An example, a Hyujikiki Helmet at G, GF and GX:
| Skill | G | GF | GX |
|---|---|---|---|
| Reflect | +4 | +6 | +6 |
| Strong Attack | +4 | +6 | +6 |
| Wind Pressure | +4 | +5 | +5 |
| Expert | +4 | +5 | - |
| Issen | - | - | +5 |
| Charge Attack Up | - | - | +5 |
The points rise at GF. GX adds Charge Attack Up, and its Expert skill turns into the G Rank Issen skill.
Burst and Origin armour
Besides normal G Rank armour, you can upgrade Gou Armour (剛種防具) to G Rank levels. At GF these become Burst Species Armour (烈種防具), which always applies the Muscle armour skill's Boost effect to all eligible skills with a single piece equipped. Used well, one Burst piece can be worth 50+ skill points, before counting the decoration slots and skill points it adds itself.
Origin Armour (始種防具) is the current final form of Gou armour. All of it has points in currently relevant G Rank skills, and gives the same Muscle Boost as Burst.
G Rank armour buffs
Maximum activated skills. Three pieces of G Rank armour raise your total of armour skills to eleven (+1), and five pieces to twelve (+2). Normal G/GF/GX/GS/GP pieces all count. Gou armour upgraded to G or GF levels does not count, so you can only have 11 skills on a set with a Burst piece. The Muscle Boost from a single Burst piece can outweigh losing that skill slot.
Extra attack. At least three G Rank pieces give an extra 30 True Attack in a G Rank quest. It is a flat addition, not multiplied by skills like Adrenaline +2, but it matters if you use no multipliers.
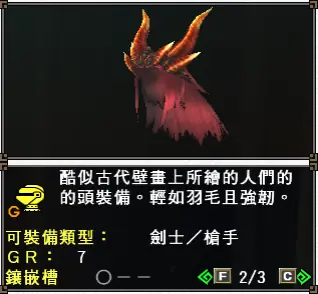
Suitability Rating buff. Each G Rank armour piece has a GR rating. The game compares it with your GR Suitability Rating (G級適正防具等級), shown on your Guild Card, and gives a buff for how far the piece's rating is below it. The buff is (GR Suitability - piece GR) x 20. For example, if your suitability is GR5 and your helmet is GR3, you gain (5-3) x 20 = 40 Defence on that helmet. Suitability grows as you rank up. GR7 armour never gets a buff, since it is always at or above the top suitability.
| Your GR | GR Suitability Rating |
|---|---|
| 1-29 | 1 |
| 30-49 | 2 |
| 50-99 | 3 |
| 100-199 | 4 |
| 200-299 | 5 |
| 300-399 | 6 |
| 400 and above | 7 |
G Rank Pugi cuffs
From GR50 you can buy a G Rank Pugi Cuff License from the Pugi Farm Manager for 60P. You need it to equip any G Pugi Cuff. You also need a Pugi and a Departure Trampoline to take the Pugi on quests. You craft G Rank cuffs at the blacksmith, like normal cuffs. The cuff types and examples are on the starting page.
G Rank cuffs are roughly of three kinds: cuffs that need Guild Treasure Hunter items, cuffs that need low-percentage and normal G Rank carves, and G Premium cuffs.
- Guild Treasure Hunter cuffs come as Base Cuffs and Combined Cuffs: a base version, and various versions made from it. For example the base Issen cuff is G Issen SA3 (G一閃鈕扣SA3), +3 Issen. Three of these, plus other items, make G Issen SA1-2 and SA4-8 cuffs. They give the same +3 Issen with other skills such as Absolute Defense, Recoil and Adaptation. Combined cuffs can use Conquest items and other Treasure Hunter items, so you may need to send the Guild's cats out many times to several places before you can craft them.
- Cuffs that need G Rank materials are made from monster materials. For example the G Absolute Defense SA1 cuff (G絕對防禦鈕扣SA1), +3 Absolute Defense and +3 Evasion, uses G Rank Diorekkusu's 1%, 3% and 50% carves.
- Premium G Cuffs are the same as non-G ones and are made with paid-for tickets on the official servers. Those tickets are not sold here.
G Rank decorations
G Break Jewels
Most G Rank weapons and armour need Jewels of various tiers. They come from breaking parts of monsters of the same star rating. A lot of gear needs several tiers to reach Lv50 or GX Lv7, and the first craft needs the Jewel of the same rank as the monster. For example Anorupatisu is ★6, and its armour needs both ★6 Jewels (仙玉) and ★5 Jewels (至玉) to be fully upgraded.
| Jewel | From breaking parts of |
|---|---|
| 優玉 (the GR1 Break Jewel) | ★1 monsters |
| 偉玉 | ★2 monsters |
| 華玉 | ★3 monsters |
| 壯玉 | ★4 monsters |
| 至玉 | ★5 monsters |
| 仙玉 | ★6 monsters |
| 絕玉 | ★7 monsters |
All monsters except Conquest monsters give these Jewels when you break their parts. Quests posted in the Scheduled Quests section often give many more Jewels than simple breaking (a break gets one roll per tail carve or part break), so do them when they are up. This is especially true of ★7 Jewels: lower-tier Jewels can be bought with GCP, N Points or Festival Points, but ★7 Jewels cannot be bought in any way, so you always have to hunt a monster for more. The third page of a quest's info shows whether it is built around break gems. Ideally you want quests with them at the top of the rewards list. The extra Jewels are usually given for part-break sub-objectives.
Standard G Rank decorations
Most G Rank decorations can be crafted straight from a few materials: usually a couple of the lower-percentage standard carves and a GHC carve. On the official servers these were nearly always sold through the Road, Festival or GCP stores. A few need you to craft and upgrade armour (White Fatalis, Keoaruboru or Hiden decorations), but they are a strict minority, and even event decorations now use only their base materials. G and GF decorations can still only be made from armour pieces, but you will rarely use them in a modern set.
The decoration crafting menu has sections to make finding things easier: Direct Crafting (直接生產精鍊珠), Show All, Monsters, Hunter Festival, Regular Event, Event and Other.
Converting armour into gems
The older way to get G Rank gems is to refine Level 7 G Rank armour into them. Each piece gives one gem and is destroyed. You will only very rarely have to do this: most gems can be made from the menus above.
- Level 7 G armour refines into one G decoration.
- Level 7 GF armour refines into one GF decoration.
- Level 7 GX armour refines into GX1 to GX5 by the piece converted: head is GX1, torso GX2, arms GX3, waist GX4, legs GX5 (the same order as the blacksmith).
A few armours have several G or GF gems, numbered the same way. For example for a GF3 decoration you convert the Level 7 GF Arms of that armour.
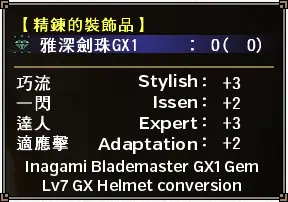
The gem's skills are roughly based on the piece being converted. The Inagami GX Blademaster Helmet gives Stylish +4, Issen +3, Expert +7, Three Worlds +4 and Adaptation +3, and its GX1 gem gives Stylish +3, Issen +2, Expert +3 and Adaptation +2.
As an example of all the gems you can make from one monster, here is G Rank Silver Rathalos armour:
| Gem | Piece needed | Total upgrades | Skills |
|---|---|---|---|
| G | Any piece | 7 levels | Edgemaster +2, Exploit Weakness +1, Expert +2 |
| GF | Any piece | 14 levels | Edgemaster +2, Exploit Weakness +2, Expert +3, Vitality +2 |
| GX1 | Helmet only | 21 levels | Edgemaster +2, Exploit Weakness +2, Expert +3, Vitality +2 |
| GX2 | Torso only | 21 levels | Edgemaster +2, Exploit Weakness +2, Expert +3, Evade Distance +2 |
| GX3 | Arms only | 21 levels | Edgemaster +2, Exploit Weakness +2, Expert +3, Rage +2 |
| GX4 | Waist only | 21 levels | Edgemaster +2, Exploit Weakness +2, Expert +3, Movement Speed +2 |
| GX5 | Legs only | 21 levels | Edgemaster +2, Exploit Weakness +2, Expert +3, Issen +2 |
Most armours follow this pattern: GF is a flat upgrade over G, and GX has the same points as GF with a couple of points in an extra skill. Some gems differ, such as G Black Fatalis, where the last two skills change per GX gem, and Gougarfs, which have a GF1 gem for helmets and a GF2 gem for all other pieces at GF level.
G Class decorations
A small number of G Rank-level decorations can be made from very few materials compared with a full standard decoration. In return you must fight the 7★ Elder Dragons or the ★8 GR500 Exotics (you can lower the Elders to 1★ for less Defence loss, but they are still tough). Two Hypnocs at 1★ give materials for two types of these decorations. They are easier to get than Gurenzeburu decorations and excellent for a Rasta once they stop being useful to you. All of these decorations mainly bridge the gap to real sets that use 15 GX decorations, and let you build Rastas without needing 15 to 18 true G Rank decorations. Likely their best use is in a Rasta, from the skill sets available on them. These are the decorations from the Bulldrome and Velocidrome quest in the Hunter Guide steps (see Starting G Rank).
| Skills | Materials |
|---|---|
| Issen +2, Three Worlds Protection +2, Rage +2 | Hypnoc Quest Jewel x15, GR1 Break Jewel x1, Everlasting Ice Cubes x1 |
| Strong Attack +2, Three Worlds Protection +2, Rage +2 | Hypnoc Quest Jewel x15, GR1 Break Jewel x1, Everlasting Ice Cubes x1 |
| Issen +2, Three Worlds Protection +2, Exploit Weakness +2 | Teostra Dragon Scale x5, Teostra Heavy Shell x5, GR1 Break Jewel x1 |
| Issen +2, Three Worlds Protection +2, Vigorous +2 | Stygian Zinogre Cortex x5, Stygian Zinogre Hardclaw x5, GR1 Break Jewel x1 |
New monster releases from Amatsu on give materials for new versions of these that are beyond the level of standard GX decorations.
Exotic equipment and G Finesse weapons
Exotic equipment
Except for Tonfas, Light Bowguns and Heavy Bowguns, all Exotic equipment must be upgraded from its HR5 Exotic version. Progress is faster than Gou: one tier at HR5 that upgrades straight into the standard G, GF and GX progression, for 4 upgrade tiers in all.
- Exotic weapons give the Quick Eating skill while equipped, and have hybrid slots that take both G Rank Sigils and Decorations. Their stats end up comparable to any G Lv50 weapon.
- Exotic armour is mostly like standard G Rank armour, and counts as such for the skill limit and raw attack increases. But wearing any one piece always gives a set skill for that set. For example any piece of Zinogre Armour gives Thunder Attack [Large]. That does not use up a skill-limit slot, so with Exotic armour you can have up to 17 skills (12 base skills plus 5 set skills from different Exotic sets).
| Exotic monster | Free skill from one piece of its armour |
|---|---|
| All Exotic weapons | Speed Eating |
| Zinogre | Thunder Attack (Large) |
| Deviljho | Starving Wolf +2 |
| Brachydios | Bomber |
| Barioth | Ice Attack (Large) |
| Uragaan (Blademaster) | Guard +2 |
| Uragaan (Gunner) | Ammo Combiner |
| Nargacuga | Evasion +2 |
| Stygian Zinogre | Dragon Attack (Large) |
| Gore Magala (Z1) | Focus +2 |
| Shagaru Magala (Z1) | Status Immunity (Myriad) |
Nargacuga armour is especially sought after for its Evasion +2.
G Finesse weapons
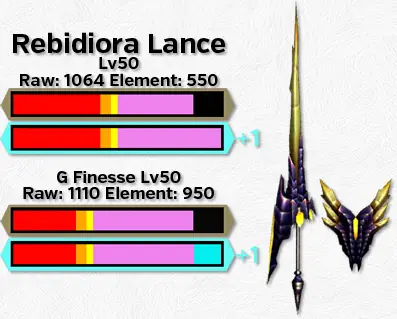
G Finesse weapons have two skills built in: Weapon Handling (武器技術, faster sheathing and unsheathing) and Movement Speed +1 (移動速度UP+1). That makes them among the best weapons of their class. They also give 20% extra CP on Caravan quests for breaking monster parts. There are two ways to get them: event quests and the Caravan Festival at GR1, or fighting Exotic monsters at GR800.
Event and Caravan weapons
Most G Finesse weapons you can make come from weekly events. The events unlock weapons for crafting. Most can be upgraded to Master's Mark or HC level and then into G Finesse with a Caravan Box.
- You get Caravan Boxes by taking part in the Caravan Festival. Completing full ★ ranks gives either a type of Named Caravan Box (商隊月箱, 商隊花箱 and so on) or a Caravan Secret Box (商隊秘箱).
- Secret Caravan Boxes are needed for some special quests that give back Named Boxes. The exact box is shown on the third page of the quest info.
- Named Caravan Boxes upgrade one particular preset weapon to G Finesse. Which weapon depends on the box, so check which one makes the weapon you want. An index of the boxes and the weapons they make is in Fist's Google Doc.
After an event weapon reaches G Finesse, it keeps upgrading using Pallone's Wisdom (熱氣球的智慧). The first 10 upgrades always cost 3 boxes. After that you can use 3 for a 100% chance, or 1 for 60%. With perfect luck that is 70 items for a full upgrade run. But since that means all 40 gambles succeed, about 100 is more realistic.
Pallone's Wisdom comes only from Points Goals in Caravan Festivals (see Regular Events: Caravan). You still need the standard Conquest materials to upgrade past Lv30.
Exotic monster upgrades
G8 added the option to upgrade existing G Lv50 weapons to G Finesse. That raises their stats and gives the same abilities as a Caravan G Finesse weapon (Weapon Handling, Movement Speed, CP bonus). Which stats rise varies, but most things can improve over the base Lv50 form: Affinity, Sharpness, Coatings, Shot Types, Shot Capacity, Recoil, Elemental and Status values.
These upgrades use items that only drop from G Rank Exotic monsters such as Zinogre and Deviljho, once you are GR800. The monster to hunt depends on the weapon, and all need 50 of an Exotic Gem, Bone or Shell (遷悠玉, 遷悠骨, 遷悠殻). So you must hunt the matching G Rank Exotic at least 50 times. With their built-in buffs, and since they beat the plain G Lv50 form, these are among the very best weapons in the game. An index of the G Rank weapons with G Finesse upgrades is in Fist's Google Doc.
Special equipment and the Shiusu set
Reduced-grind gear
This is mostly not relevant to the current meta and can be ignored, except for events that might need you to have these pieces (for example Volganos transmogs).
With G9, all non-G equipment was changed to use Armour Spheres instead of standard monster or gathering materials. Many pieces that needed annoying materials became much easier. Hiden sets did not change. Notable pieces with a lower grind:
- Surging Volganos Helmet (a gunner piece; GX Lv7 skills Steady Hand +5, Combination Expert +5, Critical Shot +3, Gentle Shot +5, Bullet Saver +4). You use a Black Shell: hunt 1 Volganos and break its head. Somewhat less grind (no normal materials, fewer dedicated quest materials).
- Boiling Red Volganos Helmet (a blademaster piece; GX Lv7 skills Sword God +7, Compensation +3, Combat Supremacy +4, Stylish +10, Issen +3). You use a Red Shell: hunt 1 Red Volganos and break its head. Somewhat less grind, the same way.
- Lost Cat "Mystery Crown" armours: from the Lost Cat between quests (see House and AI Companions). 25 Crowns per set instead of 248 per piece.
- Pugi Farm Adventure House armours: Memory Fragments from the Pugi Adventure House (see House and AI Companions). 30 in total for all sets instead of 225 per piece.
- The Rath subspecies armours: a grind cut from 80 books to 30. The rest of this table row is unreadable in the original.
Of these, the Volganos Helmet is especially notable, with very good points for strong G Rank sets.
Shiusu gathering grind
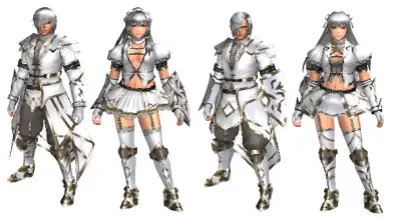
The Shiusu Set has excellent points in the core skills used at endgame from G9. You first craft it just by delivering gathered materials, so it is worth working on in advance. The gathering takes very long: you need 20 of each coin, and each coin needs 50 of 3 item types delivered. It is a long-term project, so start early if you want to use any of the pieces. (The guide linked a pastebin and an image listing all the materials.)
| Piece | Blademaster skill points | Gunner skill points |
|---|---|---|
| Head | Sword God +5, Critical Conversion +4, Strong Attack +5, Combat Supremacy +4, Drawing Arts +4 | Bullet Saver +5, Critical Conversion +4, Strong Attack +5, Elemental Attack +6, Combination Expert +5 |
| Chest | Sword God +5, Critical Conversion +4, Strong Attack +5, Stylish +5, Stylish Assault +5 | Bullet Saver +5, Critical Conversion +4, Strong Attack +5, Evasion +5, Stylish Assault +5 |
| Arms | Sword God +5, Critical Conversion +4, Strong Attack +5, Status Assault +5, Drug Knowledge +5 | Bullet Saver +5, Critical Conversion +4, Strong Attack +5, Auto-Reload +5, Steady Hand +5 |
| Waist | Sword God +5, Critical Conversion +4, Strong Attack +5, Assistance +6, Encourage +5 | Bullet Saver +5, Critical Conversion +4, Strong Attack +5, Assistance +6, Steady Hand +5 |
| Legs | Sword God +5, Critical Conversion +4, Strong Attack +5, Focus +6, Charge Attack Up +5 | Bullet Saver +5, Critical Conversion +4, Strong Attack +5, Combat Supremacy +4, Mounting +5 |
Conquests
Ultimate Conquests
Conquests are tiered quests that give materials to upgrade G Rank weapons and armour. They come at four levels (1, 200, 1000 and 9999), each with a bigger reward pool and more items. Every item you need to upgrade armour and weapons comes from Lv200. To see everything a monster can give, do Lv1000 at least once. Extreme Conquests are one of the four cycling events and are not optional if you want to play G Rank properly.
The Lv9999 Conquests are some of the tankiest content in the game. Expect to be one-shot by everything and for the quests to take a long time. They give fixed G1% carves from the target monsters, and a transmog of the monster's armour on the first clear. There are four Ultimate Conquest monsters: Black Fatalis, Shantien, Disufiroa and Crimson Fatalis.
| Item | Use |
|---|---|
| Extreme Conquest Proof (極征貢獻證) | Upgrading G weapons (Lv30/39/45), GX armour, G Pugi Cuffs. |
| Radiant Armour Stone (輝累石) | GX armour upgrades. |
| Kimono Armour Stone (絢累石) | GX armour upgrades. |
| Green Valour Stone (碧武玉) | Lv31 / Lv37 weapon upgrades. |
| Blue Valour Stone (蒼武玉) | Lv40 / Lv44 G weapon upgrades. |
| Red Valour Stone (紅武玉) | Lv46 / Lv49 G weapon upgrades. |
| Yellow Valour Stone (黃武玉) | Lv50 weapon upgrade. |
| Suppression Ball (鎮定球) | Used in a Conquest, it slightly weakens the target monster. |
Shiten Conquests
Heavenly Conquests (Shiten) are Conquests already set to Level 9999 that reward very good Sigils for G Rank weapons. They cycle in alongside Ultimate Conquests. Usually one monster is available, and rarely two.
- To take them you must have made at least one Lv50 G Rank weapon.
- They turn off Halk Pots (including the Premium Course buff) and Legendary Rastas.
- The time limit is 20 minutes, and the monsters have the maximum Defence they can have.
You will probably need a party of four active players with high-level sets. Or, to solo, use Hiden skills and Adrenaline. Soloing is entirely possible but needs a solid set and good knowledge of the monster. It is possible to solo both monsters with every weapon in the game, and good times for the stronger weapons are well under 5 minutes.
There are Heavenly Conquests for Disufiroa and Unknown. Both are quite different from their normal Conquest and Supremacy versions. Unknown has about 140,000 Effective Health, and Disufiroa about 230,000.
| Item | What it does | How you get it |
|---|---|---|
| Shiten Key (至天之鑰) | Makes powerful general-purpose sigils and sigils for Hammer, SnS, Gunlance, Bow and HBG. | Beat Disufiroa. 1x fixed for the clear, 1x fixed for no carts, 1% chance of 1x extra per reward slot. |
| Shiten Latch (至天之閂) | Makes powerful general-purpose sigils and sigils for GS, DS, LS, HH, Lance and LBG. | Beat Unknown (Black Rathian). Same rewards as the Key. |
| Shiten Lock (至天之鎖) | Makes powerful general-purpose sigils with slightly higher stat ranges than other Shiten sigils. | 1x fixed for beating either monster in under 10 minutes. |
You can use Lucky Charms to get extra Shiten rewards.
Advanced Shiten
Advanced Shiten quests are much the same, with far higher health and attack. The monsters seem to have about 300% of the HP of a standard Shiten monster: Unknown about 420,000 and Disufiroa almost 690,000.
| Item | What it does | How you get it |
|---|---|---|
| Shiten Black Key (至天之黑鑰) | Makes powerful Affinity and Attack sigils. | Beat Advanced Unknown. 2x fixed for the clear, 1x fixed for no carts, 1% chance of 2x extra per reward slot. |
| Shiten Opposition Key (至天之對鑰) | Makes powerful Elemental and Attack sigils. | Beat Advanced Disufiroa. Same rewards as the Black Key. |
You can use Lucky Charms to get extra Shiten rewards here too.
The Diva
Diva quests
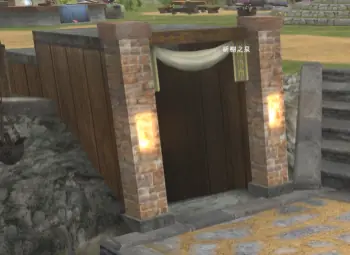
You find the Diva in a side area of the main town, on the steps that lead to the square. Her quest line gives materials for Diva-only equipment, which is extremely good. English objectives and rewards for each chapter are in Fist's Google Doc. You may need to talk to more people than the document lists.
Unlocking Tonfa. Since the 10th Anniversary Update you no longer need to talk to the Diva to unlock Tonfa. You get them together with Extreme Styles.
Diva Song buff

After you finish the Third Chapter of the Diva Quests in full, you can give the Diva gifts and have her sing. Gifts raise her hidden Affection value. The higher it is, the better the buffs of the Diva Song. Making her sing costs a Diva Song Gem and gives buffs for about an hour and a half. The Song gives:
- Extra Souls during the Hunter Festival (up to +2)
- Extra GRP and GSRP (up to 1.25x)
- Divine Protection
The buff starts weak, so it is well worth maxing. The maximum Affection is 999, and the full buff comes at 990. The easy way: buy lots of Fluffy Cakes at the GCP store. Buy 87 and give her all of them. The first cake you give also gives you 5 Warm Honey Tea from the Hunter Guide Challenge. Give those too, to reach max Affection.
Fully completing each chapter gives 10 Affection. The minimum of 87 cakes comes from the three compulsory chapters and the five free Warm Honey Teas. It drops by 1 cake for each further chapter you complete, down to 75 with all chapters cleared. You never need to give items again: the 87 cakes are a one-off.
Starting the buff costs 1 Diva Song Gem to make the Diva perform. You can buy Gems with GCP or Tower Medals. On the official servers the performances, and so the buffs, were free for players on the VIP course; whether that applies here was not checked.
| Item | Purpose | Cost or source |
|---|---|---|
| Diva Song Gem (天籟的祈珠) | Song performances | 120 GCP at the GCP Store, or 30 Medals at the Tower Store |
| Fluffy Cake (鬆軟的蛋糕) | Diva Affection +10 | 100 GCP at the GCP Store |
| Warm Honey Tea (暖暖的蜂蜜茶) | Diva Affection +20 | 20 Medals at the Tower Store, or a Hunter Guide reward |
Diva weapons
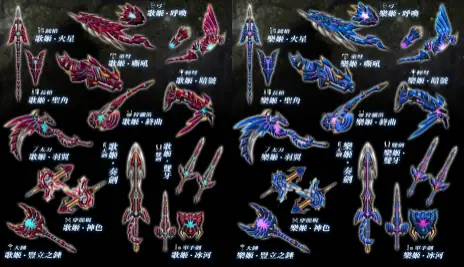
The Diva has several weapons tied to her quest line. Completing all Diva Quests gives you the materials to make 4 of the first series and 2 of the second. These weapons are very good overall, and all upgrade to G Finesse level. At that point they can eclipse the Raviente weapons, which are a 250-hour grind.
Proper G Rank sets and max rank benefits
Your first proper 11 or 12 skill set is one of the biggest buffs you get in Frontier, and makes a world of difference. The guide's example sets are things to work towards or use as templates. For Blademasters, any combination of pieces that gives the skills you want is fine. For Gunners, always have at least one Origin or Zenith armour piece in the set. It is a huge DPS buff when you are properly spaced, for every ranged weapon (see Gunner sets). If you cannot space properly, you should not be gunning, so these pieces are close to compulsory.
The guide's sample sets are quite old: they still work up to the content they were made for, but you can probably build something better more easily now. Its sets were Z1 sets for any weapon except Hunting Horn, a Z1 Hunting Horn set (core skills, plus Encourage +2 for Evasion +2 and Horn Maestro for longer songs), a Z1 Generic Bowgun set and a Z1 Generic Bow set. Bows always want Auto-Reload, which is awful on bowguns, so never use bow sets with bowguns. Its links for these were pastebins that we do not copy. Use the Armour set builder and Armour, Decorations and Skills instead.
Zenith sets
The guide's author does not own any Zenith pieces, but notes they are hugely enabling for every weapon type. You can strengthen activated skills, go beyond the usual 12-skill limit, and go beyond 11 skills while using an Origin piece for gunning. ZX pieces can stay at Level 1 with no real downside, which cuts the grind a lot compared with level 7. They need you to be at GR800 and to have a set that can kill GR800 monsters, which are much tankier than any other standard monster and fairly harsh. See Zenith.
Max rank benefits
When you are both GSR999 and GR899, you start earning a new type of Hunting Points (功獵點數). They are used only for a randomised exchange on the Guild Master NPC, under Hunting Menu > Hunting Points Exchange (功獵選單 > 功獵點數交換), with two options: Lottery Draw (白色抽獎) and Cheque Exchange (波爾多卡牌交換).
- The Lottery Draw draws five transmog creation items at a time from a random pool. There is nothing deterministic: you are at the mercy of luck. The pool includes all the standard White Hiden armours and armours such as Garuga. A few armours not yet released for transmog (any with SP in the name) also have tickets, which you must wait to redeem.
- If you draw a duplicate, the Cheque Exchange turns it into a stack of 5x 50k Gzeny tickets. That is not much, but there is no other use for duplicate transmog items at present.
Hiden decorations
Basics
Hiden Decorations are per-weapon decorations that give one weapon type's Hiden skill (for example Great Sword Tech). You get them by refining Hiden armour, the same way as any other GX decoration. Hiden skills always give at least 20% more attack, plus extra effects for the weapon. For the true endgame, such as Berserk Raviente or solo GR800 Zeniths, it is practically compulsory, and dedicated players often have several sets of decorations. If you are a casual player or always play in groups, Hiden can be seen as optional.
The armour you upgrade into Hiden decorations has its own section. When you create it you can make White (which upgrades into White or Black) or Red (which upgrades into Red or Blue) pieces. All pieces convert into the same final decorations: a full Black set, or 5 maxed Black Helmets, would give identical decorations. The only difference is the materials used for upgrading each piece, so use an index of the items needed to avoid farming more G1% or GHC carves than you need (Fist's Hiden items list).
There are four colours of Hiden decoration for each weapon: White, Black, Red and Blue. Each gives different extra skill points by colour, and comes from refining its matching armour type.
Souls, Ribbons and Merits needed
Hiden armour needs several thousand materials, mostly Weapon Souls, Ribbons and Merits. They come from fighting monsters, in or out of HC mode, at the right ranks. The totals per set are in the table on Hunter Rank and Style Rank (Souls 425 Low, 975 Mid, 1,375 High, 425 Top; Ribbons 500 Low, 825 Mid, 825 High; Merits 250 Low, 300 Mid, 250 High).
You can raise the number you get per quest by matching the monsters posted on the Bounty Board next to the Blacksmith's entrance. A monster with an active Bounty gives 3 Souls or Ribbons instead of 1 while it is targeted, and 8 on premium.
There is no magic way to get more. The guide mentions paid Hiden Stones, each worth one piece's worth of Souls. They give no HC carves and no G Rank materials. It does not recommend them (see All-in options below).
Choosing decorations
For the best return, hold off committing to one set without research. Plan a set for after your grind. The four coloured sets convert into different gem types: White Tiger (白虎), Military Black (玄武), Crimson Bird (朱雀) and Azure Dragon (青龍).
There are two kinds of Hiden decoration: standard Hiden and True Hiden. True Hiden gems are upgraded versions of the originals that carry G Rank skill points. Making one needs 1 of each of the 4 colours of normal Hiden decoration, so grinding a full set is the same as making four full sets of Hiden decorations.
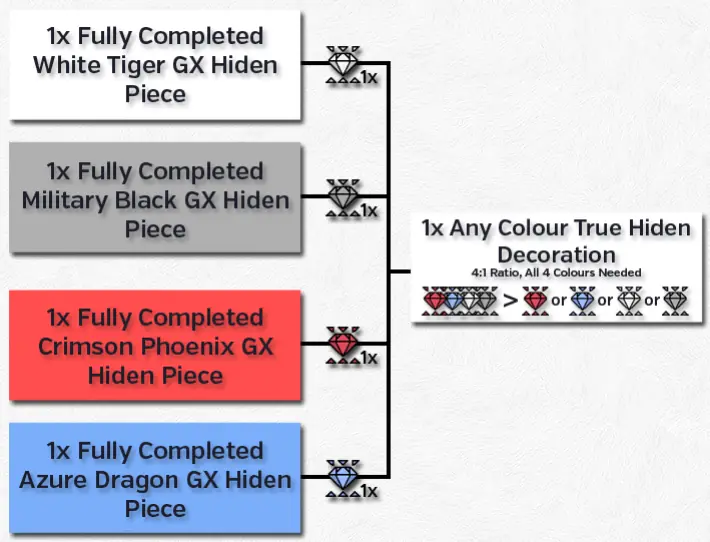
True Hiden gems are clearly better than standard ones, but they should not be a priority. They are good for absolute optimisation, but you still need a full Hiden set to grind them out with.
Z1 also adds extra skill slots, so the relevant skills on your Hiden decorations are worth much more: a set of decorations can work as 2 fixed skills on any set. If you use Determination, its decorations take up an extra 5 slots, so you only have 5 slots to work with on a Hiden plus Determination set.
Choose by the sets you plan to build. As an example, the guide's author gives these thoughts on Sword and Shield decorations (SnS Tech 6 points plus a second skill). The original's table headings were lost, so which table is standard and which is True Hiden is read from the skills.
| Colour | SnS Tech | Second skill (standard Hiden) | The guide's verdict |
|---|---|---|---|
| White Tiger | 6 | Expert 2 | Only relevant without Determination; a brick gem with that skill. Flash Conversion is also often used instead of Expert. |
| Military Black | 6 | Fencing 2 | Brick gem. |
| Crimson Bird | 6 | Elemental Attack 2 | Excellent choice. Going for 5 red decorations and 1 extra of another colour, to avoid a forced activation, is wise. |
| Azure Dragon | 6 | Speed Setup 2 | Brick gem with a niche use as a support role. |
| Colour | SnS Tech | Second skill (True Hiden) | The guide's verdict |
|---|---|---|---|
| White Tiger | 6 | Strong Attack 3 | Excellent choice; the meta since Z1 is firmly towards Strong Attack. |
| Military Black | 6 | Issen 2 | Only relevant without Determination; a brick gem with that skill. |
| Crimson Bird | 6 | Stylish Assault 3 | Excellent choice; the skill is always desirable. |
| Azure Dragon | 6 | Thunder Clad 2 | Excellent choice; the skill is always desirable. |
General notes
- For most weapons, avoid Hiden gems that give a skill outright. Many skills can push more wanted skills out of priority, or overlap. Several skills can give Affinity or Fencing +2, for example, so you do not want to reach the points that trigger those on their own.
- Some weapons, such as Hammer, Great Sword, SnS or Bow, will nearly always want one specific skill (Focus, Elemental Attack, Auto-Reload). For them a variety of gems, or True Hiden at all, matters less.
- Elemental Attack is quite desirable on SnS, but it is not a must-have, unlike Focus on a Great Sword. If you make SnS decorations, make 6 rather than 5 if you want to min-max.
- For anything with no de facto skill, if you are planning ahead, get at least 1 of each of the four colours. That lets you make a True Hiden decoration at once and avoids most problems with fixed skills bricking sets. A 3 and 2 split, or similar, also helps avoid unwanted skills.
- If you make True Hiden decorations and ever want Determination, avoid Issen or Sniping on them, since both are part of that compound skill. Sniping is not a brick skill, because the auto-reload part still applies. Issen is completely bricked by Determination and useless with it.
The full list of Hiden gems and their skill points is in Fist's Google Doc. Hiden skills per weapon are on Hunter Rank and Style Rank.
Hiden grind guide
Red Chests, Black Waists and White Arms all need Conquest monster G1% carves. If you already have the materials this is no problem, but those Conquests are time-slotted and can be down for weeks at a time, which makes them much worse to grind than the other G1% carves. Red Chests need a Disufiroa G1%, Black Waists a Black Fatalis G1%, and White Arms a Shantien G1%.
Preparation
The Hiden grind is very drawn out: at best it takes about 20 hours per set. So get these things in place first.
- A proper set. A proper 12-skill set without Hiden greatly raises how fast you kill monsters. A bad set can easily double the time per quest, which can waste tens of hours.
- An Impatience Charm. It can cut the wait after a quest by up to 40 seconds. If the grind baseline is 775 quests, that saves over 8 hours at once, maybe enough to skip an extra day of premium. See Special Charms in Items and Materials.
- A shopping list. Souls, Ribbons and Merits are only one part of the grind: G1%, GHC and HC carves are a big part too. Work out in advance what you have and what you need. If you use the Festival Point store to buy GHCs or HCs ahead of time, you finish sooner. The G upgrades on a full Hiden need about 25 G1%s, 45 GHCs and 25 HCs. Working on HCs and 1%s before you start avoids downtime. Use the basic Hiden materials list, or the guide's author's slightly nicer Google sheet (make a copy, as only the copy can be saved). Fist's Hiden tracker links all the rare carves and works out the Souls, Ribbons and Merits you have and the quests left.
- Premium. The guide's author recommends premium for this grind, which is rare for them. Without premium a single Hiden set takes 1,609 quests; with it only 775. That is 834 fewer, enough for a second Hiden set, and assumes the same quest times either way. Every account here has the Premium course (not tested in game).
- A Gook. A Gook can cook spare HC and GHC carves into extra Souls or Ribbons. That matters most for the Soul grind, where on premium you often get HC carves (10% rate, and Rastas and the Legendary Pugi's carve slots add 8 more rolls). Carves cook into up to 5x Weapon Souls or up to 3x Weapon Ribbons. You can also cook Conquest Gems into Merits at 1:1. That is very expensive until you are firmly late-game: at 8 Merits per quest it is never a good choice unless you are swimming in gems. Even if you do not use the Gook on your first Hiden, it can instantly give a lot of Souls and Ribbons to kick-start your second. Any Raw Soul Stones you got from lottery coins can be cooked for 5 of the Soul rank they belong to.
Daily quests
There are always daily quests for each weapon type that give Weapon Souls: 5 Low, 10 Mid, 15 High and 10 Top Souls. That is not much, but it equals one piece every 19 days, which adds up over time. Sometimes there are also dailies for Ribbons and Merits. The Ribbon daily gives 6 Low, 10 Mid and 10 High Ribbons. The Merit daily gives 5 Low, 10 Mid and 5 High Merits. The Ribbon daily is better, but both are only worth about 3 quests on premium. Even so they equal one piece every 10 days. This makes them very good on the rare days when 5 dailies are given out.
What to grind
Some monsters are far better than others for Ribbons, Souls and Merits. Grind the ones you reach quickest and kill fastest. The guide's table lists many for each Soul tier, Ribbon tier and Merit tier, with the number of Souls or Ribbons a cooked HC or GHC carve gives. It was too scrambled to rebuild tier by tier, so only these clear examples are kept.
- Desert Pink Rathian: always spawns in Area 5 and is reached quickly using the well.
- Black Gravios: spawns in Area 4, connected to the Base Camp.
- Black Diablos: can be met in Area 7, straight after dropping down the well.
- Kirin and Akantor: have a quest on the Battlefield, so they are reachable immediately.
- Yian Garuga: has an arena quest.
- White Espinas: always on the Great Forest Peak (Kuarusepusu has a quest there too).
- Orange Espinas: in the Tower you always spawn right in front of its entrance.
- Silver Rathalos and Gold Rathian: each spawns in its own quick-to-reach arena.
- Akura Vashimu, Gogomoa, Yian Kut-Ku, Inagami, Akura Jebia and others: immediately outside the Base Camp.
- Hypnoc and Gypceros: fast to reach and die quickly.
Matching your grind (Souls, Ribbons or Merits) to the Guild Priority Targets can greatly raise your rate. Basically only grind something else if it has a GHC or G1% you want, or if the Priority monsters are especially poor. The guide's schedule only held for the official servers' rotation.
Distractions and alternatives
The Hiden grind is a literal grind: you kill the same few monsters again and again. Have something to keep you sane, such as Netflix, audiobooks or music.
The guide notes that on the official servers you could buy HC and GHC carves from the Road store and use the Road in place of the grind. It said this was probably strictly worse than grinding on Premium, but you can do it passively for extra decorations. These were the official Road store's prices in points:
| Item | 1x (one decoration's worth) | 5x (five decorations' worth) |
|---|---|---|
| Low Souls | 8,500 | 42,500 |
| Mid Souls | 39,000 | 195,000 |
| High Souls | 82,500 | 412,500 |
| Top Souls | 25,500 | 127,500 |
| Souls completion | 155,500 | 777,500 |
| Low Ribbons | 68,000 | 334,000 |
| Mid Ribbons | 110,000 | 550,000 |
| High Ribbons | 110,000 | 550,000 |
| Ribbons completion | 288,000 | 1,434,000 |
| Full completion | 443,500 | 2,211,500 |
| Carves for armour upgrades (G1%s, GHCs, HCs) | 48,000 | 240,000 |
The Low Ribbons 5x figure is as printed in the guide (5 x 68,000 would be 340,000).
For the best value, buy the HCs and GHCs that cook into the most (Souls x5, Ribbons x3). Anything below these cookable totals is a waste of time and effort.
| Item | Cooks into |
|---|---|
| Daora Desolation Shell (HR) | Low Souls x5 |
| Akantor Extreme Scale (HR) | Mid Souls x5 |
| Akantor Corruption Claw (HR) | High Souls x5 |
| Dyura Ice Shell (HR) | Top Souls x5 |
| Monoblos Brave Shell (G Rank) | Low Ribbons x3 |
| Malleable Hide, Red Khezu (G Rank) | Mid Ribbons x3 |
| Dora Perish Claw (G Rank) | High Ribbons x3 |
The guide says that on the official Road, 50 floors gave about 100,000 points, so about four or five runs finish one decoration.
Hiden conversion
Since Z2.1 you can convert Souls, Ribbons or Merits into cookable stones at the Combiner NPC (魂・綬・勳交換 / Hiden Exchange). The rate is 10:5, and the results must be Gook-cooked in your house. Since that is really 2:1, only do it with materials you have a great excess of on one weapon class.
All-in options: Hiden Stones and character slots
Hiden Stones are premium items that give a lot of Souls, Ribbons or Merits. There is one stone per type, and each gives exactly one piece's worth of its items.
| Stone | Gives |
|---|---|
| Soul Stone (秘傳魂的結晶) | 85 Low, 195 Mid, 275 High, 85 Top Souls |
| Ribbon Stone (秘傳綬的結晶) | 100 Low, 165 Mid, 165 High Ribbons |
| Merit Stone (秘傳勳的結晶) | 50 Low, 60 Mid, 50 High Merits |
You cash in a stone by taking a map delivery quest or by delivering the stone itself. These quests are always solo and have things such as Lucky Charms disabled. On the official servers the stones were effectively lottery only: you gambled with lottery coins, or spent coins to buy a Hiden Soul Stone outright. The lottery with Hiden Stones was typically a 3-step Step Up lottery: the first step gives 1 guaranteed Soul Stone, the second a Ribbon Stone and the third a Merit Stone. It cost 30 coins for 11 rolls, which have a chance of giving more Stones. So each fully completed Hiden armour piece costs 90 coins, a lot of real money on the official servers. Rewards are 1x or 5x Hiden Stones, at about 0.09% per roll for 5x and about 0.36% for single stones, so most likely you get none. Other prizes include stacks of Raw Soul Stones (up to 20), which are much more common (about 48% to get at least 5, worth 25 Souls, per roll) and cook in the Gook into 5 Souls of a type. Standard Hiden Soul Stones were also sold on the Lottery Coin store for 20 coins each, which may beat gambling. You could also buy 19 dailies over 4 days with single coins for the same number of Weapon Souls, but you must hunt for them.
Character slots. You can have up to three characters on a Frontier account. Each can take a daily quest, which lets you do the Dyuragaua daily that gives 5 Low, 10 Mid, 15 High and 10 Top Souls. With one character that is the equivalent of a Hiden stone every 19 days; with two it becomes every 10 days, and with three every 7 days. The guide says extra characters cost 100 points each, far cheaper than lottery coins, but you must log into several characters every day. Slots never go away, so you can use them forever on all relevant dailies. On rare days with 5 dailies, three characters give 15 dailies a day: enough to finish one weapon's Soul grind for five pieces. Extra character slots cost nothing here, and some accounts have five characters; the client's maximum was not checked.
Berserk Raviente
Berserk Raviente is the End of the Endgame. Do not try it until you have invested seriously in your character. The guide says not to even think about starting the Raviente grind until you have several Hiden set-ups and a good number of fully upgraded G Rank weapons. An entry-level amount of Raviente is still around 250 hours for a weapon and a set of decorations. See Raviente for how it works, and !ravi in the server chat commands (!help lists them).
Written from the Monster Hunter Frontier guide by Fist (as saved in January 2022). That guide describes Capcom's old official servers; we reworded it, laid it out for Hunsterverse and added the "On Hunsterverse" notes (all of them: Hunsterverse vs the old servers). The pictures are from the original guide.