
Frontier guide · Progression · 13 of 18
Starting G Rank
What to do the moment you reach G Rank: claim your Style Ranks, follow the Hunter Navigation tasks to your first G sets and weapons, and set up Pugi, Rasta, Partner and Gou gear.
First steps in G Rank
The HR7 Urgent is Shantien. The quest takes place on an airship and is straightforward. The gong makes Shantien collapse unless it is doing certain actions, and you can pick up ballista binder ammo from the box on the ground to reel it in when it flies off the ship.
When you reach G Rank, do these things at once.
- Claim every GSR and every Extreme Style. There is no reason to wait. Walk up to the Guild Master and she moves any weapon you have not yet claimed to GSR and unlocks all the Extreme Styles.
- Switch every weapon to Extreme Style. It is the best style for all weapons at all times, except for niche or gimmick use.
- Check the Purple Entrance NPC. She has something new now that you are G Rank. There is no fixed set of rewards, but you can get useful materials and sometimes weapons.
- Start the Hunter Navigation tasks (below).
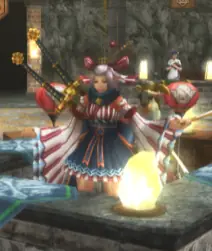
To turn on Extreme Style, visit the smith and open the Equipment Box, then choose Change Equipment > Equip Book of Secrets > (weapon) > Equip Book of Secrets > Style > Extreme Style. Do this for every weapon type in one go so you always have the most flexible movesets. Menu names may differ slightly on our server. More on styles is in Style Rank.
Hunter Navigation tasks
The Hunter Navigation tasks are the best start to G Rank. They teach G Rank and mechanics that HR never taught properly, and their rewards and materials really help you find your feet.
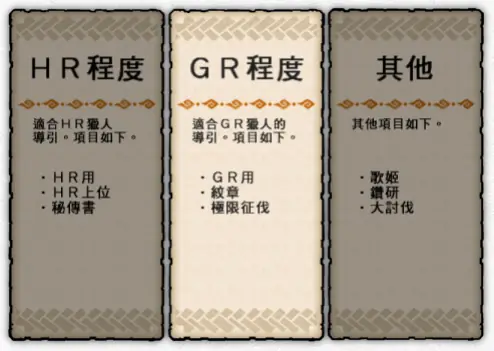
Open the Hunter Guide from its menu option (獵人導引), with Shift+C or with R1+R2. A window opens where you choose HR, GR or Other tasks. When you first reach G Rank you unlock the first set of GR tasks, plus the Sigil and Conquest tasks. The most important are the ones in the GR Tasks section (GR用), which cover your first steps.
For any task with a quest, select the task and confirm. The arrow icon disappears and the task is tracked. Then talk to the G Rank Quest NPC and the right quests appear.
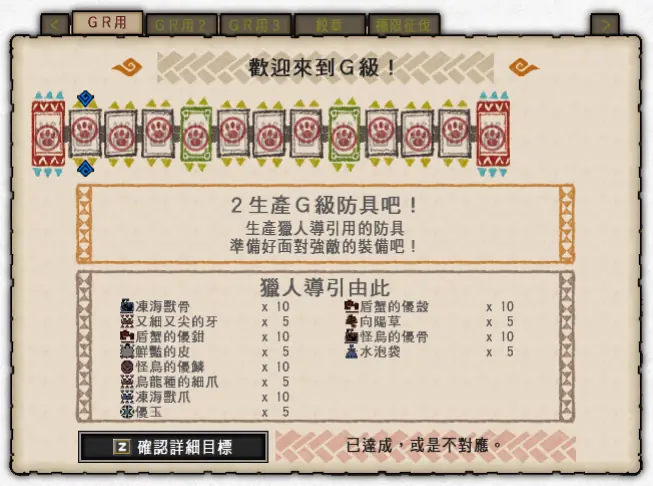
G Rank Series 1
Tasks 1 to 3: the Newbie set
Task 1. Open the Hunter Guide and press X/Square on a pad (XB360) or Z on the keyboard to see the details. The rewards come at once, and you claim them by confirming. They are Cheques worth 1,000 G Zeny each (they look like purple tickets). Sell them right away with Sell Items at your box or a shop NPC. All G Rank equipment and content runs on GZeny. It works like Zeny, but you start with only what you are given.
Task 2 is to craft the G Newbie Set (入門G) and equip it. Turn on tracking and talk to the G Rank Quest NPC. Each run of the quest gives you all the materials to make one piece and push it to G Lv7. Run the quest five times, then upgrade and equip the pieces. Making G armour uses a new option, but upgrading uses the same option for every armour type:
- Armours > Create G Armour (防具加工 > 生產G級防具)
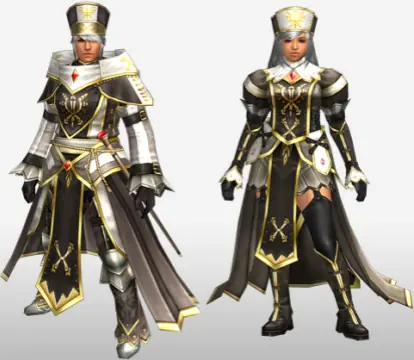
Task 3 is to upgrade the pieces to GF Lv7. Like the last task, track it and run the quest it pulls up five times on the G Rank NPC. Use Armours > Upgrade Armour (強化防具). Completing Task 3 gives 5 Conquest Proofs. You can use them, with the quest "First G Armour: Intro GX" (最初的G級防具・入門GX) in G★1, to max out the Newbie set.
Tasks 4 to 9: Gurenzeburu decorations
Task 4 only asks you to view the description (Z or X). The second G option at the Blacksmith turns any armour that can become a decoration into one once it is at Lv7 of any tier (G Lv7, GF Lv7 or GX Lv7). You will do this in a later step.
Task 5 is to hunt the G★7 Gurenzeburu, the same monster as your HR2 Key Quest. G Rank hunts reduce your Defence: you lose 150 for every star above ★1. A ★7 quest is 6 stars above ★1, so you lose 900 Defence (6 x 150). That can easily leave you on 0 Defence.
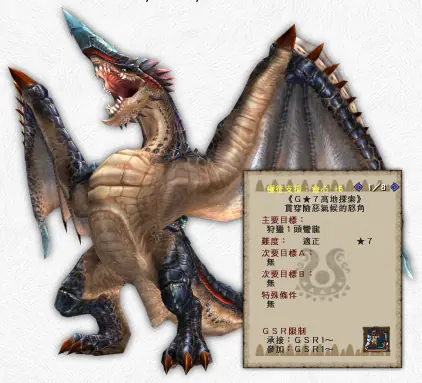
The newbie servers recently got a fixed ★1 version of this quest. It works fine and you do not need to lower its difficulty.
To counter the Defence loss, lower the difficulty rating of your first Gurenzeburu. On the screen that asks you to confirm spending GZeny on the quest, press F on the keyboard or L1 on a pad. Lowering the star rating sharply reduces your rewards and can leave carves with nothing in them. Only use it for quests you need for Hunter Guide tasks or the Diva Quests storyline.
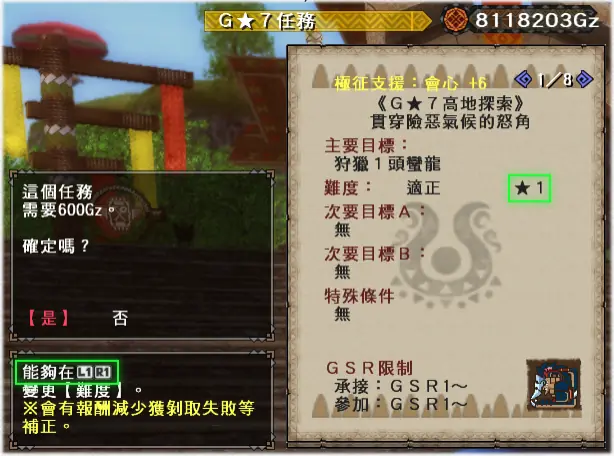
Even with the difficulty lowered, Gurenzeburu is strong and hits hard. Do not be discouraged if you cart. You can also use one of the Halk Pots (元氣之源) that the first task gave you: it cuts all damage by 70%.
When you slay it, claim Task 5's rewards: everything you need to make a Gurenzeburu chest piece.
Task 6 is making the chest piece, at the Blacksmith under the G Chests option. Armour sorts by rating and type, so his armour is near the last page. Make a Blademaster chest even if you are a gunner. You will not wear it: you will turn it into a decoration.
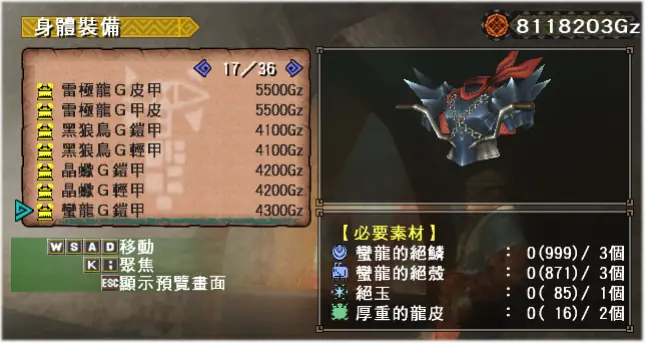
Do NOT upgrade the Guren chest to GX Lv1 or higher! You would be stuck and have to waste time on arena quests or N Points, which are scarce.
Task 7 is upgrading that piece to GF Level 7. Task 8 is converting it (at GF Level 7) into a decoration, with the option in the Armour section that has a G in it and is not crafting: Armours > Convert G Armour (精鍊G級防具).
When all of that is done and claimed, you have 10 Gurenzeburu GF Blademaster decorations. Slot them into your starter set and you complete Task 9, which gives more Gz cheques and the materials to make basic G Rank weapons.
This is one of the very few times you convert armour. Every standard monster's armour has GX decorations you can craft directly, with only White Fatalis, Keoaruboru and Raviente as exceptions. So you do not need to max armour for most decorations, which makes full sets much faster than they look.
Tasks 10 to 13: a weapon and sigils
G Rank weapons use levels: each has 50, and the stats climb gradually to the maximum at G Lv50. Task 10 is to craft the weapon of your choice. Task 11 is to read the description, which tells you about levelling past Level 11 (see G Rank weapons). The menu options are Weapons > Create G Weapon and Weapons > Upgrade G Weapon. You must identify and gather the materials for the weapon's first tier yourself: see Items and Materials.
Task 12 is making a Sigil. Sigils are like decorations but fit only the triangular slots found in G Rank weapons. They can add to your weapon's Raw, Element or Affinity, or have odd effects such as gestures giving store discounts or making your Halk more likely to drop things. The full list is under Sigil skills on the Weapons page.
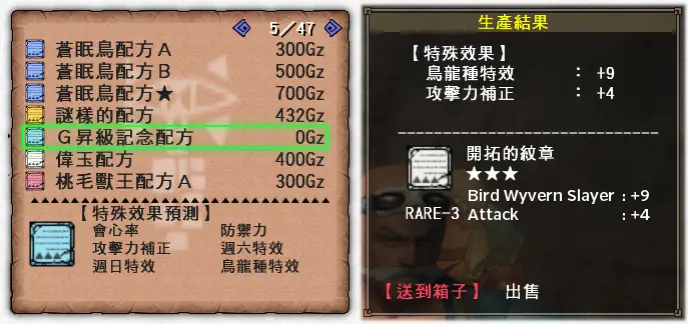
To make one, talk to the cat at the Blacksmith who handles Partnyaa gear, choose Sigils (紋章), then Create Sigils (生產紋章). That opens a recipe list. Around the 5th page you find "G Level-up Commemorative Recipe" (G昇級記念配方). Choose it and spam the create option to make some basic Sigils. The most useful skills to look for are Attack (攻擊力補正), Elemental (屬性值) and Affinity (會心率). To put them in a weapon, choose Insert Sigils (烙印紋章). It is probably best to wait until you have made the free weapons from G Rank Series 2, which will likely be better than anything you have now.
Task 13 unlocks once you have made a Sigil. With that, every task in the GR Tasks section is done and the GR 2 tasks unlock.
The Newbie set's skills
The Newbie set gives the same skills at GF Lv7 or GX Lv7. These are the final skills with 10 Gurenzeburu GF decorations in it:
| Set | Skills |
|---|---|
| Blademaster GF/GX | Strong Attack +3, Issen +1, Rage +2, Sharpness +1, Expert +3, Super High Grade Earplugs, Dragon Wind Breaker, Evasion +2 |
| Gunner GF/GX | Strong Attack +3, Issen +1, Steady Hand, Rage +2, Expert +3, Reload +3, Super High Grade Earplugs, Evasion +2 |
You will not use this set for long: replace it with the Samurai set later. What the skills do is in Armour, Decorations and Skills.
G Rank Series 2
Tasks 1 to 3: free weapons and decorations
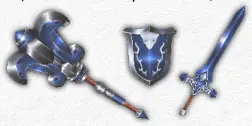
Task 1 is again just reading the description. It gives you three kinds of weapon gem and some materials:
- Black Gems (黑之寶珠) make a Sword and Shield, Gunlance, Bow, Tonfa or Switch Axe.
- Blue Gems (青之寶珠) make a Hammer, Lance, Long Sword, Heavy Bowgun or Switch Axe.
- Yellow Gems (黃之寶珠) make a Great Sword, Hunting Horn, Light Bowgun, Dual Swords or Switch Axe.
All these weapons are strong, about the lower-middle of G Lv50 weapons. Make whichever you like. You can get all the materials again from fairly easy G★1 quests (see Easy equipment below), which are always available, so there is no reason to hoard them.
Task 2 triggers when you equip one of the weapons you made. It gives some Legendary Rasta Tickets and more Cheques. Holding Legendary Rasta Tickets makes the Bar Manager appear at the steps in town, telling you to pick a Legendary Rasta if you want to use the tickets. Enter the bar, approach any legendary Rasta and choose Contract (訂立契約).
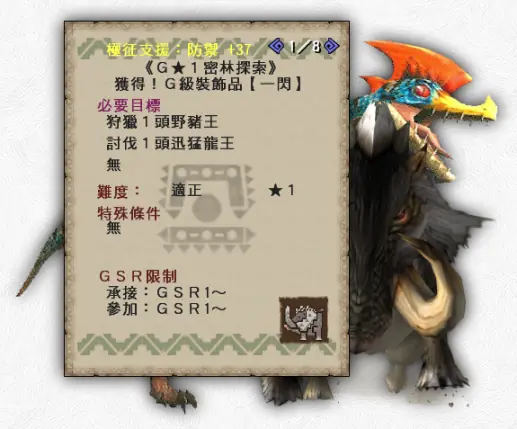
Task 3 is to get and equip 5 G Class decorations with Issen +2, Three Worlds Protection +2 and Status Res +3 (the Chinese name is G級·閃耐珠). These are a type of G Rank decoration that is not made by converting armour. Turn on tracking and you are sent to a Bulldrome and Velocidrome quest that gives them as rewards. For that quest you may want to buy Psychoserums (千里眼之藥) from the Pink Shop NPC in the last section. Both monsters spawn at the start and wander the jungle, so seeing where they are cuts a lot of frustration.
If you do not mind spending GCP or hunting hard monsters, you can instead buy or collect Guanzorumu materials and make them in the G Class decoration section. You need 25 Scales (帝征龍鱗), 25 Pelts (帝征龍皮) and 5 GR1 Break Gems (優玉). Be sure to craft the right decoration, because four different types use the same materials. Slotting five of the right type into your gear completes the task at once.
Tasks 4 to 7: the Furogada set
These tasks get you your second early G Rank set, the Furogada set. Turn on tracking for each task in turn. The first quest gives the materials to make one G piece and upgrade it to Level 7. Making the headpiece completes the task, and gives all the materials to make and upgrade four more pieces to G Level 7. The other two quests and tasks work the same way: Task 4 gives the materials for GF and Task 5 for GX. You must make a full set of GX Lv7 pieces and equip it to complete Task 7.
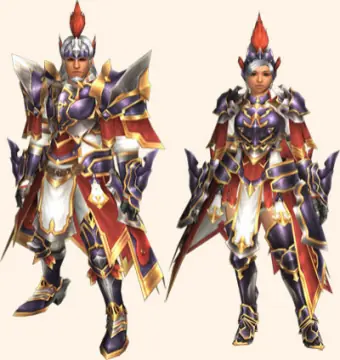
| Furogada set, GX Lv7 | Skills |
|---|---|
| Blademaster GX | Strong Attack +5, Unaffected +3, Rage +2, Fencing +2, Expert +3, Martial Arts +2 |
| Gunner GX | Strong Attack +5, Unaffected +3, Mounting +2, Rage +2, Expert +3, Recoil +2 |
You do not really need to use this set. You mainly want it for the Hunter Navigation tasks and to have it if you need it later. Unaffected +3 combines the highest levels of Quake Res, Hearing Protection and Wind Pressure. For the other skills see Armour Skills.
Tasks 8 to 14: the Samurai set
Tasks 8 to 13 each ask you to beat a specific monster. As before, turn on tracking and the right quests are chosen for you.
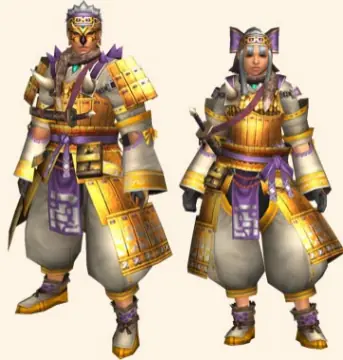
Unlike the earlier sets, think carefully about which version of this armour to commit to. The tasks give materials for 5 pieces in total, so you cannot make both a Blademaster and a Gunner set: pick one. Task 14 unlocks when you have finished all the others, and opens the G Rank Series 3 tasks.
Bridging steps: decorations for the Samurai set
After you make the Samurai set, grind some decorations to widen your armour skills. Which ones depend on whether you are a Blademaster, Bowgunner or Bow user. For both ranged sets, the G Decoration quests are on the non-G NPC under Other Quests > G Decoration Quests (其他任務 > G裝飾品任務).
| Set | Decoration | Where it comes from |
|---|---|---|
| Blademaster | 10 x Strong Attack +2, Three Worlds Protection +2, Rage +2 (怒剛珠) | G★1 quest "Get! G Class Decorations [Strong Attack]": Kut-Ku and Iodrome in the Swamp. |
| 5 x Issen +2, Exploit Weakness +2, Herbal Science +2 (閃藥珠) | G★1 quest "Get! G Class Decorations [Issen]": Bulldrome and Velocidrome in the Jungle. | |
| Bow | 8 x Issen +2, Three Worlds Protection +2, Rage +2 (護閃珠) | The same G★1 [Issen] quest: Bulldrome and Velocidrome in the Jungle. |
| 5 x Issen +2, Exploit Weakness +2, Herbal Science +2 (閃藥珠) | The same [Issen] quest. | |
| 2 x 連気珠G | HR5 G Decoration quest "連氣珠G and Black Diablos [Veteran]": Black Diablos in the White Lake. You also need HR5 Harudomerugu Scales and Gureadomosu Shells. | |
| Bowgun | 8 x Issen +2, Three Worlds Protection +2, Rage +2 (護閃珠) | The same G★1 [Issen] quest. |
| 5 x Issen +2, Exploit Weakness +2, Herbal Science +2 (閃藥珠) | The same [Issen] quest. | |
| 2 x 銃士珠G | HR2 G Decoration quest "銃士珠6 and Lunastra [Low Rank]": Lunastra in the Desert. You also need HR5 Inagami Fur and Garuba Daora Scales. |
The skills these sets give (for full details see Armour Skills):
| Skill | Effect |
|---|---|
| Issen +1 / +2 | A little Affinity, and a Critical Hit multiplier above the standard 1.25x (+0.10x for Issen +1, +0.15x for Issen +2). |
| Thunder Clad | A bar appears under your name and fills as you move, attack and evade (slowest to fastest in that order). When full you get +5 to all Raw Weakness values, Movement Speed +2, Evade Distance Up, Weapon Handling and Status Immunity. |
| Unaffected +3 | A mix of Super High-Grade Earplugs, Violent Wind Breaker and Quake Resistance +2. It protects against the matching effects from most standard monsters. |
| Encourage +2 | Gives every hunter in the quest Evasion +2 and Stun Negate. The player with the skill gets Horn Maestro: longer Hunting Horn song buffs and fewer broken flutes. |
| Herbal Science | Any recovery item instantly fills Red Health. With several players having it you get extra effects: two players with it make all recovery items, including Max Potions, apply to the whole party. |
| Blazing Majesty +2 | Many skills in one. The most notable are Adrenaline +2, Artillery God and Fire Attack Up (Large). |
| Stylish Assault | +100 Attack whenever you use i-frames successfully. |
| Strong Attack +5 (Blademaster) | Adds attack by level: +150 at Strong Attack +5. |
| Status Immunity (Myriad) (Blademaster) | Resists all statuses, including Frontier-only ones such as Crystallisation. |
| Rage (Blademaster) | Gives the effect of True Guts and Adrenaline +2: if you have over 50 HP when hit, you are left on 1 HP instead of dying to a one-shot. |
| Critical Shot +3 (Bow and Bowgun) | Attack +50, and +5 to all Raw Weakness values when you are at the right critical distance. |
| Mounting +2 (Bow and Bowgun) | An extra charge level, and coatings load a little faster. |
| Recoil +1 (Bowgun) | Less recoil when firing. |
| Stamina Recovery Up (Small) (Bow) | 150% Stamina recovery speed. |
| Auto-Reload (Bow) | 85% charge duration for shots. |
Alternative Blademaster decorations
A Blademaster can swap in either of these two decorations for the Issen/Herbal Science ones (閃藥珠), for different skill sets depending on the weapon. The quests are in the same place, Other Quests > G Decoration Quests. You lose the Herbal Science and Issen +1 that the 閃藥珠 decorations gave.
| Decoration | Skills | Quest |
|---|---|---|
| 4 x 劍技珠G | Fencing +2 (every hit has a second part dealing an extra 20% of all raw, status and elemental damage); Peerless (all actions use 50% less stamina); Weapon Handling (sheathe and unsheathe at 1.2x speed) | HR2 quest "劍技珠G and Chameleos [Low Rank]": Chameleos in the Swamp. |
| 5 x 集勞珠G | Focus +2 (charge at 1.25x speed for GS, Hammer, Switch Axe, LS, Tonfa and Lance, and more bar gain on weapons with meters); Defense +60 (mostly worthless, but slightly reduces damage taken); Caring +3 (your attacks never interrupt players or NPCs) | HR5 quest "集勞珠G and Odibatorasu [Gou]": Odibatorasu in the Desert. |
G Rank Series 3
Tasks 1 to 5: Burst gear
Tasks 1 and 2 only need you to read the descriptions. They give you GRP tickets, plus materials for Gou Toridcless legs and for all upgrades to G Supremacy Lv1. Gou pieces upgrade to Origin level, which buffs all ranged weapons, and any Burst or Origin Blademaster weapons, by a lot (see Gou equipment below).
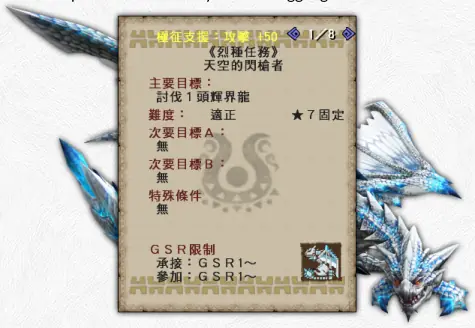
Task 3 is hunting Burst Zerureusu. It is a fixed G★7 quest that always applies a -900 Defence debuff, and you cannot lower the difficulty. If you struggle, use the Halk Pots, Legendary Tickets and Great Guts Tickets you were given in earlier rewards.
Zerureusu adapts to the damage type that hurts it most, and strengthens its weakest parts against that type: Cutting strengthens the legs and tail, Impact the head, and Shot the wings. Change your target spots as needed. It only strengthens a part against that damage type: when the head has adapted to impact, impact on the head is weak, but cutting on the head is unchanged. This task gives the materials to upgrade the Gou Toridcless armour to Burst (GF) Lv1.
Task 4 is upgrading the Toridcless piece you have been working on, with those materials.
Task 5 is making any Burst weapon. Start with a G Supremacy weapon, which needs Weapon Souls. It specifically needs Weapon Top Souls, which come from hunting any HR5 Goushu monster with HC on. To find which monsters are Goushu, look at the top of HR5 quest cards for "Gou Species Quest" (剛種任務), or search "Goushu" in Fist's Monster Name Database. You also need GHC carves: the 2% carves from G Rank Hardcore monsters. Which monster you need depends on the weapon: see how to identify materials in Items and Materials.
Always make G Supremacy weapons at G Rank level: making them at Gou level and upgrading costs more materials. Bowguns can be crafted straight at Origin level, skipping every upgrade. The menu option is Create G Supremacy Weapon (生產G級霸種武器).
To have a G Supremacy weapon in the list, you need some of the Supremacy monster's materials. Do the repel of that monster in the HR NPC's ★6 section. The top six quests are repels. You need about 10 repels to craft a weapon, but even one makes all that monster's weapons appear in the menu. Chances and items are in Supremacy quests.
Recommended Origin weapons
The original table was flattened, so the weapon, skill and monster were rebuilt from reading order. Check the names in game.
| Weapon | Free skill | Supremacy monster |
|---|---|---|
| Varusaburosu Great Sword | Vampirism +2 | Teostra |
| Teostra Long Sword | Vampirism +2 | Teostra |
| Varusaburosu Sword and Shield | Vampirism +2 | Volganos Duo (Aruganosu and Goruganosu) |
| Meraginasu Dual Swords | Exploit Weakness | Teostra |
| Gureadomosu Dual Swords | Vampirism +2 | Doragyurosu |
| Varusaburosu Hammer | Vampirism +2 | Teostra |
| Poborubarumu Hunting Horn | Vampirism +2 | Doragyurosu |
| Varusaburosu Lance | Vampirism +2 | Teostra |
| Poborubarumu Gunlance | Vampirism +2 | Volganos Duo |
| Meraginasu Tonfa | Exploit Weakness | Teostra |
| Gureadomosu Tonfa | Vampirism +2 | Teostra |
| Varusaburosu Switch Axe | Vampirism +2 | Teostra |
| Toa Tesukatora Light Bowgun | Exploit Weakness | Volganos Duo |
| Teostra Light Bowgun | Vampirism +2 | Unknown |
| Varusaburosu Heavy Bowgun | Vampirism +2 | Pariapuria |
| Varusaburosu Bow | Vampirism +2 | Volganos Duo |
| Poborubarumu Bow | Vampirism +2 | Pariapuria |
The game's tutorial tells you to make the Voljang Long Sword or Switch Axe. You can safely ignore that and make one of the weapons above, which have much better stats and less narrow uses.
Tasks 6 to 8: Voljang and Origin
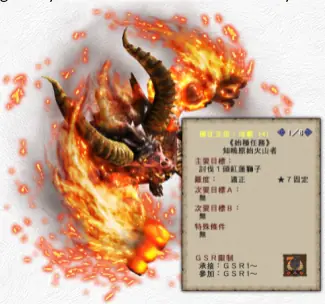
Task 6 is hunting a Voljang. Like Zerureusu it has a fixed G★7 difficulty with a -900 Defence debuff. It is one of the newer monsters and quite challenging. Use every tool you were given, including Halk Pots, Legendary Tickets and Great Guts Tickets, if you struggle. The reward is the materials for the Toridcless Legs Origin (GX) Lv1 upgrade. You still need to farm all the materials to push it from Burst (GF) Lv2 to Lv7.
Task 7 is upgrading the Toridcless Legs to Origin Level 1. As above, you farm the bridging materials from GF Lv2 to Lv7. It rewards Origin Bloods: low-percentage carves needed to max out various Origin armour and weapons. They are meant for Task 8.
Task 8 is maxing out a Gou weapon to Origin levels. Not every Gou weapon has Origin upgrades, so be careful when choosing a G Supremacy weapon to upgrade: you could end up capped at Burst instead of Origin. The guide's sentence listing the safe weapons is cut off after "All Varusaburosu, Teostra, Gureadomosu".
Tasks 9 to 13: GR100, Zinogre and GR200
Task 9 is to reach GR100, which you do by grinding.
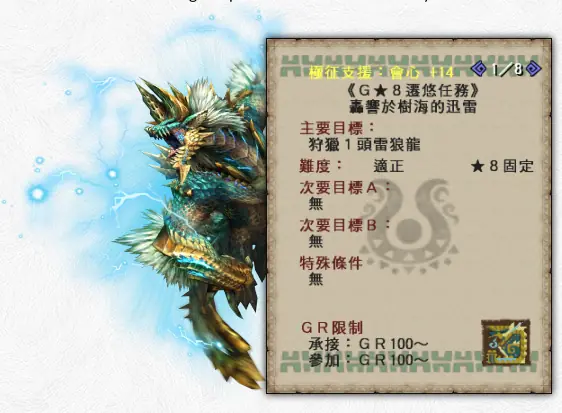
Task 10 is hunting a G Rank Zinogre. It has a fixed G★8 difficulty, which costs you 1,050 Defence. G Rank Exotics all have one-shot attacks and hit fairly hard. As always, use whatever the game gives you to ease it.
Task 11 is making and equipping a piece of Zinogre armour at G Lv1. Exotic armour comes with a free extra skill, switched on by wearing a single piece (only the helmet, for example), and it depends on the monster. Zinogre's gives Thunder Attack Up [Large].
Task 12 is making and equipping any Zinogre weapon, using the materials from the earlier tasks. Exotic weapons start at HR5 for normal weapons and at G Rank for Tonfa and Switch Axe. A weapon made at HR5 upgrades twice, and one made at G Rank upgrades once. All Exotic weapons, Zinogre's included, automatically give Speed Eater, so you swallow consumables (Potions, Seeds, Meat and so on) much faster. They also have combined Sigil and Decoration slots, so you can fit decorations or sigils. You can replace a sigil by inserting another directly over it, but you must remove sigils to insert a decoration, and the other way round.
Task 13 needs every other task in the series done, and also GR200. It gives a booster set of consumables to help with the Zenith content at GR200 (see Zenith).
Easy equipment
Beyond the Hunter Navigation rewards, some equipment is easy to make compared with normal G Rank pieces.
G8 event weapons
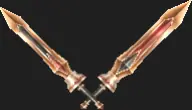
Three weapons from the G8 cycle are now always available: Dual Swords, a Tonfa and a Great Sword. All end up with Cyan sharpness and are very powerful for how easy they are to get. The Dual Swords have Attack 651, Affinity 0%, 3 sigil slots and Sharpness +1.
The DS and GS need HR2 and HR5 content, then a G1★ Pokaradon hunt for the final upgrade to G Rank. The Tonfas only need G Rank Akura Jebia hunts, but you must have unlocked Tonfas from the Diva questline. (Another part of the guide says that since the 10th Anniversary Update you get Tonfa with Extreme Style.)
| Weapon | Base quest | Materials |
|---|---|---|
| G8 Dual Swords | HR2 Rathalos in the Tower | 3rd weapon materials |
| G8 Great Sword | HR2 Hypnoc in the Great Forest | 2nd weapon materials |
| G8 Tonfa | G Rank ★7 Akura Jebia in the Swamp | 1st weapon materials |
| All three (Guild quest) | G Rank ★4 Midogaron, with compulsory Back and Head Breaks | All three weapons' materials |
The HR quests are on the standard HR quest giver under Special Material Quests > Other Quests (特殊素材任務 > 其他任務). The G Rank ones are on the GR quest giver under G Hunter Quests > G★7 Quests (G獵人任務 > G★7任務).
The DS and GS need Lead Pawprint Coins (肉球的硬幣·鉛) and HC Pawprint Medals (HC肉球獎章) to upgrade.
- HC Pawprint Medals: trade Guild Contribution Points for them at 1 GCP to 1 Medal at the Pink Shop NPC. Reaching G Rank gives a lot of GCP, plus tickets that convert to it. The options are Exchange Guild Contribution P > Get Points (交換公會貢獻P > 取得點數) and Exchange Guild Contribution P > Exchange for points > Other Items (以點數交換 > 其他道具).
- Lead Pawprint Coins: at the Yellow Guildie, trade 5 Quest Achievement Certificates (任務達成證) for 10 coins. You earn the certificates by doing a Shogun Ceanataur or a Yian Garuga quest, found on the standard HR quest giver under Special Quests > Pawprint Coin annual bonus (特別任務 > 肉球的硬幣・年度特典). The trade is under Exchange Items > Other (交換道具 > 其他). Many trades look alike, so choose carefully (if you pick wrong you only have to redo the easy Garuga or Shogun quest).
The G upgrade for the DS and GS only needs Pokaradon materials and GR1 break gems. The Tonfas start fully maxed.
The Guild Hall has a quest that gives all three weapons' materials at once, but it is much harder than the single quests: a Midogaron with compulsory Back and Head breaks is easy to fail, and most materials depend on luck, so you would repeat it anyway. It is only mentioned for completeness.
Prep weapons
From G9 on, new monsters came with events to "prepare" for them, often with weapons. Since Z1 all of these are always available on the standard G Rank NPC. Three of these weapons come from the Hunter Navigation tasks, and there are many more. The quests are easy, mostly killing one large monster and some small ones. The small monsters change per quest and need not match the large one (for example Kut-Ku with Hermitaurs). The quests are on the GR quest giver under G Hunter Quests > G★7 Quests. The Hunter Guide gives you one weapon's worth of the Daimyo, Pokaradon and Hypnoc quest stones.
| Target | Gem | Weapons it makes |
|---|---|---|
| Daimyo Hermitaur | Black Gem | Sword and Shield, Gunlance, Bow, Tonfa, Switch Axe |
| Pokaradon | Blue Gem | Hammer, Lance, Long Sword, Heavy Bowgun, Switch Axe |
| Hypnoc | Yellow Gem | Dual Swords, Great Sword, Hunting Horn, Light Bowgun, Switch Axe |
| 2 x Iodrome | White Gem | A Switch Axe with especially high sharpness and element |
| Yian Kut-Ku | Green Gem | Hammer, Long Sword, Bow, Tonfa |
| Velocidrome | Pink Gem | Great Sword, Lance, Hunting Horn, Light Bowgun |
G Class decorations
If you followed the bridging steps you have already done some of these quests. G Class decorations are about as strong as GF ones. They are made straight from materials, or given as quest rewards. Two quests are made for players who are just starting, or who want these decorations for their Rastas. Both are under G Hunter Quests > G★7 Quests: the Strong Attack decoration quest (Kut-Ku and Iodrome) and the Issen decoration quest (Bulldrome and Velocidrome).
| Quest | Skills on each decoration |
|---|---|
| Strong Attack: Kut-Ku and Iodrome | Strong Attack +2, Three Worlds Protection +2, Rage +2 |
| Strong Attack +2, Status Res +3, Drawing Arts +2 | |
| Strong Attack +2, Exploit Weakness +2, Herbal Science +2 | |
| Strong Attack +2, Dissolver +2, Blazing Grace +2 | |
| Strong Attack +2, Blazing Grace +2, Gentle Shot +2 | |
| Strong Attack +2, Three Worlds Protection +2, Status Res +3 | |
| Issen: Bulldrome and Velocidrome | Issen +2, Three Worlds Protection +2, Rage +2 |
| Issen +2, Status Res +3, Drawing Arts +2 | |
| Issen +2, Exploit Weakness +2, Herbal Science +2 | |
| Issen +2, Three Worlds Protection +2, Status +2 | |
| Issen +2, Three Worlds Protection +2, Exploit Weakness +2 | |
| Issen +2, Three Worlds Protection +2, Status Res +3 |
For how to craft other G decorations and how G, GF and GX gems work, see G Rank decorations.
Newbie server quests
On the official servers the Newbie servers had quests for almost everything the guide recommends for starting G Rank, including the Intro G armour and the Gurenzeburu GF decorations. You got access if you made a new account or had not played for 3 months, and lost it after a time, so you had to finish the quests you wanted first. The list below was from the official servers. Hunsterverse has a Newbie world (see Worlds); what is offered there was not checked.
| Type | Target | What it gives |
|---|---|---|
| GRP quests | ★1 Daimyo Hermitaur | 3,000 GRP |
| ★3 Basarios | 4,000 GRP | |
| ★7 Silver Rathalos | 5,200 GRP | |
| Money quest | ★1 Bulldrome | 50,000 Gz |
| Weapon quests | Kut-Ku | Premium Tonfa materials |
| Unknown | Zerureusu weapons: G Supremacy upgrade materials | |
| Zerureusu | Zerureusu weapons: Burst upgrade materials | |
| Armour quests | Pokaradon | Purple set (遠久) base materials |
| Hypnoc | Purple set GF upgrade materials | |
| Farunokku | Purple set GX upgrade materials | |
| Unknown | Baruragaru armour G Supremacy upgrade materials (not the materials for the Gou to Supremacy upgrades) | |
| Zerureusu | Baruragaru armour GF Burst upgrade materials | |
| Unknown | Odibatorasu armour G Supremacy upgrade materials (not the materials for the Gou to Supremacy upgrades) | |
| Diorekkusu | Odibatorasu armour GF Burst upgrade materials | |
| Hunter Guide quests | Gendrome (GR task 2), Iodrome (GR task 3) | The Intro G armour piece and the Intro GF armour piece |
| Gurenzeburu (GR tasks 4 to 8, fixed ★1), Gendrome | The chest piece to turn into a decoration, and finishing the starter G set | |
| Bulldrome and Velocidrome; Hyujikiki, Midogaron, Abiorugu, Rajang, Gold Rathian, Zerureusu, Voljang, Zinogre | Generic G Class decorations; and the quests for Hunter Guide tasks that need those hunts. Duplicates of the Purple set base, GF and GX quests also exist. |
The guide's author notes that some of these were added in the Z update cycle and the list may be incomplete.
Attack Ceiling and SR skills
The Attack Ceiling is one of the most important things to upgrade.
Frontier has a cap on the maximum attack: by default 800 true raw. That sounds high, but after a decade of power creep it is very low by mid to late game standards. A single skill can add up to +300 true raw, ranking GSR adds +100, and standard weapons have up to 700 true raw by themselves. If you do not raise the cap you deal far less damage.
You raise it with My Missions: set tasks where you kill certain numbers of monsters under certain conditions. See your current one in the Book of Secrets (Status > Book of Secrets Status). Both the standard HR and G Rank quest NPCs have options for these missions that search for matching quests. You still need to turn HC on yourself if the mission needs it. These missions also raise other passive stats. The multiplier table, examples and recommended levels are in Hunter Rank and Style Rank: Attack Ceiling.
SR skills
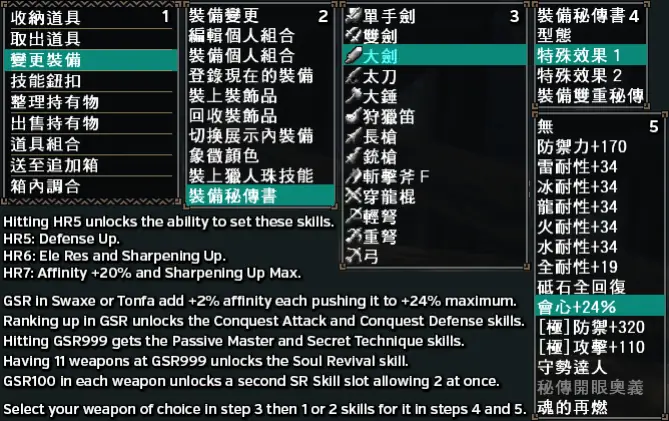
At G Rank there is practically no reason not to have the Affinity Up SR skill on. It is a flat +20% to +24% Affinity, equal to Expert +2, completely free. The full list and what each does is under Style Rank skills.
Pugi cuffs and whetstones
Pugi Outfits and Cuffs
For the best G Rank set you need a Pugi with a Pugi Outfit and a Pugi Cuff. They work as two extra decoration slots that take only special Pugi decorations or cuffs. You can get a G Rank Pugi Cuff License from GR50, which lets you use cuffs that come with G Rank skills. Get it as soon as you can after it unlocks.
The full process is on House and AI Companions (House Facilities, then HR4 Pugi Farm). You need 120P in total to get your Pugi ready for G Rank cuffs: 30P for the Pugi, 30P for the Departure Facility and 60P for the G Rank License. You then farm materials for proper cuffs.
There are currently 7 types of cuff in three groups:
- SC, SB, SA are Standard Cuffs.
- SZ are Standard Zenith Cuffs.
- PC, PB and PA are Premium Cuffs.
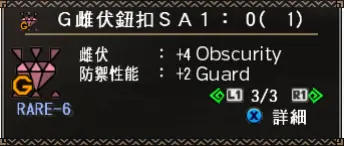
The A and B cuffs have the most points in their main skills but take 2 fixed slots. The C cuffs take a single slot but have fewer points. In general, Standard cuffs come first, and Premium cuffs are added in the next major patch. For example, the skill Obscurity arrived in G10.1 with only the SA1 cuff, and a number of P cuffs came with Z:
| Update | Cuff | Skills |
|---|---|---|
| G10.1 | G Obscurity SA1 | Obscurity +4, Guard +2 |
| Z | G Obscurity PA1 | Obscurity +5, Fortification +3 |
| G Obscurity PA2 | Obscurity +5, Reflect +3 | |
| G Obscurity PC1 | Obscurity +2, Three Worlds +2 | |
| G Obscurity PC2 | Obscurity +2, Vampirism +2 | |
| G Obscurity PC3 | Obscurity +2, Vigorous +2 |
Standard cuffs are still good for their main skill, but P cuffs give more flexibility and more points in total. No new Premium cuffs have been added for a while: the last came with base MHF-Z. So for the newest skills (such as Ceaseless, Rush, Point Breakthrough) there is only a single SA cuff that enables the skill.
The SZ cuffs work like normal cuffs but give a Zenith skill instead of a normal one. So far they have always been standard cuffs, so they add value to slots without needing a premium outfit.
| SZ cuff skill | Materials from |
|---|---|
| Critical Conversion Up | Zenith Espinas |
| Stylish Assault Up | Zenith Daimyo |
| Thunder Clad Up | Zenith Khezu |
| Assistance Up | Zenith Hypnoc |
Zenith skills strengthen an existing skill or give you an extra skill slot (Stylish Assault Up makes Stylish Assault better, for example). See Armour Skills and Zenith.
Hi-Speed Whetstones
Hi-Speed Whetstones (高速砥石) restore 75 Sharpness in a single swipe and are very useful at every level. When you reach G Rank you automatically unlock an SR skill that makes any whetstone use give full sharpness at once. Since a Hi-Speed Whetstone sharpens in one swipe, together they are a very efficient way to recover sharpness.
To unlock them you need a level 2 Combination Booth on the Pugi Farm, slots for Felynes on the Pugi Farm if you need them, and gifts for your Farm's Manager (depending on which of the three you have). In short: get the Combination Hut to Level 2, give your manager her preferred type of materials, and when she gives you the Hi-Speed Whetstones you unlock them for combination. The recipe uses normal whetstones and Knife Mackerel (堅硬竹筴魚, 135z, from the Combination NPC), which you can buy without limit, so you get unlimited Hi-Speed Whetstones. The full guide is in House and AI Companions, Pugi Farm, House Facilities, Airou Plaza.
G Whetstones recover 200 Sharpness, compared with 150 for a Normal Whetstone and 75 for a Hi-Speed one. A weapon with a maximum-size sharpness bar has 400 sharpness, so one G Whetstone is 50% of it.
Caravan Gem
You can get a Caravan (Hunter) Gem as soon as you reach HR2: enter the Caravan area (Pallone) and approach the bonfire. You are made to take a Caravan Gem and choose your first colour. The gem has many passive skills, as strong as making well-timed blocks damage enemies, or a straight 5% attack increase. They take no skill slots and cost no skill points. Read Regular Events: Caravan.
Hardcore and Supremacy reminders
These systems are explained in full on Hunter Rank and Style Rank. The key numbers:
- Hardcore (HC) monsters: turn HC on yourself on the final quest screen (the flame icon only shows it is possible).
- HC carves are 5% for HC monsters and a flat 2% for GHC monsters. They come from outside the normal carve pool, so you roll the pool first and the item second. Your Partner can carve them too.
- Weapon Souls have four levels: Low (HR1-2), Mid (HR3-4), High (HR5, non-Gou), Top (HR5, Gou). Example: an HC Teostra at HR5 with a Tonfa gives a Tonfa Soul (Top). They are used to upgrade anything in a Gou weapon tree, such as G Supremacy weapons.
- Supremacy monsters are required to get to G Rank, but you do not need their items. Their items only go into Gou armour and weapon trees. Repel quests give 2 stacks at about 38 to 40% per roll; slay quests are far better for Supremacy Blood. See the tables.
Gou equipment in G Rank
Gou equipment starts its tree at HR5. Armour and weapons both follow the usual upgrade pattern: they start at Gou in HR5 and can go all the way to G Rank Origin. The stages are Gou, Storm, Supremacy, G Supremacy, Burst, Origin. Weapons can be started at G Supremacy level, but armour must always be crafted at HR5 Gou level.
Wearing Gou-tree armour with a Gou-tree weapon has special effects.
Heavenly Storm, Supremacy, G Supremacy and Burst armour
With a weapon from a Gou path that is at least Heavenly Storm (天嵐防具) or higher level, every piece of Heavenly Storm, Supremacy (霸種防具), G Supremacy (G級霸種防具) or Burst (烈種防具) armour adds +15 Attack, +2% Status and +2% Elemental. This stacks per piece, up to +80 Attack, +10% Status and +10% Elemental.
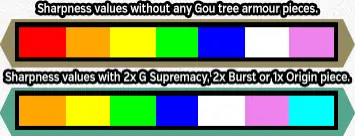
With at least two pieces of these armour types, you also get Sharpness Level Up, Critical Distance Up +0.3x and Power Coatings Up +0.1x. Sharpness Level Up raises the colour grade of your sharpness by one full level. The Critical Distance multiplier greatly strengthens properly spaced shots for ranged weapons. Power Coatings Up improves power coatings further (for example 1.6x becomes 1.7x). These effects only work on Gou, Supremacy or G Rank quests, which is most of the content you play.
Origin armour
With a Gou-tree weapon, every piece of Origin armour (始種防具) adds +20 Attack, +3% Status and +3% Elemental. This stacks per piece, up to +110 Attack, +15% Status and +15% Elemental.
- Blademasters with any piece of Origin armour get Sharpness Level Up when using the right Gou weapon types.
- Gunners with any piece of Origin armour get the Critical Distance Up and Power Coatings Up buffs on all G Rank weapons, not only Gou-tree ones. This is a huge buff for standard weapons. It is almost never worth wearing a standard armour piece rather than an Origin one, even with Zenith armour in the Z update. Note that the extra Attack, Elemental and Status is not applied to non-Gou weapons.
The extra attack is added at the end. If you had an Origin weapon and armour piece you would get +20 attack. With 500 true raw this becomes 820, and with Adrenaline +2 it becomes 1,220 ((800 x 1.5) + 20) rather than 1,230 (820 x 1.5). That matters little at the low end of sets and even less later, with more multipliers.
GZeny
To get GZeny, check first whether the quest "Counterattack! Poison Wyvern King" (逆襲!毒猛龍王) is up. It is an Iodrome that gives GZeny Cheques as its reward. If available, it is under time-limited quests on the G Rank NPC (期間限定任務 > 新領域任務).
If it is not up, use the Quest Search function (捜尋任務, in green) on the G Rank NPC and search by GZeny amount (報酬金). You can pair this with the Log In Boost (see Basics, Important Knowledge) to get 5x the GZeny you would normally get from quests.
G Break Jewels and standard G Rank decorations are covered in G Rank.
Gunner sets
This is not needed right at the start of G Rank, but know it now: every proper gunning set should have a single Origin or Zenith piece. It is one of the biggest DPS increases available and is not optional.
It raises your Critical Distance multiplier by +0.3x in any HR5 or higher quest with any Gou or G Rank weapon. That is about a 20% DPS increase for LBGs and 15% for HBGs, more than most standard skills, with no real downside. Zenith armour lets you keep the critical distance and other boosts and also gain extra skill slots, so it should be standard in all sets either way.
Guild Pugis
You can only have one of these buffs active! You only need to feed once per log-in, or when you want to change your active Guild Pugi skill.
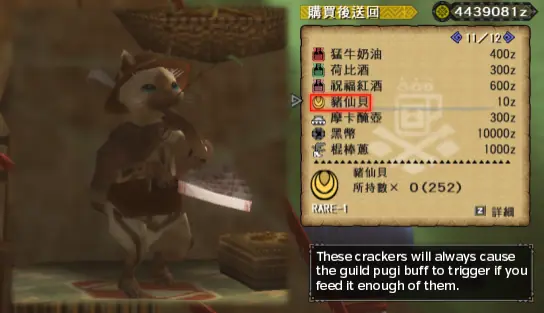
The Guild Pugis give a bonus when fed. The Guild has three Pugi Outfits, and each gives a different skill when fed successfully. The easiest way to get the buff is to mass-feed them Pugi Crackers (豬仙貝, 10z) from the Guild Shop. When it works, the Pugi jumps up and down in a white flash. See English Guild and Guild Hall for what each outfit does.
If you feed more than one Pugi, only the last one you fed is active. The buff lasts the whole session and only needs renewing when you log in. All Pugi buffs stack with similar skills: you can use the Luck Pugi with Great Luck or the Premium Course active and still gain from it.
The Luck Pugi has a 12.5% chance to reroll a failed reward roll and a 12.5% chance to add extra reward slots. You can reach a maximum of 24 standard reward slots with Great Luck and the Pugi active. The Pugi only affects the top 24 Main Reward slots, and not the other reward types (Sub Objectives, Additional, Breaks, Partner and so on).
AI companions
Serious G Rank players want a Partner, a Rasta and a Partnyaa. Partners are long-term investments. Partnyaas are mostly good for extra break rolls. A decent Rasta can be set up soon after you start G Rank with little investment.
Partners
Get your Partner into G Rank equipment as soon as possible. G Rank gear has fixed values for Partners: choose any full set and the best sharpness you can find on a weapon, and give them to your Partner. Take part in the Diva Defense event to earn lots of GCP for working towards skills on your Partner. That is a much better use of GCP than buying materials. Do not confuse Partners with mainline's Felyne Partners. Frontier's Partners have all the standard skills used at endgame and elemental values better than normal humans can reach. They can easily outdo many G Rank players if you invest in them. More in Partner and Diva Defense.
Partnyaas
Partnyaas are support AI with very low DPS, barely enough to matter. The biggest reason to bring one is that it doubles all break rewards from a monster. With enough effort a Partnyaa can still be a solid support, with abilities such as Assistance, Encourage, Demon Flutes and special flutes that act like Hunting Horn buffs. See Partnyaa.
Rastas
Rastas are clones of other players, so you rely on them caring enough to invest a little. Both players gain when you have a Rasta contracted or contract yours to another player, and you naturally help them in any content they use a Rasta in. As with the basic G Rank sets, you can spam the easy decoration quests to get a solid base Rasta set. An example:
| Slot | Piece |
|---|---|
| Head | Garuba Daora FX Head |
| Chest | Zerureusu FX Chest |
| Arms | Odibatorasu FX Arms |
| Waist | Varusaburosu F Waist |
| Legs | Varusaburosu FX Legs (the guide's list says "waist" twice, but the Chinese name for this one means leg guard) |
| Decorations | 10 x Strong Attack +2, Three Worlds Protection +2, Status Res +3 (剛耐珠); 5 x Issen +2, Exploit Weakness +2, Herbal Science +2 (閃藥珠) |
| Weapon | Any Supremacy weapon. Guanzorumu Dual Swords are recommended. |
| Skills | Strong Attack +3, Issen +1, Unaffected +3, Herbal Science, Elemental Attack Up, Status Immunity (Myriad), Fencing +2, Sharpness +1, Expert +4 |
The guide calls this set a bit silly looking but very practical for Dual Swords or Sword and Shield. It ends up clearly better than free NPCs and Partners, without much investment or needing event-locked pieces. If you build your own, always use at least two Storm or Supremacy armour pieces on a Rasta set: that gives the Boost effect and strengthens the weapons used.
For the Gook Farm, see House and AI Companions, House Facilities.
Your first proper set
Frontier content is not like mainline. Monsters are balanced for a baseline of power that depends on when they were released. Early G Rank monsters have about 40,000 Effective Health, and the newest content has up to 375,000 Effective Health. Your first proper 11 or 12 skill set is one of the biggest buffs you will get in Frontier, and makes a world of difference.
The guide's example sets are baselines for tackling all non-challenge content without taking forever. They are not the best, and you can certainly build far better. The guide had Z1 sets for any weapon except Hunting Horn (with different decoration set-ups), a Z1 Hunting Horn set (core skills plus Encourage +2 for Evasion +2 and Horn Maestro for longer songs), a generic Bowgun set and a generic Bow set. Bows always want Auto-Reload, which is terrible on bowguns, so do not use bow sets on bowguns. Its links for these were pastebins that we do not copy. To build your own, use the Armour set builder, and see Armour, Decorations and Skills.
Hiden sets
Hiden is the catch-all word for Weapon Tech Skills. They raise damage by at least 1.20x everywhere and add extra effects by weapon type (for example higher coating multipliers for the Bow, and faster, more forgiving charge windows for the Great Sword). They are always among the five best decorations on a proper set. On the official servers subscribing gave five Hiden Decorations ("HL Hiden"); the server does not hand out course bonus items, so those five are not given here. Rather than copy sets, the guide's author suggests learning MHSX2G (see Tools and References) and building your own. More in Hiden.
Written from the Monster Hunter Frontier guide by Fist (as saved in January 2022). That guide describes Capcom's old official servers; we reworded it, laid it out for Hunsterverse and added the "On Hunsterverse" notes (all of them: Hunsterverse vs the old servers). The pictures are from the original guide.