
Frontier guide · Gear and items · 5 of 18
Items and Materials
How to find where a material comes from, a quick list of the basic items, armour spheres, every combination recipe, and the special Frontier-only items, tickets and charms.
Finding where a material comes from
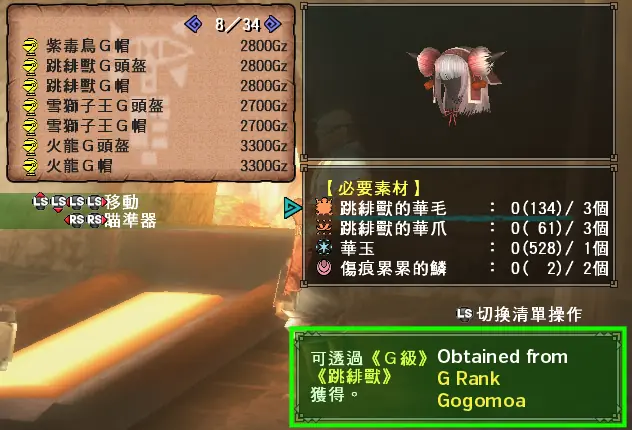
While you are crafting something and can see the list of required materials, press in the Left Stick or press 1 on the keyboard. The game highlights a material and shows where it comes from. On the Taiwanese client the monster and place names were in Chinese, so players looked them up elsewhere.
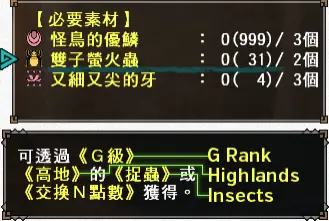
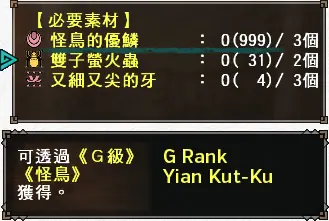
The message always has the same shape. For example, "Obtainable from [HR1~99] [Kelbi]" means the material comes from Kelbi at that rank range. Any carve marked HC needs Hardcore turned on (see Hardcore and Starting G Rank).
The HR and SR ranges in these messages are still the ones from G9. The modern ranges are:
| Rank shown | Current range |
|---|---|
| HR1 | SR or HR1 |
| HR2 | SR or HR2-31 |
| HR3 | SR or HR32-50 |
| HR4 | SR or HR51-99 |
| HR5 | SR or HR100 |
| HR6 | SR300 |
Words to look for
| Source | Meaning |
|---|---|
| Gathering, Mining, Bug Catching | Gathering spots, mining spots and insect spots |
| Gook Farm | Comes from your Gook Farm |
| N Point Store | Bought with N points |
| Conquest Reward | A reward from a Conquest quest |
| Time-limited or event items | The message points you to the official site's news and event pages to check |
Area names used in these messages: Jungle, Desert, Swamp, Snowy Mountains, Volcano, Tower, Forest and Hills, Great Forest, Gorge, Highlands, Tidal Island, Flower Field, Polar Sea, White Lake and Painted Falls. If the message does not help, use the other lists named in the guide.
Ferias
Ferias is a community database site. There are two versions: a Japanese one, which is the original, and a less updated Taiwanese clone. The original guide used a translation script to read it in English; we do not link the site or the script.
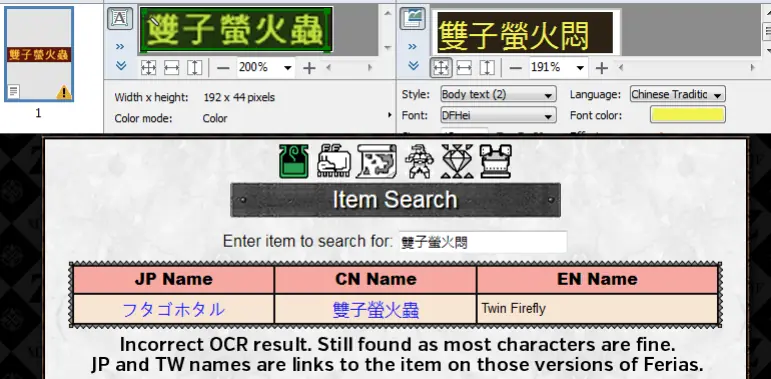
The database lets you type any English, Japanese or Chinese name. It then gives links, where available, to the relevant sites and shows all three versions of the name. If you read a name from a screenshot with OCR, the database usually still finds it even when some characters are wrong, as long as most are right. If there are clear mistakes, cut the text down to the characters you believe are correct. Partial matches are fine.
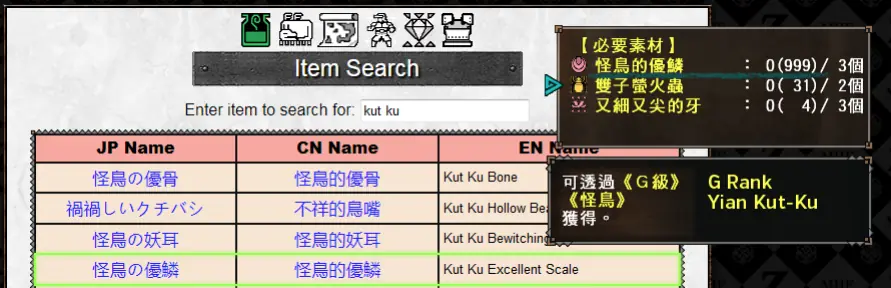
You can also type a monster name you recognise. It lists the materials with that monster's name in them. From there you can click through to Ferias for rank requirements, drop percentages and more.
Box space, presets and sorting
This page of the original guide also explains how to grow your item box, how to save item presets and how to sort your equipment box. Those parts are now on the Equipment and Item Boxes page:
- Getting more box space (up to 41 pages)
- Item presets
- Sorting your equipment box
Basic items
These common items matter for basic play. This is not a complete list. The original guide kept full lists, including materials and combinations, in its document, which we do not link; the item and equipment catalogue lists what exists on our server. Recipes for most of these are in Combinations below.
| Group | Items |
|---|---|
| Healing | Herb, Honey, Potion, Mega-Potion, Nutrients, Mega-Nutrients, Antidote, Max Potion, Ancient Potion, Energy Drink, Lifecrystals, Lifepowder, Catalyst, Immunizer, Herbal Medicine |
| Boosts | Power Juice, Mega-Juice, Demondrug, Mega Demondrug, Power Pill, Armorskin, Mega Armorskin, Armor Pill |
| Drinks and sight | Cool Drink, Hot Drink, Hot + Cold Drink, Psychoserum (the guide lists two kinds under this name) |
| Food | Raw Meat, Rare Steak, Well-Done Steak, Gourmet Steak |
| Bombs and traps | Bomb Material, Paintball, Marking Ball, Flash Bomb, Sonic Bomb, Net, Trap Tool, Pitfall Trap, Shock Trap, Small Barrel Bomb, Large Barrel Bomb, Large Barrel Bomb+, Lightning Rod, Tranquilizer, Tranq Bomb |
| Seeds, extracts and plants | Armor Seed, Power Seed, Power Extract, Pale Extract, Dragon Toadstool, Thunderbug, Flashbug, Sap Plant, Paintberry, Kelbi Horn |
Armour spheres
Armour spheres come in eight grades. The guide's table gives three numbers for each: GCP, NP and Festival Points (the guide does not explain them further). It also shows where each grade is mined and which quests give it.
| Armour sphere | GCP / NP / Festival Points | Mining | Quest rewards |
|---|---|---|---|
| Armour Sphere | 30 / 6 / 20 | HR1-2 | HR1-2 quests |
| Armour Sphere+ | 40 / 8 / 30 | HR1-2 | HR1-2 quests |
| Adv Armour Sphere | 50 / 10 / 35 | HR3-4 | HR3-4 quests |
| Hard Armour Sphere | 60 / 12 / 40 | HR3-4 | HR3-4 quests |
| Heavy Armour Sphere | 70 / 14 / 50 | HR5 / G Rank | HR5 standard quests |
| True Armour Sphere | 80 / 16 / 55 | HR5 / G Rank | HR5 standard quests |
| Strong Armour Sphere | 90 / 18 / 65 | Rewards only | HR5 Gou or Exotics, HR6 Supremacy quests |
| Divine Armour Sphere | 100 / 20 / 70 | Rewards only | HR5 Gou or Exotics, HR6 Supremacy quests |
Combinations
Frontier has two combination modes: 2 item and 3 item combinations. For example, you can make an Ancient Potion by combining either Immunizer + Kelbi Horn or Catalyst + Dragon Toadstool + Kelbi Horn. Items are not limited to two recipes, so one result can have several.
Each line below is one recipe, with its percentage (the chance the combination works). Each recipe makes 1 item unless the line says otherwise. Some recipes carry an [Alchemy] or [Mission] mark in the guide, which the guide does not explain. Numbers are the guide's own recipe numbers.
The guide's recipe table was flattened when it was saved. The recipes below are rebuilt from it. A few ingredients are items that only have a Chinese name in the guide, and they are written that way. Recipes 136 to 138 (secret-area and book items with no English names) are left out.
Healing items, drugs and powders
| No. | Result | Recipes |
|---|---|---|
| 1 | Potion | Day Herbs + Blue Mushroom: 95% Herb + Blue Mushroom: 95% |
| 2 | Mega-Potion | Potion + Honey: 90% Honey + Day Herbs + Blue Mushroom: 90% Honey + Herb + Blue Mushroom: 90% |
| 3 | Nutrients | Energy Drink + Select Mushroom: 75% [Alchemy] Godbug + Blue Mushroom: 90% Day Herbs + Sunset Herb + Blue Mushroom: 90% |
| 4 | Mega-Nutrients | Nutrients + Honey: 75% Energy Drink + Aged Mushroom: 75% [Alchemy] Honey + Godbug + Blue Mushroom: 75% |
| 5 | Antidote | Antidote Herb + Blue Mushroom: 95% |
| 6 | Immunizer | Catalyst + Dragon Toadstool: 75% Honey + Dragon Toadstool + Bitterbug: 65% |
| 7 | Power Juice | Catalyst + Rare Steak: 75% Rare Steak + Honey + Bitterbug: 65% Blue Mushroom + Toadstool + 超毒菇 (no English name given): 65% [Alchemy] |
| 8 | Mega-Juice | Well-Done Steak + Power Extract: 65% |
| 9 | Demondrug | Catalyst + Power Seed: 65% Honey + Power Seed + Bitterbug: 55% Special Mushroom + Select Mushroom + Aged Mushroom: 65% [Alchemy] |
| 10 | Mega Demondrug | Demondrug + Pale Extract: 55% Catalyst + Power Seed + Pale Extract: 55% |
| 11 | Power Pill | Immunizer + Power Seed: 75% Catalyst + Power Seed + Dragon Toadstool: 65% |
| 12 | Armorskin | Catalyst + Armor Seed: 65% Honey + Armor Seed + Bitterbug: 65% Stone + Iron Ore + Earth Crystal: 90% [Alchemy] |
| 13 | Mega Armorskin | Armorskin + Pale Extract: 55% Catalyst + Armor Seed + Pale Extract: 55% |
| 14 | Armor Pill | Immunizer + Armor Seed: 75% Catalyst + Armor Seed + Dragon Toadstool: 65% |
| 15 | Cool Drink | Ice Crystal + Bitterbug: 90% |
| 16 | Hot Drink | Hot Pepper + Bitterbug: 90% |
| 17 | Psychoserum | Cactus Flower + Thunderbug: 75% [Alchemy] |
| 18 | Psychoserum (second kind in the guide) | 魔物體液 (no English name given) + Ice Crystal + Sleep Sac: 55% [Alchemy] |
| 19 | Herbal Medicine | Cactus Flower + Bitterbug: 90% Dung + Garbage + Insect Husk: 65% [Alchemy] |
| 20 | Max Potion | Mega-Nutrients + Dragon Toadstool: 65% Dragon Herb + Potion + Mega-Potion: 90% Nutrients + Honey + Dragon Toadstool: 65% |
| 21 | Ancient Potion | Immunizer + Kelbi Horn: 55% Catalyst + Dragon Toadstool + Kelbi Horn: 55% |
| 22 | Catalyst | Honey + Bitterbug: 75% Piscine Liver + Aged Mushroom: 65% [Alchemy] |
| 23 | Energy Drink | Honey + Sunset Herb: 65% |
| 24 | Gunpowder | Fire Herb + Nitroshroom: 95% |
| 25 | Lifecrystals | Godbug + Wyvern Fang: 90% |
| 26 | Lifepowder | Lifecrystals + Wyvern Claw: 65% Godbug + Wyvern Fang + Wyvern Claw: 55% |
| 27 | Powertalon | Lao Shan Claw + Powercharm: 100% |
| 28 | Armor Talon | Armor Charm + Lao Shan Claw: 100% |
| 29 | Tranquilizer | Sleep Herb + Parashroom: 65% |
Meat
| No. | Result | Recipes |
|---|---|---|
| 30 | Raw Meat | Burnt Meat + Dung: 95% [Alchemy] |
| 31 | Cooked Meat | Raw Meat + Sunset Herb: 95% Raw Meat + Red Oil: 95% Raw Meat + Power Lard: 95% |
| 32 | Spicy Meat | Raw Meat + Hot Pepper: 95% |
| 33 | Cool Meat | Raw Meat + Ice Crystal: 95% |
| 34 | Poisoned Meat | Raw Meat + Toadstool: 90% |
| 35 | Tainted Meat | Raw Meat + Parashroom: 90% |
| 36 | Drugged Meat | Raw Meat + Sleep Herb: 90% |
| 37 | Rare Steak | Velociprey Hide + Thunderbug: 90% [Alchemy] |
Boomerang and throwing knives
| No. | Result | Recipes |
|---|---|---|
| 38 | Boomerang | Small Monster Bone + Whetstone: 90% |
| 39 | Poison Throwing Knife | Toadstool + Throwing Knife: 65% |
| 40 | Sleep Throwing Knife | Sleep Herb + Throwing Knife: 65% |
| 41 | Paralysis Throwing Knife | Parashroom + Throwing Knife: 65% |
| 42 | Tranq Throwing Knife | Tranquilizer + Throwing Knife: 65% Sleep Herb + Parashroom + Throwing Knife: 55% |
Bombs, traps and barrels
| No. | Result | Recipes |
|---|---|---|
| 43 | Bomb Material | Sap Plant + Stone: 95% Sap Plant + Iron Ore: 95% (makes 1~2) |
| 44 | Paintball | Sap Plant + Paintberry: 95% |
| 45 | Flash Bomb | Bomb Material + Flashbug: 75% Sap Plant + Nitroshroom + Sunstone: 65% Sap Plant + Stone + Flashbug: 65% |
| 46 | Sonic Bomb | Gunpowder + Screamer: 75% Bomb Material + Sap Plant + Screamer: 65% Fire Herb + Nitroshroom + Screamer: 65% |
| 47 | Dung Bomb | Bomb Material + Dung: 75% Dung + Territorial Dung: 65% (makes 1~2) [Alchemy] Dung + Sap Plant + Stone: 75% |
| 48 | Smoke Bomb | Bomb Material + Ivy: 75% Ivy + Sap Plant + Stone: 65% |
| 49 | Poison Smoke Bomb | Bomb Material + Toadstool: 75% Bomb Material + Poison Sac: 90% (makes 1~3) Sap Plant + Toadstool + Stone: 65% |
| 50 | Farcaster | Bomb Material + Exciteshroom: 95% |
| 51 | Deodorant | Bomb Material + Sunset Herb: 75% |
| 52 | Tranq Bomb | Tranquilizer + Bomb Material: 75% Bomb Material + Sleep Herb + Parashroom: 65% |
| 53 | Net | Spiderweb + Ivy: 90% |
| 54 | Pitfall Trap | Net + Trap Tool: 65% Spiderweb + Trap Tool + Ivy: 55% |
| 55 | Shock Trap | Trap Tool + Paralysis Sac: 90% Trap Tool + Parashroom + Flashbug: 75% |
| 56 | Lightning Rod | Trap Tool + Needleberry + Thunderbug: 75% |
| 57 | Small Barrel | Small Monster Bone + Sap Plant: 75% [Alchemy] |
| 58 | Large Barrel | Medium Monster Bone + Ivy: 65% [Alchemy] |
| 59 | Small Barrel Bomb | Small Barrel + Fire Herb: 90% |
| 60 | Small Barrel Bomb+ | Trap Tool + Flame Sac + Small Barrel Bomb: 75% |
| 61 | Large Barrel Bomb | Gunpowder + Large Barrel: 75% Large Barrel + Fire Herb + Nitroshroom: 65% |
| 62 | Large Barrel Bomb+ | Trap Tool + Flame Sac + Large Barrel Bomb: 65% |
| 63 | Bounce Bomb | Vespoid Wing + Gunpowder + Small Barrel: 75% |
Bowgun ammo, coatings and bait
| No. | Result | Recipes |
|---|---|---|
| 64 | Huskberry | Huskberry + Iron Ore: 75% (makes 5) [Alchemy] |
| 65 | Normal S LV2 | Huskberry + Needleberry: 95% (makes 2~4) |
| 66 | Normal S LV3 | Huskberry + Rumblefish: 95% (makes 2~4) Huskberry + Large Rumblefish: 90% (makes 3~5) |
| 67 | Pierce S LV1 | Huskberry + Velociprey Fang: 90% (makes 1~3) Huskberry + Pin Tuna: 75% (makes 1~3) |
| 68 | Pierce S LV2 | Huskberry + Large Pin Tuna: 65% (makes 2~4) Small Bone Husk + Pin Tuna: 75% (makes 1~2) |
| 69 | Pierce S LV3 | Small Bone Husk + Large Pin Tuna: 65% (makes 1~3) Large Bone Husk + Large Pin Tuna: 90% (makes 1~3) |
| 70 | Pellet S LV1 | Huskberry + Scatternut: 90% (makes 1~3) |
| 71 | Pellet S LV2 | Huskberry + Wyvern Fang: 75% (makes 1~3) |
| 72 | Pellet S LV3 | Small Bone Husk + Wyvern Fang: 75% (makes 1~3) |
| 73 | Crag S LV1 | Huskberry + Burst Arrowana: 90% Huskberry + Large Arrowana: 75% (makes 1~2) |
| 74 | Crag S LV2 | Small Bone Husk + Burst Arrowana: 90% Small Bone Husk + Large Arrowana: 75% (makes 1~2) Large Bone Husk + Large Arrowana: 65% (makes 1~3) |
| 75 | Crag S LV3 | Large Bone Husk + Bomb Arrowana: 95% |
| 76 | Clust S LV1 | Huskberry + Bomberry: 90% |
| 77 | Clust S LV2 | Small Bone Husk + Wyvern Claw: 75% |
| 78 | Clust S LV3 | Large Bone Husk + Scatterfish: 95% |
| 79 | Flaming S | Huskberry + Fire Herb: 90% |
| 80 | Water S | Huskberry + Knife Mackerel: 75% (makes 1~3) Huskberry + Large Knife Mackerel: 65% (makes 2~4) |
| 81 | Thunder S | Huskberry + Flashbug: 75% (makes 2~4) |
| 82 | Freeze S | Huskberry + Ice Crystal: 75% (makes 1~3) |
| 83 | Dragon S | Large Bone Husk + Dragon Seed: 75% |
| 84 | Recov S LV1 | Huskberry + Herb: 90% |
| 85 | Recov S LV2 | Potion + Huskberry: 90% |
| 86 | Poison S LV1 | Huskberry + Toadstool: 90% |
| 87 | Poison S LV2 | Small Bone Husk + Ioprey Fang: 75% |
| 88 | Para S LV1 | Huskberry + Parashroom: 90% |
| 89 | Para S LV2 | Small Bone Husk + Genprey Fang: 90% |
| 90 | Sleep S LV1 | Huskberry + Sleep Herb: 90% |
| 91 | Sleep S LV2 | Small Bone Husk + Sleepyfish: 75% Small Bone Husk + Large Sleepyfish: 75% (makes 1~2) Large Bone Husk + Large Sleepyfish: 65% (makes 1~3) |
| 92 | Tranq S | Tranquilizer + Small Bone Husk: 90% Small Bone Husk + Sleep Herb + Parashroom: 75% |
| 93 | Paint S | Huskberry + Paintberry: 90% |
| 94 | Demon S | Huskberry + Power Seed: 75% |
| 95 | Armor S | Huskberry + Armor Seed: 75% |
| 96 | Empty Bottle | Small Bone Husk + Whetstone: 75% (makes 1~3) |
| 97 | Power Coating | Empty Bottle + Nitroshroom: 75% (makes 1~2) |
| 98 | Poison Coating | Empty Bottle + Toadstool: 75% (makes 1~2) |
| 99 | Paralysis Coating | Empty Bottle + Parashroom: 75% (makes 1~2) |
| 100 | Sleep Coating | Empty Bottle + Sleep Herb: 75% Empty Bottle + Sleepyfish: 90% Empty Bottle + Large Sleepyfish: 95% (makes 1~2) |
| 101 | Tuna Bait | Worm + Yambug: 95% |
| 102 | 魚龍糰子 (no English name given) | Cricket + Bughopper: 95% |
| 103 | Goldenfish Bait | Firefly + Snakebee Larva: 90% |
Pickaxes and bug nets
| No. | Result | Recipes |
|---|---|---|
| 104 | Old Pickaxe | Stone + Mystery Bone: 75% |
| 105 | Iron Pickaxe | Stone + Bone: 95% Iron Ore + Bone: 75% |
| 106 | Mega Pickaxe | Machalite Ore + Bone: 95% |
| 107 | Old Bugnet | Net + Mystery Bone: 95% Spiderweb + Ivy + Mystery Bone: 75% |
| 108 | Bugnet | Net + Small Monster Bone: 75% Spiderweb + Ivy + Small Monster Bone: 65% |
| 109 | Mega Bugnet | Net + Medium Monster Bone: 95% Spiderweb + Ivy + Medium Monster Bone: 75% |
Grill kits and grilled food
Every grill recipe here is 100%. The guide gives the Grill Tools as "Universal Grill Tools" and the kits as the male, female and cat grill sets.
| No. | Result | Recipes (all 100%) |
|---|---|---|
| 110 | Universal Grill | Male Grill + Grill Tools Female Grill + Grill Tools Cat Grill + Grill Tools |
| 111 | Universal Grill - Meat | Raw Meat + Universal Grill |
| 112 | Universal Grill - Meat | Cooked Meat + Universal Grill |
| 113 | Universal Grill - Meat | Spicy Meat + Universal Grill |
| 114 | Universal Grill - Meat | Cool Meat + Universal Grill |
| 115 | Universal Grill - Meat | Poisoned Meat + Universal Grill |
| 116 | Universal Grill - Fish | Knife Mackerel + Universal Grill Pin Tuna + Universal Grill Rumblefish + Universal Grill |
| 117 | Universal Grill - Fish | Large Knife Mackerel + Universal Grill Large Pin Tuna + Universal Grill Large Rumblefish + Universal Grill |
Flutes
| No. | Result | Recipes |
|---|---|---|
| 118 | Health Flute | Lifepowder + Flute: 65% Lifecrystals + Flute + Wyvern Claw: 55% |
| 119 | Antidote Flute | Antiseptic Stone + Flute: 65% Flute + Earth Crystal + Bitterbug: 55% |
| 120 | Demon Flute | Mega Demondrug + Medium Monster Bone: 55% Catalyst + Power Seed + Medium Monster Bone: 55% |
| 121 | Armor Flute | Mega Armorskin + Medium Monster Bone: 55% Catalyst + Armor Seed + Medium Monster Bone: 55% |
Raw ingredients and other materials
These are the recipes that make basic gathered items such as herbs, mushrooms, seeds and fish.
| No. | Result | Recipes |
|---|---|---|
| 122 | Honey | Firefly + Special Mushroom: 90% [Alchemy] |
| 123 | Herb | Sap Plant + Insect Husk: 95% [Alchemy] |
| 124 | Fire Herb | Garbage + Hot Pepper: 90% [Alchemy] |
| 125 | Blue Mushroom | Antidote Herb + Toadstool: 95% [Alchemy] |
| 126 | Spicy Mushroom | Hot Pepper + Special Mushroom: 75% |
| 127 | Power Seed | Bomberry + Kut-Ku Scale: 65% [Alchemy] |
| 128 | Armor Seed | Needleberry + Velocidrome Claw: 65% [Alchemy] |
| 129 | Needleberry | Needleberry + Earth Crystal: 75% (makes 5) [Alchemy] |
| 130 | Antiseptic Stone | Earth Crystal + Bitterbug: 75% |
| 131 | Sushifish | Sleepyfish + Antidote Herb: 75% [Alchemy] |
| 132 | Rumblefish | Hot Pepper + Sushifish: 75% [Alchemy] |
| 133 | Screamer | Frog + Flute: 75% [Alchemy] |
| 134 | Power Extract | Dragon Seed + Piscine Liver: 65% [Alchemy] |
| 135 | Daora Scale | Decayed Dragon Scale + Catalyst + Lifecrystals: 75% |
| 139 | 主船帆 (main sail, no English name given) | Blangonga Hide + Blangonga Whisker: 100% Blangonga Vivid Pelt + Blangonga Hide: 100% |
| 140 | 主船桅 (main mast, no English name given) | Large Monster Bone + Congalala Pelt: 100% Giant Bone + Congalala Pelt: 100% |
| 168 | Throwing Knife G | Machalite Ore + Knife Kit: 100% [Mission] |
Mocha Pots
Mocha Pot recipes put one item and a Mocha Pot together, and every recipe is 100%. The pot colour depends on what goes in. You buy the pots in the shop; see Farm tools for how a pot works.
| No. | Result | Item put in the pot |
|---|---|---|
| 141 | Green Mocha Pot | Herb |
| 142 | Green Mocha Pot | Antidote Herb |
| 143 | Green Mocha Pot | Potion |
| 144 | Green Mocha Pot | Mega-Potion |
| 145 | Green Mocha Pot | Nutrients |
| 146 | Green Mocha Pot | Antidote |
| 147 | Green Mocha Pot | Herbal Medicine |
| 148 | Green Mocha Pot | Power Juice |
| 149 | Red Mocha Pot | Burnt Meat |
| 150 | Red Mocha Pot | Rare Steak |
| 151 | Red Mocha Pot | Burnt Fish |
| 152 | Red Mocha Pot | Rare Fish |
| 153 | Yellow Mocha Pot | Day Herbs |
| 154 | Yellow Mocha Pot | Sunset Herb |
| 155 | Yellow Mocha Pot | Fire Herb |
| 156 | Yellow Mocha Pot | Blue Mushroom |
| 157 | Yellow Mocha Pot | Special Mushroom |
| 158 | Yellow Mocha Pot | Select Mushroom |
| 159 | Yellow Mocha Pot | Cactus Flower |
| 160 | Yellow Mocha Pot | 小電龍 (no English name given) |
| 161 | Yellow Mocha Pot | 超毒菇 (no English name given) |
| 162 | Yellow Mocha Pot | Rice Weevil |
| 163 | Yellow Mocha Pot | Wheat & Barley |
| 164 | Yellow Mocha Pot | Red Oil |
| 165 | Yellow Mocha Pot | Dry Margarine |
| 166 | Yellow Mocha Pot | Insect Husk |
| 167 | Yellow Mocha Pot | Garbage |
Special items
These items either change the rewards of a quest when you take them along, or exist only in Frontier and not in the main games.
Halk Potion
The Halk Potion massively reduces the damage you take in quests. You can use a maximum of 5 each day, and you get one a day from the Halk area. See Halks.
Special tickets
| Ticket | What it does |
|---|---|
| Legendary Rasta Ticket | Lets you take a Legendary Rasta on a quest without needing a Premium subscription. Given for completing Hunter Guide tasks and during events. |
| Guts Ticket and Great Guts Ticket | Stops you dying at 0 HP once. A Great Guts Ticket instantly refills your health to maximum. A Guts Ticket only stops you from dying. They work in situations where the Guts skill would not, including when you are on low HP. |
| Poison, Paralysis and Sleep Tickets | Stop you from entering that status. They only cover the normal versions of the statuses, not the Zenith versions of Poison, Paralysis and Sleep. |
| 4,000 GRP Ticket | When taken on a quest, it gives you 4,000 GRP and GSRP after completion (gathering and simple quests are excluded), on top of the normal rewards. You can assign these points directly to your AI companions by talking to them, but the guide calls that fairly wasteful. Given as daily bonus rewards, for completing Hunter Guide tasks and during events. It does not stack with itself or other GRP tickets. |
| 20,000 GRP Ticket | The same, but 20,000 GRP and GSRP. Given as daily bonus rewards, for completing Hunter Guide tasks and during events. It does not stack with itself or other GRP tickets. |
| 4,000 PRP Ticket | When taken on a quest, it gives your partner 4,000 PRP after completion (gathering and simple quests are excluded), on top of the normal rewards. You can assign these points directly to your AI companions by talking to them. The stamps that fill up after a quest grant these tickets, 1 or 3 at a time, when a card is completed. Claim them at the Blacksmith from the guild girl in glasses who wears brown and yellow, using her last option. It does not stack with other PRP tickets or with itself. |
| 20,000 PRP Ticket | The same, but 20,000 PRP. Given as rewards for Hunter Navigation tasks, during events and as Caravan Festival rewards. It does not stack with other PRP tickets. |
The guide groups these as PRP, SRP, GRP and GSRP tickets.
Consumables and tools
| Item | What it does |
|---|---|
| Sword Crystals | Ammo for Blademaster weapons. They need their own skills, with three levels in each. Having the skills at +3 guarantees maximum damage or status output from the crystals. See Sword Crystals. |
| Toxin | A purchasable consumable that takes away 10 health when you use it. It is very useful for triggering Adrenaline, because that skill goes by your HP total and not your health percentage. So you can eat any meal that gives -50 health and be in Adrenaline range straight away. It does not reduce your maximum HP, so Vampirism and armour with HC regen will stop you keeping Adrenaline health levels. |
| Starvation Drug | Given on a NetCafe course, or by the Guild Cat at a certain rate each day. It instantly sets your maximum Stamina to 25, which can trigger Starving Wolf. |
| Adrenaline Drug | Given on a NetCafe course, or by the Guild Cat at a certain rate each day. It instantly sets your health to 40, which can trigger Adrenaline. It does not reduce your maximum HP, so Vampirism will stop you keeping Adrenaline health levels. |
| Spirit Drug | Given on a NetCafe course, or by the Guild Cat at a certain rate each day. It instantly fills the Long Sword Spirit Meter. It is fairly niche, since the meter fills easily, and not common enough for regular use. |
| Gook Pickaxe | A pickaxe that can double the items you mine with it. Made from items you sometimes get at the Gook Farm once you own a Gook. |
| Gook Fishing Bait | Bait that can double the fish you gather with it. Made the same way. |
| Gook Bug Net | A bug net that can double the insects you gather with it. Made the same way. |
| Gook Gloves | Gloves that can double any items you gather with them. Made the same way. |
How to get a Gook and make these tools is on the House page: Gook tools.
Consumable charms
| Charm | What it does |
|---|---|
| Carving Charm | Allows an extra carve from everything that can be carved. Consumed when the quest starts. |
| Large Lucky Charm | Gives chances for more reward rolls, and for double successful rolls, in the post-quest rewards. |
| Super Lucky Charm | The same as the Large Lucky Charm, but better. |
Hunter Festival gems
| Gem | What it does |
|---|---|
| White Festival Gem (20P) | Gives 20 extra souls when taken on successful hunts during a Hunter Festival. |
| Green Festival Gem (40P) | Gives 40 extra souls when taken on successful hunts during a Hunter Festival. |
| Red Festival Gem (80P) | Gives 80 extra souls when taken on successful hunts during a Hunter Festival. |
Each gem also comes in a G version. There is no difference in function. You simply get the ones branded with G while doing G Rank tasks. More on souls is in Hunter Festival.
Mysterious Stones
Mysterious Stones are rare materials, fairly commonly used in older G Rank equipment. You can get them in two ways: feed Pariapuria and gather his vomit, or use Gook Cooking. The guide strongly recommends Gook Cooking over trying to make Pariapuria vomit. The steps are in Gook Cooking.
Medal charms
You get these charms in two steps. Kill certain numbers of monsters and the Guild Master gives you medals (Hunt Medals, with an option to claim and confirm rewards). Then trade the medals at the Combination Store for the charms below (Exchange Medals for Charms, with a Refund Charms option).
The guide's author is not sure of the exact requirement for claiming these medals. It is likely to be having killed at least 10 of a single monster type, and the author would like confirmation.
These charms always affect the quest you take them on, and they are not consumed. Be very careful not to discard or replace them while on a quest. The charms that cut the waiting time only work when you play solo, so they suit you if you are spamming quests and do not mind possibly losing carves.
| Charm | Effect | Medal cost |
|---|---|---|
| Impatience Charm (5 colours: blue, red, yellow, white, black) | Cuts the wait after a quest: -5, -10, -20, -30, -40. The dearer colours cut more. Only works while you are the only human player in the quest. | 10, 20, 35, 55 and 80 |
| Gathering Charm (blue, red, yellow): raises the minimum | Raises the minimum number of times you can gather from a spot: +1, +2, +3, never above the maximum. The dearer colours do more. | The guide gives 10, 20, 35, 55 and 80 |
| Gathering Charm (white, black): raises the maximum | Raises the maximum gathering chances: +1, +2. The dearer colour does more. | 85 and 150 |
| Health Charm (5 colours) | Raises your health when taken on a quest, +10 per level of charm, up to +50 (+10, +20, +30, +40, +50). | 10, 25, 45, 70 and 100 |
| Stamina Charm (5 colours) | Raises your stamina when taken on a quest, +10 per level of charm, up to +50 (+10, +20, +30, +40, +50). | 10, 25, 45, 70 and 100 |
| Colour Charm | Doubles (2x) the Colour Points added to your Caravan Gem. See Caravan Gems. | 40 |
How the gathering charms work
Every gathering spot has a fixed minimum and maximum number of gathers, and the gathering charms change these values. For example, the Insect Spot in White Lake Area 1 has a range of 4 to 8 gathers. With a yellow minimum charm this becomes 7 to 8. With the black maximum charm it becomes 4 to 10. So yellow is best for steady results and black is best for the highest possible return.
Written from the Monster Hunter Frontier guide by Fist (as saved in January 2022). That guide describes Capcom's old official servers; we reworded it, laid it out for Hunsterverse and added the "On Hunsterverse" notes (all of them: Hunsterverse vs the old servers). The pictures are from the original guide.