
Frontier guide · Things to do · 18 of 18
Hunter's Road
The Hunter's Road is a branching huntathon that replaced the Tower. This page covers how a run works, the stores and Road skills, Tower weapons and armour, White Fatalis and Duremudira, and using Road points for Hiden and Raviente grind.
How the Road works
The Hunter's Road replaces the Tower, or Sky Corridor, event. It is a very fancy branching huntathon that borrows from both the Caravan and the Tower.
The Road is always available. Only some limited-quantity rewards reset over time, so you can run it whenever you like. You start it from a new NPC that replaces the Tower NPC. You cannot take items in. You start in an area very like Guanzorumu, where you can buy things with Gm and choose a path through a number of different quests.

Most monsters are tuned to end up around a normal G Rank monster, whatever their tier was before Zeniths. The multipliers below hold up to floor 40. Many monsters use non-standard rates for their Road versions, so they are actually noticeably lower in health.
| Floors | Attack | Health |
|---|---|---|
| 1 to 10 | 1.00x | 1.00x |
| 11 to 20 | 1.50x | 1.11x |
| 21 to 30 | 2.00x | 1.25x |
| 31 and up (the guide writes "30+") | 2.50x | 1.33x |
The choices have a wide range. They can include almost any standard G Rank content: normal G monsters, GHC, Exotics, Zeniths, Burst and Origin. There is some logic to it and a few are fixed difficulty, but mostly it is random. Each monster has an amount of Gm and Hunt Points it gives when slain.
There are also bonus quests, such as Shakalaka slaying. These give fewer points but give Tower Medals, and they can be much easier than the other choice, so you can progress without using items.
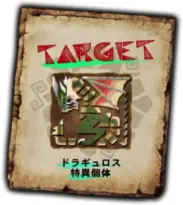
After you choose a branch, a Target pops up showing the name of the next monster.
Stores and points
Gm store
The Gm store works just like the one in the Tower. You spend Gm, earned by killing things on the Road or given to you at the start, on things like Whetstones, Potions and other utility items.
Hunt P store
There are no carves on the Hunter's Road. Instead, after each run you receive Hunt P based on what you hunted and how far you went. You spend Hunt P on items from most monsters in the game.
More items unlock as you take consecutive steps on the Road, up to 40 steps, which unlocks all monster items. Unlocks are never reset: once you have met a requirement, you can buy those items from then on.
The store can stock most items in the game, including G Rank items and Zenith materials. You still need to progress far enough down the Road to unlock them.
Some items have weekly limits. You must repeat the requirements every week to get more of them. Examples are White Fatalis materials and the Tower Weapon Zenith Sigil materials.
HC and GHC carves are easy to get here, so the Road is a good alternative to the standard Hiden grind. You can buy HCs, cook them in Gook and get Souls and Ribbons (see Road as a Hiden alternative).
The store has these sections: Consumables, Gatherables, Mats (HR1 to 4), Mats (HR5 to 7), G Rank Mats (GR1+), Decorations, Other, Time Limited Items (items with a purchase limit) and Super Special Items.
Common prices:
| Item | Price |
|---|---|
| Tower Weapon Gems | 30 to 50 P |
| Tower Equipment Mats | 300 to 500 P |
| HR1-2 HC carves | 500 P |
| HR3-4 HC carves | 1,000 P |
| HR5-7 HC carves | 1,500 P |
| GHC carves | 2,000 P |
| G3% carves | 1,000 P |
| G1% carves | 4,000 P |
| Origin Low% carves | 1,500 P |
| Common G Break items | 50 P |
Surviving a long run
The Road rewards one long session, and its consumables are limited to what you buy with points. So do not play it like a normal hunt. After the first step you cannot be sure what items you will have or what you will fight next. Some stages always hold a fixed type of monster, but not always the same monster.
As you go deeper, monster attack multipliers rise a lot while their health stays about the same. You need to play better in later stages, because hits that were not one-shots before may become one-shots.
Fixed stages
| Step | What appears |
|---|---|
| Every 10 steps | White Fatalis |
| 12 steps | ★1 Zenith |
| 14 steps | ★2 Zenith |
| 16 steps | ★3 Zenith |
| 18 steps | ★4 Zenith |
Nothing else is truly fixed. You will almost always get Zenith choices in pairs of the same tier (such as a choice of two ★2 Zeniths), unless you roll a Bonus Stage.
You need to complete 50 stages to unlock everything on the Road at the moment. These things help you last that long.
Things that help
- Transcend
- A very large buff to several stats that you can turn on roughly every 4 to 6 minutes, depending on how far you have levelled it. Maxed Transcend lasts two minutes and gives +800 Defense, +100 to all Elemental Resistances, Super Armour, Movement Speed Up, 113% Raw Damage and 200% Elemental Damage (113% for ranged). It makes you immune to all blights and lets you survive almost any single hit if your base defense is high enough. See Transcend.
- Guild Cooking
- A meal prepared in the Guild Hall gives a skill without using a skill slot. On the Road, the food effects last until you leave the Road.
- Diva Buff
- Gives Divine Protection, which helps you survive harder monsters.
- Guild Pugis
- As in any content, a fed and happy Guild Pugi applies an extra minor skill. The best Guild Pugi for the Road is usually the fluffy sheep pugi, which halves stamina use on actions such as evading. The watermelon status-attack Pugi can also help if you use a status build.
- Caravan skills
- The most useful is Bonus Art, which keeps your food buffs after you cart. Lesser useful ones: Recovery Items Up (1.10x healing from Potions, Mega Potions and Lifepowders), KO Technique (a flat 1.10x stun), and quality-of-life skills such as Unstable Defender, Perfect Defense or Weapon Art. The guide's author does not know whether skills with trigger limits reset for every monster, but thinks they should. See Caravan skills.
Any skills you have when you start the Road quest last the whole run. Guild Food and the Diva Song normally last only an hour and a half. But if you spend 8 hours on the Road without returning, you keep both effects for the whole time.
Good skills to have
- Vampirism
- Lets you skip most healing while boosting your attack. It makes small mistakes easy to recover from and stops lesser monsters from whittling your health down.
- Vigorous
- Gives 1.15x attack while you are above 100 Health. It is a big boost on the Road, without the risk that even lesser monsters bring when you use Adrenaline. The Zenith skill Vigorous Up adds +100 True Raw for melee weapons and +50 True Raw for ranged weapons. You can get it on Zenith Midogaron's Waist, on Tower Weapon Zenith Sigils, or on the Vigorous Up Cuff.
- All Res Up
- You can gain +20 to every resistance with enough points or with Guild Food. Add a decent base set (5 in each element), SR skills (+19 All Res) and the Road All Res skill (+15), and you get an extra 49 resistance to every type. That can make you immune to all Extreme Blights on the Road.
- Negate Hunger
- Stops your stamina going down. You can get it with Guild Cooking.
- Divine Protection
- Gives you a chance to take no damage. The Diva Buff gives it.
- Wide-Area +3
- Lets you heal others without carrying Lifepowder. You can get it with Guild Cooking or an FP Exotic piece.
- Encourage
- Gives everyone evasion and stun immunity. Having it in your party lets people take more DPS skills and saves lives. Encourage Up also gives the whole party Stamina Recovery (Large) and Peerless, which helps everyone manage stamina.
Weapon choice for a deep run: Lance
Of all weapons, the Lance gives the best survivability on the Road. Guarding gives you infinite stamina, Lifepowder effects and attack buffs. With Guard Up you can chain guards even when attacked from behind. This blend of survivability and support means 4 Lance players can go deep without much risk.
Tower Lances can use Guard Up or Reflect Up sigils while also giving Guard+2 or Reflect+3. They are weaker than a maxed Zenith weapon, but a Raw Lance will be within a few points of the raw value of a Zenith one.
Tower Medals
Tower Medals come only from Bonus Stages on the Hunter's Road. You use them in place of points for items sold only in the Tower Medal store. A Bonus Stage always gives 5 medals, but they have low spawn rates. Even with the Road skill that makes them spawn more often, you will see about 5% Bonus Stages at most.
Bonus Stages are easy to spot: the monster names are pink instead of white, and they are worth very few points.
Tower Medal store
| Medals | Item |
|---|---|
| 8 | Festival Gem worth 20 Souls (20P) |
| 16 | Festival Gem worth 40 Souls (40P) |
| 30 | Festival Gem worth 80 Souls (80P) |
| 8 | Diva Defense Gem worth 200 Song Spheres |
| 16 | Diva Defense Gem worth 500 Song Spheres |
| 30 | Diva Defense Gem worth 1200 Song Spheres |
| 8 | Interception Point Gem, low tier (purple) |
| 16 | Interception Point Gem, mid tier (orange) |
| 30 | Interception Point Gem, top tier (white) |
| 2 | White Conquest Ticket (1 level) |
| 10 | Purple Conquest Ticket (5 levels) |
| 20 | Warm Honey Tea (+20 Diva affection) |
| 30 | Diva Performance Gem |
| 5 | Randomised Weapon Grass (Gou) |
| 100 | Partner Rename Ticket |
| 100 | Partner Personality Change Ticket |
| 10 | Partnyaa Decorations lottery item, low tier (bronze paw print) |
| 25 | Partnyaa Decorations lottery item, mid tier (silver paw print) |
| 40 | Partnyaa Decorations lottery item, high tier (gold paw print) |
| 1 | Sigil Removal Solution |
| 500 | Tower Decoration Removal Solution |
| 5 | Halk Pot |
| 1 | HRP Ticket (4k) |
| 200 | Weapon creation material (trash) |
| 150 | Gesture guides: new gestures based on the actions the Legendary Rastas perform. The "I" series are gesture animations and the "II" series are idle animations. You can preview them by hiring a Legendary |
| 100 | Halk food that instantly swaps their element |
These descriptions are the guide's. Item names on Hunsterverse may differ slightly.
White Fatalis
White Fatalis can be a target on the Road, and he appears as an option every 10 floors. To unlock all his materials you must kill three White Fatalis in a week, and spend 19,800 P to buy them all.
The fight is harder than a normal monster and about as hard as a Zenith. He has Ultra Roar, Ultra Quake and Ultra Wind Pressure, and attacks that one-shot you through any amount of health or survivability skills.
The biggest one-shot is chained from a roar with a long start-up. If you are too far away you are very likely to die. If you stand next to Fatalis' legs, you avoid the one-shot completely and make him stagger himself.
There is a weekly limit on the materials you can claim from White Fatalis, so you cannot finish everything he has in one week. You can complete a single decoration or armour piece in a week.
White Fatalis' weapons all have the Emperor's Roar element, a hybrid of Thunder (150%) and Dragon (50%).
Hunter's Road skills
Like the Tower, the Road has special skills you can switch on and manage: more revivals, more attack, more Gm and other utility skills. As with the old Tower skill system, three things matter: Rank, Skill Points and Skill Cost.
- Road Rank: if you are below the required rank, you cannot use the skill.
- Cost: the total amount of skills you can equip. Each skill has its own Cost, and you have a total Cost you can allocate.
- Road SP (Hunt SP): like Cost, but used for allocating the skill.
Example: the Lv5 Attack skill costs 35 Cost and 12 SP in total to equip, and needs Hunt Rank 100. In the tables, the number in brackets is the total SP you have spent on that skill up to that level.
You raise your total Cost, SP and Rank over time by playing the Road and using special items. If you took part in the Tower event before, your old TRP, TR and TSP convert to Hunt RP, Hunt R and Hunt SP, so you can pick some skills straight away.
Physical skills
| Skill | Lv | Cost | Road SP | Road Rank | Effect |
|---|---|---|---|---|---|
| Attack | 1 | 15 | 1 [1] | 1 | Small increase to attack (+10) |
| 2 | 25 | 1 [2] | 1 | Increases attack (+20) | |
| 3 | 25 | 2 [4] | 1 | Medium increase to attack (+30) | |
| 4 | 35 | 3 [7] | 50 | Large increase to attack (+50) | |
| 5 | 35 | 5 [12] | 100 | Very large increase to attack (+70) | |
| Defence | 1 | 5 | 1 [1] | 1 | Defence +30 |
| 2 | 5 | 1 [2] | 1 | Defence +50 | |
| 3 | 5 | 2 [4] | 1 | Defence +80 | |
| 4 | 10 | 3 [7] | 50 | Defence +110 | |
| 5 | 10 | 5 [12] | 100 | Defence +150 | |
| Health Recovery | 1 | 15 | 3 [3] | 1 | Red Health recovery speed is increased |
| 2 | 25 | 7 [10] | 25 | Red Health recovery speed is increased further | |
| Fire Res, Water Res, Ice Res, Thunder Res, Dragon Res (each is a separate skill with the same numbers) | 1 | 15 | 1 [1] | 1 | Resistance +10 |
| 2 | 20 | 3 [4] | 20 | Resistance +15 | |
| 3 | 30 | 5 [9] | 50 | Resistance +25 | |
| All Res | 1 | 15 | 3 [3] | 20 | All Res +5 |
| 2 | 20 | 5 [8] | 50 | All Res +10 | |
| 3 | 30 | 7 [15] | 100 | All Res +15 |
Technical skills
| Skill | Lv | Cost | Road SP | Road Rank | Effect |
|---|---|---|---|---|---|
| Starting Gm Up | 1 | 30 | 1 [1] | 1 | Increases starting Gm (+1000 Gm) |
| 2 | 50 | 3 [4] | 50 | Increases starting Gm significantly (+3000 Gm) | |
| Hunting Road Points Up | 1 | 10 | 1 [1] | 1 | Increases Road Point earning slightly (+10%) |
| 2 | 15 | 2 [3] | 50 | Increases Road Point earning (+20%) | |
| 3 | 25 | 4 [7] | 100 | Increases Road Point earning greatly (+40%) | |
| Bonus Stages Up | 1 | 10 | 3 [3] | 20 | Slightly increases the chance of Bonus Stages. Stacks with other players on the Road |
| 2 | 20 | 5 [8] | 50 | Increases the chance of Bonus Stages. Stacks with other players on the Road | |
| Resurrection Knowledge | 1 | 60 | 10 [10] | 200 | Increases the number of times you can faint on the Road before failing (+1 cart) |
| Advancement Knowledge | 1 | 20 | 2 [2] | 20 | Attack rises every 5 stages. Floor 6 gives +20 Attack, and every 5th floor after that gives +10 Attack, stopping after floor 26. Maximum buff is 60 Attack for all floors above 26 |
| 2 | 30 | 4 [6] | 50 | As above, but floor 6 gives +40 Attack. Maximum buff is 80 Attack above floor 26 | |
| 3 | 40 | 8 [14] | 100 | As above, but floor 6 gives +60 Attack. Maximum buff is 100 Attack above floor 26 | |
| Last Stand | 1 | 50 | 5 [5] | 50 | Affinity +30% and Attack +80, but you can faint only once on the Road, whatever other skills you have |
| 2 | 70 | 7 [12] | 100 | Affinity +50% and Attack +120, but you can faint only once on the Road, whatever other skills you have |
Duremudira-only skills
These skills only work in the Duremudira urgent quests (see Duremudira). Their Cost is 0.
| Skill | Lv | Road SP | Road Rank | Effect |
|---|---|---|---|---|
| Care | 1 | 2 [2] | 1 | Slightly increases the speed of revivals and the health left after being revived |
| 2 | 5 [7] | 50 | Increases the speed of revivals and the health left after being revived | |
| 3 | 10 [17] | 100 | Greatly increases the speed of revivals and the health left after being revived | |
| Pharmacist | 1 | 1 [1] | 1 | Carry 1 more revival item |
| 2 | 3 [4] | 20 | Carry 2 more revival items | |
| 3 | 5 [9] | 50 | Carry 4 more revival items | |
| Virus Protection | 1 | 2 [2] | 10 | Slightly increases resistance to Deadly Poison |
| 2 | 5 [7] | 100 | Increases resistance to Deadly Poison | |
| 3 | 10 [17] | 200 | Greatly increases resistance to Deadly Poison | |
| Frost Protection | 1 | 2 [2] | 100 | Slightly increases resistance to Powerful Frost |
| 2 | 5 [7] | 200 | Increases resistance to Powerful Frost | |
| 3 | 10 [17] | 250 | Greatly increases resistance to Powerful Frost | |
| Gatekeeper Offensive | 1 | 2 [2] | 10 | +50 true raw against Duremudira |
| 2 | 3 [5] | 10 | +75 true raw against Duremudira | |
| 3 | 4 [9] | 10 | +100 true raw against Duremudira | |
| 4 | 5 [14] | 100 | +150 true raw against Duremudira | |
| 5 | 8 [22] | 200 | +200 true raw against Duremudira | |
| Gatekeeper Defensive | 1 | 2 [2] | 10 | Increases defence against Duremudira |
| 2 | 3 [5] | 10 | Increases defence against Duremudira | |
| 3 | 4 [9] | 10 | Increases defence against Duremudira | |
| 4 | 5 [14] | 100 | Increases defence against Duremudira | |
| 5 | 8 [22] | 200 | Increases defence against Duremudira |
Tower weapons
The basics
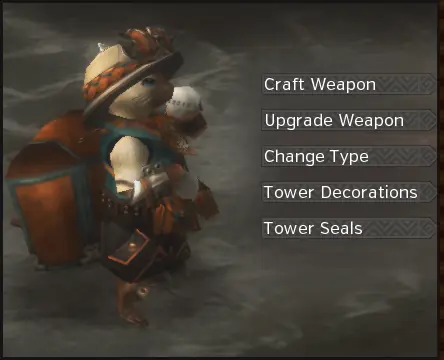
Tower Weapons are customisable weapons you build from the ground up, starting from a template weapon with very low stats. Broadly there are two kinds: Light and Dark. Most upgrades to these weapons cannot be undone.
- Light versions have two sigil slots and one decoration slot.
- Dark versions have one sigil slot and two decoration slots.
(Later the guide says all Tower Weapons have 2 Tower Sigil slots and 1 Tower Decoration slot. Check your own weapon in game.)
Tower Sigils grant Affinity, Status, Elemental or Zenith skills, or Weapon Abilities. You can only have as many of these properties as you have sigil slots, and you cannot have two of the same type. Two Elemental, Status or Affinity sigils do not stack.
Tower Decorations grant skills outright. If you have a Tower Decoration for Expert+5, it gives you that skill the moment you slot it into a weapon and equip it. A weapon can hold up to two such skills. Removing a decoration is very grindy: you need a decoration removal item that costs 500 Tower Medals, which is about 100 Bonus Stages on the Road.
All Tower Weapons are on sale in the Road's Hunt Point store, along with all the materials needed to upgrade them. Upgrades cannot be undone, so build the weapon carefully in the Weapon Sim. You craft Tower Weapons by talking to the Cat wearing a backpack in the blacksmith.
The cat's menu
- Craft Weapon
- Needs a special item. You get it for completing the first floor of the Tower, and later find it at random in Treasure Chests in the Sky Corridor.
- Upgrade Weapon
- Uses the Gems you find in the Tower to upgrade the weapon. The gems depend on the sigils inserted in the weapon. Upgrades also need SR Weapon Souls for that weapon type. You get these by fighting Hardcore SR1-31 (Prelude), SR31-99 (Middle), SR100 (Ultimate) and Gou (Heaven) monsters. For example, the Dual Swords soul for Gou comes from an HC Gou monster fought with Dual Swords.
- Change Type
- Lets you change the properties of Tower Hunting Horns, Bows, Bowguns and Gunlances. It uses a Pulsating Liquid.
- Tower Decorations
- Lets you make and slot Tower Decorations. Most are found only by fighting Duremudira. Some stronger G Rank versions of skills come from 2nd District Duremudira's carves, and from base decorations combined with Duremudira materials. For example, Fencing+2, Sharp Sword+2 and Artisan decorations combine with Duremudira materials to make a Sword God+2 decoration. A full index of Tower Decorations is in the guide's Google Document. You can only remove a decoration with the 500-medal item, but you can replace it directly at the cost of losing the decoration that was in the slot.
- Tower Seals (Sigils)
- Lets you make and insert Tower Sigils, which adjust things like the weapon's element, affinity and status, and Bowgun shots. You craft each sigil with Ancient Gold Debris. You can change a sigil's value by upgrading it in the standard upgrade menu. A full index of Tower Sigils is in the guide's Google Document.
Weapon simulator
A Tower weapon simulator calculates the stats and cost, so you can plan a build before you commit. For a Switch Axe the guide pointed to the official Japanese simulator, which closed with the Japanese servers.
Zenith Sigils affect any skills granted, including Exotics, Hybrids and Tower Decorations. They do not turn the weapon into a Zenith weapon, so it does not get the Zenith part breaker effect even though it has a Zenith skill.
Tower armour
Tower armours
This is a standard armour that you craft at low rank and upgrade all the way to GX. Players use it widely in mixed endgame sets. You make it from items found at a low chance in Tower Treasure Chests, or given outright for clearing a number of floors. Once maxed, it counts as standard G Rank armour for G Rank Skill Limits.
You craft these at the normal blacksmith, in Special Armour Production under Event Armour.
Tenrou armours
Tenrou, or customisable Tower armours, can be set up to act like other types of armour, in terms of the buffs they give. You craft and upgrade them only with Tower items, and you can fit them with special gems to get those buffs. The armour must be at the upgrade tier of the armour type you want it to copy. For example, to act as an Origin or G Rank piece, it must be at G level.
The armour glows according to the Special Decorations in it. If two slots hold the same colour, that colour is the glow. If there is one of each, it glows white.
| Seal | Slots needed | Effect | Uses |
|---|---|---|---|
| Muscle Boost | 3 | Adds the Skill Boost effect from Gou and higher armours with only 1 piece needed | Ancient Hope Stone [Orange] |
| Sharpness Level UP | 3 | Raises sharpness level with any Gou-derived weapon on Gou, Supremacy or G Rank quests | Ancient Hope Stone [Blue] |
| Attack Up | 1 | Raises Raw with any Gou-derived weapon on Gou, Supremacy or G Rank quests. Works like an Origin piece for buff values (+20/40/60/80/110) | Ancient Hope Stone [Red] |
| Elemental and Status Up | 1 | Raises element and status with any Gou-derived weapon on Gou, Supremacy or G Rank quests. Works like an Origin piece for buff values (+3%/6%/9%/12%/15%) | Ancient Hope Stone [Red] |
| Critical Range Multiplier Up | 2 | Raises the critical range multiplier within critical distance with any ranged weapon on Gou, Supremacy or G Rank quests. Typically an extra 0.3x (for example 1.6x becomes 1.9x) | Ancient Hope Stone [Red] |
| Power Coating Up | 1 | Raises the multiplier on power coatings with any bow on Gou, Supremacy or G Rank quests by 0.1x (for example 1.5x to 1.6x) | Ancient Hope Stone [Red] |
| HS Defense Up | 1 | Adds the HS Armour Defense Up buff on HC or GHC quests with any Gou-derived weapon or Hardcore weapon (+20/40/60/80/100) | Ancient Hope Stone [Yellow] |
| HS Damage Reduction | 1 | Adds the HS Damage Reduction buff on HC or GHC quests with any Gou-derived weapon or Hardcore weapon (10%/17%/24%/27%/30%) | Ancient Hope Stone [Yellow] |
| HC Health Regen | 1 | Adds the HC Health Regen buff on HC or GHC quests. Time to regenerate 1 HP is the same as with normal HC or higher parts (8s/4s/2s/1.5s/1s) | Ancient Hope Stone [Yellow] |
| G Rank Armour | 2 | Makes the piece act as G Rank armour, allowing higher skill totals and buffing damage when you wear 3 or 5 pieces in total | Ancient Hope Stone [Purple] |
You craft Tenrou armour at the same NPC as a Tower Weapon, in the armour section. These armours cannot take Zenith Sigils and are relatively poor overall.
Duremudira
Urgent quests
As you go along the Road, you have a chance to trigger a Duremudira quest. Both first and second district Duremudiras can appear at any point. Like most urgents, they are posted individually. If you are in a party of four hunters, you will probably get four Duremudiras to do at once.
The urgent quest takes place in a repurposed tower with a single floor for Duremudira. You can buy items with Gm from the cat, as on the Road, and you spawn with more Gm in the second district. Unlike White Fatalis and the Road, you can simply idle in the main hall if you do not want to fight him.
Fighting Duremudira with less than a proper G Rank Hiden set is almost impossible, especially solo. So use any Duremudiras you get before you are fully geared as a way to learn the fight.
Fighting Duremudira
You have 20 minutes from the time the first person enters the arena. There are no carts. Instead, you lose 60 seconds every time a hunter is completely defeated. You can avoid this with:
- Revival Balls, which you throw at a hunter to revive them at once, or
- Revival Drugs, which you use while standing over the downed hunter.
NPCs can also revive you a number of times, but they are inconsistent and can cause problems with some of Duremudira's attacks, because they do not know how to avoid them. By default you can carry 2 of each revival item. The Pharmacist Road skill raises this (see Duremudira-only skills).
Duremudira inflicts two statuses:
- Deadly Poison cuts defense massively and does very high damage over time. Cure it with the Deadly Poison Cure item sold at the cat store.
- Freezing is only done by second district Duremudira and is literal. Road skills reduce the effects of both, but you cannot become immune. Vampirism with resistance may be enough to leech through the damage over time with some weapons.
First District Duremudira has no equipment or items of its own. He gives a pool of Tower items, including decorations and weapon materials. You gain a title on your first and fiftieth kills. The fight has two phases: the first is around 33% of his HP and the second around 66%.
Second District Duremudira has two low% carves (Red and Black Fluids) used to make G Rank Tower Gems and Sigils. He gains a third phase after he first collapses as if dead. You get a larger pool of Tower items than from the first district, and titles on your first and fiftieth kills. His HP is split about 20% for the first phase, 40% for the second and 40% for the third.
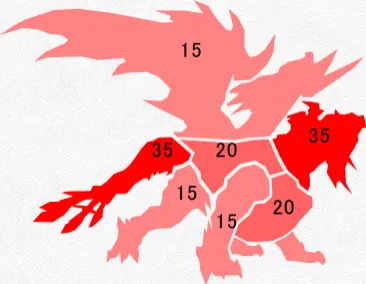
Hitzones and weaknesses
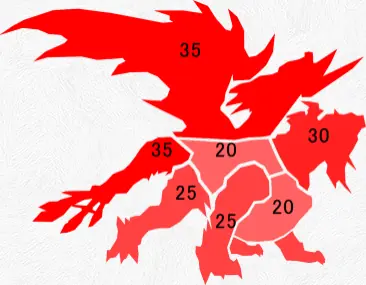
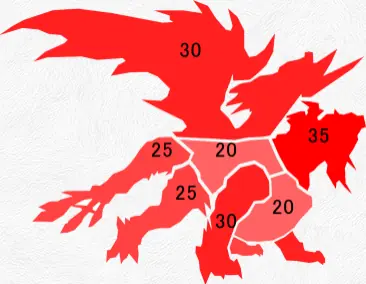
These are the hitzone values the guide gives, by part.
| Part | Cutting | Impact | Shot | Fire | Water | Thunder | Dragon | Ice | KO |
|---|---|---|---|---|---|---|---|---|---|
| Head | 30 | 35 | 35 | 15 | 5 | 5 | 15 | 0 | 100 |
| Stomach | 20 | 20 | 20 | 15 | 5 | 5 | 15 | 0 | 0 |
| Back | 20 | 20 | 20 | 15 | 5 | 5 | 15 | 0 | 0 |
| Tail | 35 | 25 | 35 | 15 | 5 | 5 | 15 | 0 | 0 |
| Front Legs | 25 | 30 | 15 | 10 | 5 | 5 | 15 | 0 | 0 |
| Back Legs | 25 | 25 | 15 | 10 | 5 | 5 | 15 | 0 | 0 |
| Wings | 35 | 30 | 15 | 10 | 5 | 5 | 15 | 0 | 0 |
Road as a Hiden alternative
You can buy HCs and GHCs from the Road store, so the Road is a direct alternative to the real Hiden grind. Time-wise it is probably worse than grinding with Premium, but you can work on it passively for extra decorations. Hitting 50 floors gives around 100,000 Points, so about four to five runs finish a single decoration.
Points needed (1x means one set, 5x means five sets):
| Hiden decorations | 1x | 5x |
|---|---|---|
| Low Souls | 8,500 | 42,500 |
| Mid Souls | 39,000 | 195,000 |
| High Souls | 82,500 | 412,500 |
| Top Souls | 25,500 | 127,500 |
| Souls completion | 155,500 | 777,500 |
| Low Ribbons | 68,000 | 334,000 |
| Mid Ribbons | 110,000 | 550,000 |
| High Ribbons | 110,000 | 550,000 |
| Ribbons completion | 288,000 | 1,434,000 |
| Full completion | 443,500 | 2,211,500 |
| Carves for armour upgrades (G1%s, GHCs, HCs) | 48,000 | 240,000 |
Not all HCs and GHCs are equal. These give the most Souls (x5) and Ribbons (x3) back. Anything below these cookable totals is a huge waste of time and effort.
| Carve | Gives |
|---|---|
| Daora Desolation Shell | Low Souls x5 |
| Akantor Extreme Scale | Mid Souls x5 |
| Akantor Corruption Claw | High Souls x5 |
| Dyura Ice Shell | Top Souls x5 |
| Monoblos Brave Shell (G Rank) | Low Ribbons x3 |
| Malleable Hide (Red Khezu, G Rank) | Mid Ribbons x3 |
| Dora Perish Claw (G Rank) | High Ribbons x3 |
Raviente materials
This was future content at the time of the guide, but you could save up points in advance. The Fourth Content Update for Z2 added Berserk Raviente materials to the point store. All of them have weekly limits, so every decoration takes at least four weeks from this source. The time investment is similar to that of the original decorations. The difference is that you can grind them solo or with small groups, without needing native speakers. See Raviente for the fights.
The tables show the materials, store costs, weekly limits and the number of weeks needed for each type of Raviente decoration.
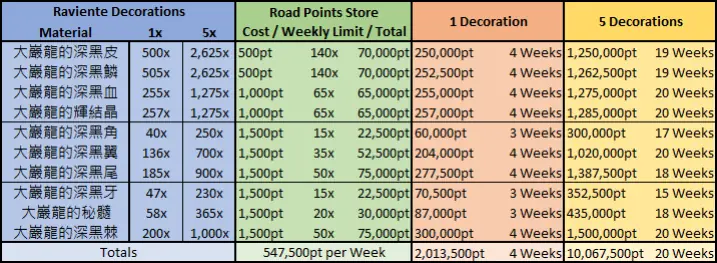
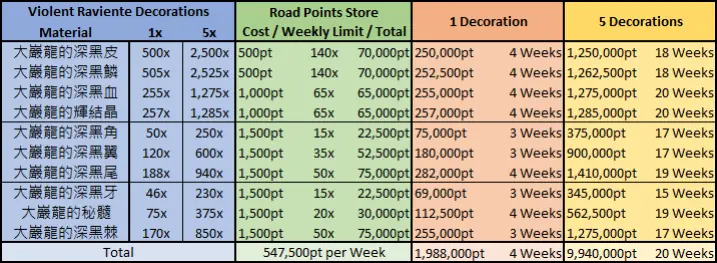
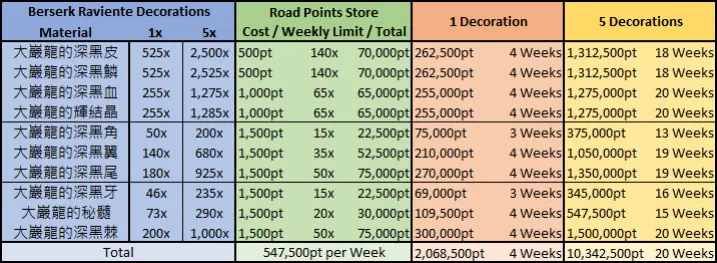
As the tables show, you need to be able to earn 547,500 points a week. It takes 20 weeks to get Determination this way. This is meant as a complement to real Ravientes, but it works for players who cannot or will not join Raviente trains for decorations.
Written from the Monster Hunter Frontier guide by Fist (as saved in January 2022). That guide describes Capcom's old official servers; we reworded it, laid it out for Hunsterverse and added the "On Hunsterverse" notes (all of them: Hunsterverse vs the old servers). The pictures are from the original guide.